Better Family Photos

  • Subscribe to our RSS feed.
  • Twitter
  • StumbleUpon
  • Reddit
  • Facebook
  • Digg

Monday, 11 July 2011

Toys for the Big Kids

Posted on 19:29 by Unknown

We will be posting a series that will review equipment for committed enthusiasts and aspiring pros.

Thus far, most of the equipment we've reviewed on our blog have been usable for candid shots.  By contrast, the equipment here are usually for setup shots, when considerations of time, convenience, and/or cost take a backseat to emphasis on control and getting the best result possible.

If you have been taking mostly candid (as opposed to setup) shots, these reviews are an opportunity to view another side of photography.  You may also be interested in these equipment for taking setup portraits.

In these reviews, we will not only talk about the product itself but also the rationale for using them.  We're not equipment snobs and we're not going to assume their value but instead continuously prod the justification for their use.  If we blow a few myths along the way, so much the better. :)

LIST OF ARTICLES (TO DATE):

  1. Speedlight Softbox
  2. A Step Closer to Strobes: Cowboy Studio Speedlight Bracket T
  3. Bare Bulb Superiority: Fact or Fiction?


Read More
Posted in | No comments

Friday, 8 July 2011

BC3:2L Portrait - Local Hiro

Posted on 02:07 by Unknown
2011070714-D300-_DSC4320-Edit.jpg

Strobist.com's Boot Camp 3: 2 Lights (BC3:2L) started a couple of weeks ago with the first assignment, a portrait of a person from your community.

I had some difficulty choosing the subject, partly because we're new to the South Bay area of Los Angeles.  Initially, I thought of taking a photo of our local neighborhood watch captain or maybe a city official, but I thought those choices were kind of boring.  I then thought about the qualities that first attracted us to our city, such as its laid-back, casual atmosphere.  I started thinking about people who might represent that quality, and then I thought of Chef Hiro.


Chef Hiro owns Sun & Moon Cafe, a sushi bar that serves Japanese fusion cuisine just a block from the beach.  The bar is a well-known hangout among locals.  The first time we went to his bar, I saw all the eclectic, somewhat chaotic decor, with Japanese umbrellas and daruma dolls beside drawings of surfboards.  I thought it was a little wacky but cool in a down-to-earth way, which reflected the personality of Chef Hiro.

When I asked him for an appointment for a portrait, I introduced myself and offered to shake his hand.  He offered me a fist bump instead.  That's Chef Hiro.  He has bragging rights for having been an Iron Chef in Japan but you'd never know it by talking to him because he's entirely unassuming, and the first time you meet him, he already makes you feel like you've been buddies for years.


CONCEPT

For Chef Hiro's portrait,  I thought it would be nice to have an environmental portrait in his bar because it showed his personality.  On the other hand, the background could be very distracting.  I did consider bringing a white popup background to create a relatively easy high-key portrait but that wouldn't do justice to Chef's colorful restaurant or his personality.

To make the background less of a distraction and more helpful to the portrait, I thought of some solutions such as a low-key portrait where a shaft of light illuminated only part of the background.  However, I thought that the low-key portrait didn't suit Chef Hiro's bright personality.  Instead I decided to use a background light to draw the viewer's attention to Chef Hiro.

For the light on Chef Hiro himself, I initially thought about using a softbox - a safe choice.  But again thinking of what I wanted to convey about the subject, I decided to keep it simple and natural - like Chef.  I decided I would rely on ambient light from the large window and for the fill, I would use a reflector.

PREPARATION

To maximize the chances of executing my vision exactly as planned, I did a dry run at home, which forced me to think of things like where I would place the light, and which tools I would use.

Speaking of positioning the light, the bar is small and narrow, and there's not much room to maneuver around.  I couldn't use my favorite light stands with its 52-inch footprint.  I decided to use a tripod for my background light.  I brought a couple of super clamps and justin clamps justin case. (har har)

To trigger the light, I would use the Radiopopper JrX Studio - it would be more reliable than CLS AWL (although I would give up the precision of exactly specified flash exposure and instead rely on the JrX dial).  When I packed my gear, I connected the speedlight (already gelled) to the RP Cube, and the RP Cube to the receiver, set to its frequency, all ready to go.  Getting everything ready this way would minimize the setup time, thus saving Chef Hiro a bit of time from his busy schedule.

THE SHOT

I got to the sushi bar a few minutes before the appointed time.  I set up the light in just a couple of minutes, taking some test shots and chatting with the lovely waitress while doing my best to insert what little Japanese I could in the conversation.

Finally, Chef was ready.  He was game from the first shot, so I needed only a few shots (3 to be exact) to get a good expression.  The gesture I captured here is 100% Chef Hiro.  I didn't 'direct' him or anything, although that's exactly what I imagined he would do (partly why I chose a wide focal length and short shooting distance - to exaggerate the gesture that I expected).


In post-processing, I applied a radial blur with a layer mask to keep the viewer's attention on Chef Hiro.

And with that, my first BC3 assignment was done!
Read More
Posted in | No comments

Monday, 4 July 2011

Easy Beach Photos

Posted on 22:35 by Unknown
Baywatch is getting a remake
During the long weekend, I got to take our toddler to the beach.  The sun was very bright - ambient was at ISO 200, f/20, 1/250.  That also meant extremely high contrast between sunlight and shadow.  If I exposed for the sunlight, the shadow would have little visible detail.  The simple solution is to use fill light.


Fill light will lift the shadow detail and reduce the dynamic range of the scene (the difference between the relevant highlight and relevant shadows) to within the camera sensor's dynamic range, thus preserving both highlight detail and shadow detail.

However, the other problem with shooting in these conditions is that the sun is a very hard light source, creating sharply defined shadows (as in the shot of our toddler building sand castles).  To address that issue, I like to use the sun as rim light instead of the key light.  With the subject's face in shadow, there's no harsh light on the face.  But that leads to the previous problem of dealing with the exposure of the subject's face which is now hidden in the shadow.

We could use a popup flash but that is a hard light source just like the sun, so we would be back at square one.  It's possible to use an umbrella or softbox but the beach is usually very windy, making it hard to handle a suitably large umbrella or softbox.

An easy alternative is to use a ringlight (aka ring flash), which produces light that appears almost shadowless (as long as the subject is not next to a wall).  A ringlight produces flat, even lighting that doesn't help reveal the subject's three-dimensional form - but that's ok under these circumstances because that's what we would expect a shaded subject to look like, thus making the use of the flash less obvious.  The ringlight's reflection will show up on sunglasses and other reflective objects but it's easy to clone out if you want to.  Here I left the reflections alone.


Besides real ring flashes from Profoto and Paul Buff, less expensive speedlight adapters are available from Ray Flash, Orbis, some eBay and Amazon sellers, and now from DIYPhotography.net.

RELATED POSTS:
Coco Ring Flash
Use Flash in Daylight?
Fill Flash: Summer Pool Party
Read More
Posted in "ring flash", beach, fill light, flash, light, lighting, ring, ringflash | No comments

Photoverse 1.5

Posted on 14:23 by Unknown


Back in February, we reviewed Photoverse for iOS.  We recommended it as a great way to get the latest photography information and tutorials on the road.  It has also earned recommendations from esteemed photographers such as David Ziser.

We have great news -- Photoverse v1.5 is out, and it's a major upgrade!


Photoverse has a full list of the improvements here.  The improvements that I like best are:


1.  Hiding blogs.  The original Photoverse included a list of many blogs.  The new one has even more new sites.  Sometimes, it was clear which ones were relevant to me and other times it wasn't.  I didn't want to have to remember which ones were not relevant to me.  Now that I can hide blogs, I can filter out the ones I'm not interested in.  Just swipe to the right and a "Hide" button will show up.  It's possible to show the hidden blogs by hitting "Undo" though it appears to reveal all previously hidden blogs.  Perhaps in the future it will be possible to selectively reveal hidden blogs.


2.  Bookmarks / Favorites.  Now I can find the blogs I like best by pressing the bookmark button.  It shows up in a separate list called Favorites.

3. Search by Name, Category or Description.  Looking for blogs that relate to your interest but don't want to go through each blog one by one?  Now you can search for blogs you're interested in by typing keywords based on your interest.

There are tons of other features for Photoverse v1.5.  Best of all, this is a free upgrade for existing Photoverse users!

Currently, Photoverse is available only for iOS.  However, an Android version is scheduled to be released in about a month. 
Read More
Posted in | No comments

Wednesday, 29 June 2011

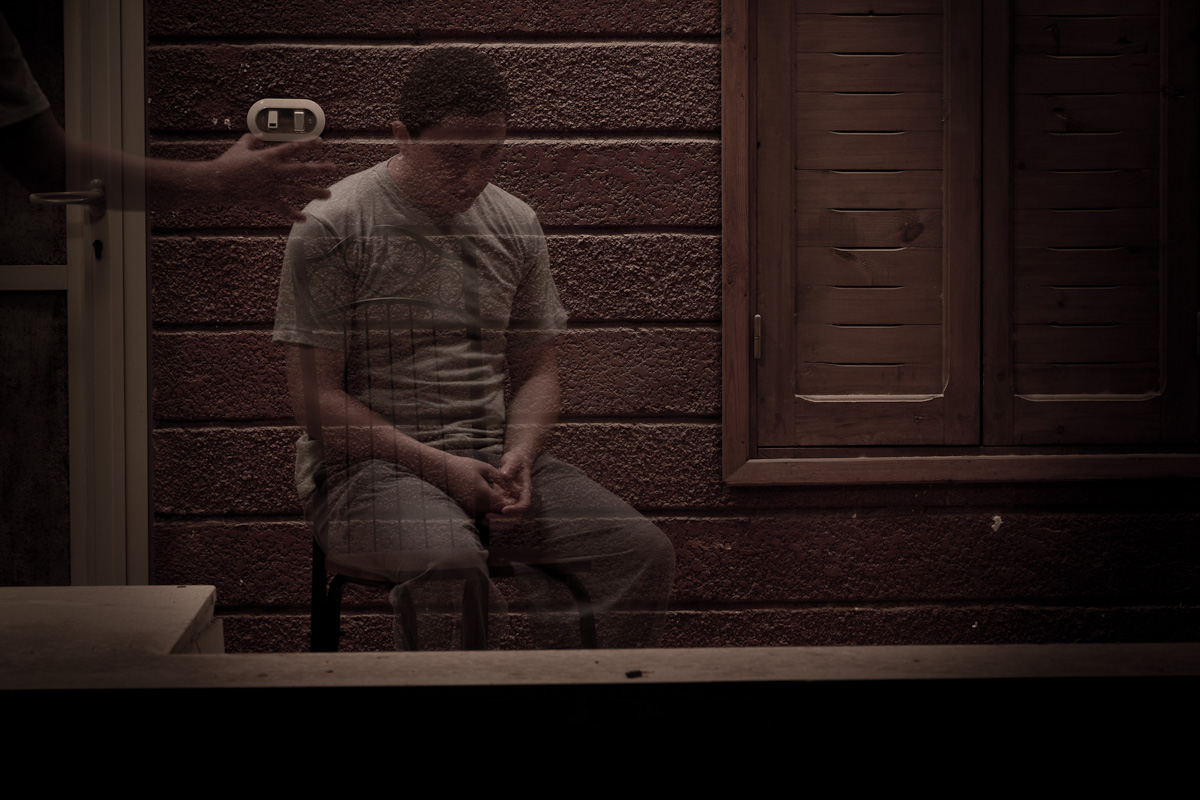
Creepy Ghost Portrait

Posted on 15:16 by Unknown
Creepy Ghost Portrait

This photo would not be mistaken for being a better family photo, and I tend to agree, but at least it was a lot of fun to shoot, hit the jump for the full story.

I spent the past weekend on the beach shooting a lot, I will have a new post about a typical three light setup portrait using the Lastolite Ezybox as my key light. The photo you see above is one of the better photos we got, we were shooting in a very dark place with no one around for a long distance and it just occurred to us to create this creepy picture, here's how the surroundings looked like.

Dark & creepy surroundings, this must be where they write horror stories!  The lights you see on the building was a test we did for light painting

The setup was easy, camera on tripod in aperture priority mode, aperture = f/8 to get everything in focus. When I checked my histogram the picture looked too bright compared to the look I wanted to achieve, so I dialed the exposure down by one and two thirds of a stop until it looked good to me. No scientific measurement at all, just my eyes and the histogram.

It took several tries until to get the desired poses and to get the timing right. The resulting shutter speed was 13 seconds, so after several tries I decided to make my subjects stay still for 10 seconds then run out of the frame so that the background would start overwriting the subjects on the sensor for the remaining 3 seconds, thus giving them this faded look. Here's the original picture.

Original Picture, too much exposure and too much orange, I could even say it is quite cheerful. :-D

All the post processing was done in lightroom and in no more than 5 minutes, I increased the blacks, decreased the vibrance and the saturation, then added a post crop vignette and played with it's parameters for a while, then finally I decided to decrease the overall exposure by 0.2 stops. That's it, very simple and a different portrait that intrigued lots of my friends. Here's the final image again for your convenience, click it to see a larger version.

Final result, click to see a larger version
Read More
Posted in creepy, ghost, portrait | No comments

Monday, 27 June 2011

Are You Ready for AlienBees?

Posted on 23:26 by Unknown

In the last several years, speedlights have been roped into tasks that have traditionally been filled by studio strobes.  The underlying premise is that speedlights are much more compact, and easier to bring to and set up for a location shot.  Combined with their TTL and high-speed sync capabilities, plus their lower upfront cost, speedlights do offer practical advantages over studio strobes.

At some point though, we run into barriers that remind us of the natural limits of speedlights.  The most significant limit is of course power.  Another is the speedlight's reflector design, which sends light only forward.

It is possible to engineer solutions around those obstacles.  For example, if we need more power, we can combine two or more speedlights.  However, sometimes those solutions create problems of their own.  If we gang four speedlights, we indeed get more power but then we limit our options for light modifiers (there are only a few softbox designs that can accommodate 4 flashes).

Instead of going to extreme lengths to stretch our speedlights, however, perhaps we could reconsider using a studio strobe instead.  One particular studio strobe stands out for its dependability and very high power-to-cost ratio: AlienBees.   Hit the jump to learn more about AlienBees and whether they are right for you.


BACKGROUND
After Paul Buff's White Lightning monolights became a runaway success, Paul turned his attention to younger photographers who had limited budgets.  Using the lessons he learned from almost two decades of making White Lightnings, Paul Buff designed and created the more economical and whimsically-named Alien Bees in 2001, with the tagline Bee Abducted.

YOU MIGHT BEE ABDUCTED IF...

  • If you find yourself combining two or more speedlights from time to time, you might bee abducted.  The B800 and B1600 have plenty of power, with output the equivalent of about 5 speedlights or 10 speedlights, respectively.  In the shots below, using a B1600 (and a Nikon D70) we were able to underexpose very sunny ambient light while shooting with a 24" umbrella about 10 feet away:

ISO 200, f/8, 1/800
  • If you are becoming particular about your choice of light modifiers, and are using speedlights for modifiers that weren't originally designed for speedlights, you might bee abducted.  Yes it's possible to use speedlights for modifiers that weren't originally designed for them, but it may entail compromises.  For example, if you use a speedlight to light a softbox, the light will tend to illuminate only the front diffuser, and less so the sides of the softbox, in turn making a hotspot more likely.  You could use a sto-fen type diffuser, but that would reduce the efficiency of the speedlight.  On the other hand, AlienBees have a bare bulb design, where the flash tube sticks out from the body of the flash and the reflector can be removed to create omnidirectional light.  That allows lighting a softbox as evenly (and as efficiently) as possible.


There are increasing numbers of modifiers for speedlights but there is a still wider variety of light modifiers for monolights such as the AlienBees, and they tend to perform better than their speedlight counterparts (again, due to the bare bulb design).  Here, for example, I used a B1600 with a 48-inch octagon softbox with grid:


  • If you would love to see the highlight and shadow pattern in realtime as you position the lights, you might bee abducted.  AlienBees have a modeling lamp (up to 150w), which allow you to see the highlight and shadow pattern of the flash in realtime, making it easier to position your lights for your intended effect.  Some speedlights do have a modeling lamp as well but they are too weak and too brief to be very useful.
  • If you are looking for a means to light a large room (such as at a party) while using a separate light for taking photos of subjects, you might bee abducted.  Speedlights will be hard-pressed to light up a large room (unless you use several of them).  Strobes such as the AlienBees are much better suited for the job because they not only have a lot of power but they can recycle quickly and keep firing without overheating.

DISADVANTAGES vs. SPEEDLIGHTS
  • AlienBees need AC power.  If a power outlet is nearby then all you'll need is the power cord or an extension cord.  Otherwise, you'll need a portable AC power source.  Not just any power either -- you'll need one with a pure sine wave inverter.
  • Manual only - no TTL.  In an ideal world, the photographer would always retain full control of flash exposure.  However, when the subject is moving around a lot and constantly changing his or her distance to the flash (e.g. kids) TTL is useful.  Unfortunately, AlienBees and other monolights (or pack-and-heads) don't have TTL.
  • No true high speed sync mode.  Although there are ways of going above sync speed and forcing the flash to fire, the flash burst of an Alien Bee won't burn slow enough to last through the entire shutter movement, resulting in very uneven exposure across the frame.  (This is not an issue when you have an electronic shutter.)
  • Slower flash duration at lower output (except IGBT monolights such as the Einstein).  Unlike speedlights, when you reduce the power, the flash duration increases (becomes slower).  


CHOOSE YOUR ALIENBEE
AlienBees come in three models with varying capacity: the B400 (160ws), the B800 (320ws), and the B1600 (640ws).  (Note: although there is a White Lightning X3200 with 1280ws of power, there is no equivalent of the X3200 for AlienBees.)

Personally, I don't think the B400 offers significantly more power compared to speedlights to warrant their use instead of a speedlight.  I would recommend the B800 or B1600 instead.

HOW TO USE AN ALIENBEE


Using an AlienBee is very simple:

  • Put the AlienBee on a light stand using its built-in receptacle for light stands.
  • Plug it into an AC power source using the supplied 3-prong (NEMA 5) power cord.  
  • You can trigger the flash either by its built-in optical slave, a sync cord, or a remote control cable into the RJ-11 port.  If you're using the RJ-11 port, insert a dummy plug into the sync port to disable the built-in optical slave.
  • Remove the plastic protective cap over the flash tube by squeezing the two "antenna" at the top of the AlienBee.  You add the flash modifier you want to use (such as a 7-inch reflector or a speedring for a softbox)
  • Turn on the strobe.  Slide the power to the desired output level.  You're ready to shoot.
    • Here's one difference from how you use speedlights: Whenever you increase the power, the Alienbee will be ready to fire in a second or so.  Whenever you decrease the power, however, you have to wait a little bit for the AlienBee to "dump" the excess energy.  The wait time varies with how far you decreased the power and it can be anywhere from a couple of seconds to a full minute.  While you wait, the dump light will turn red.  It will turn green when it's ready to fire.  Alternatively, instead of waiting, you can press the test button to fire a test shot, which will also get rid of the excess energy.

Modeling Light:
There are a few options for controlling the modeling light. First, you can turn it on or off. Second, you can specify whether it will stay at full intensity or will track the power level (dimming in proportion to the power level you set).  Third, you can specify whether the modeling light will temporarily turn off while the strobe is charging, turning back on when the strobe is ready to fire again.

Remote adjustment:
Maybe I'm spoiled by the Radiopopper JrX, but I really need a remote adjustment option like the JrX to make it practical to control the AlienBee.  I sometimes raise the AlienBee very high, and to have to bring the AlienBee down or tilt the stand every time I want to adjust it is too cumbersome.

As previously mentioned in my JrX review, the JrX receivers include an RJ-11 port that can be connected easily to the RJ-11 port on an AlienBee, White Lightning or Zeus strobe.

PORTABLE POWER OPTIONS
Although an AlienBee requires AC power, you don't have to be tethered to a power outlet.   Paul Buff produces two portable power options: the Vagabond II and the Vagabond Mini.  The Vagabond II ($299) is based on older technology and uses a sealed lead-acid battery.  It has a little more power than the Vagabond Mini, but because of its battery, it weighs over 20 lbs. and must be kept trickle-charged to maintain the battery's capacity.  On the plus side, its weight allows it to double as a sandbag.

Note: The Vagabond II is being phased out.

Vagabond Mini


The Vagabond Mini ($239) is a new portable power option from Paul Buff, just released January 2011.  It uses a cutting-edge lithium-cobalt-nickel-magnesium battery with no memory effect whatsoever and has a very high amount of energy in a compact package.  It weighs only 3.5 lbs. yet has almost as much capacity as the Vagabond II.

Other than the Vagabond II and Vagabond Mini, there are also portable power sources from 3rd parties such as Innovatronix.

I chose the Vagabond Mini.  Although I considered the Vagabond II (so that it can double as a sandbag), I wanted the option of having a lightweight power source.  Plus it doubles as a way to power a laptop or cell phone during long trips (it even has a USB port to power USB devices).


CONCLUSION
I've only had my 'bees for a little while but have become quite fond of them.  It has tremendous power - enough for almost any shot you can imagine.  There are also plenty of light modifiers for it that allow me to achieve effects that I would have some difficulty replicating with a speedlight.  No, it is not a do-it-all light and there are many tasks for which a speedlight is a better tool.  But for setup shots, especially outdoors in bright ambient conditions, or when you want to use a large modifier, there are few tools that will serve you better than studio strobes such as AlienBees.


RELATED POSTS:
Intro to Studio Strobes
Multiple Speedlights
Radiopopper JrX Studio Review
Read More
Posted in "alien bee", alienbee, lighting, monobloc, monoblock, monolight, speedlight, speedlite, strobe | No comments

Friday, 24 June 2011

Radiopopper JrX Studio Review

Posted on 00:47 by Unknown

I was looking for a dependable wireless flash solution that would allow me to adjust my flashes from behind the camera.  I considered several alternatives and ultimately decided on a Radiopopper JrX Studio.  Did it perform as promised?  What's it like to use it in real life?  Hit the jump!

A couple of months ago, I agreed to take a portrait of my co-worker's family.  It was going to be at the beach in the middle of summer.  I was also planning to use a softbox or two, which would block the sensors.  I thought it would be a good time to upgrade from my MK-RC7 flash triggers to a much more reliable wireless trigger.  At the same time, I wanted not just a "dumb" trigger but one that would allow remote adjustment.

OPTIONS CONSIDERED
I considered several alternatives, and it seemed that each system had its unique advantages and disadvantages. I chose the Radiopopper JrX system primarily for these reasons:
  • I was planning to use this for setup shots (not candid shots).  I don't need TTL as much.  Plus, in multiple-flash setups, TTL flash exposure has not been very accurate in my experience.  Moreover if I needed TTL in the future, the JrX is compatible with the Radiopopper PX (which does support wireless TTL).
  • I wanted to mix speedlights and one or more AlienBee monolights.  The JrX system would allow me to do that.
  • My budget is limited.  Not only is the JrX system itself one of the less costly wireless remote adjustment systems, it also allows me to use inexpensive old TTL flashes by Nikon (such as the SB-24 or SB-26) or Canon.  No, I can't use an all-manual Yongnuo YN-560 but those old flashes are still much less expensive than current speedlights.
  • The JrX is compatible with any camera that has an ISO-type hotshoe or sync port, leaving open the possibility of using it with a 35mm film camera or a medium format camera (or if you wanted, a high-end point-and-shoot).  It also makes it possible to combine it with other remote adjustment systems (see below).
The JrX system isn't perfect of course, and there are disadvantages:
  • Can't remotely adjust the Paul C. Buff Einstein E640 monolight.  (The PocketWizard ControlTL and Paul Buff CyberCommander can control the Einstein.)
  • Requires an RPCube module or miniplug-to-TTL cable to control speedlights.
  • Can only control 3 groups.  (The CyberCommander can control up to 16 lights!)
COMPATIBILITY
As noted above, the JrX transmitter can be used with any camera with a regular hotshoe or a sync port.  The JrX can remotely adjust:
  • any flash with a Canon or Nikon TTL quench pin* provided you add an RPCube or similar module.
  • AlienBees or White Lightning monolights
  • Zeus pack-and-head
*Note that this is not limited to speedlights.  For example, a Quantum battery-powered strobe with the appropriate Canon or Nikon TTL module can be remotely adjusted with the JrX.  On the other hand, the JrX cannot remotely adjust the Nikon SB-700 or SB-900 because they don't have the TTL quench pin as such.

This also means that even non-Canikon cameras can use a Canikon TTL flash as a slave.

USAGE

Transmitter
The JrX transmitter has a metal foot that fits the standard ISO-type hotshoe.  It stays on my camera's hotshoe just by friction.  I was surprised that there is no locking pin or knurled lockdown knob or anything like that.  Alternatively, the JrX transmitter can also be triggered via its 1/8 miniplug-type sync port, which can be connected to the sync port of the camera or another flash with the appropriate cable.

The transmitter has a power button that serves other functions.  When the transmitter is on, you can press the power button to send a test signal (also useful for dumping excess power from a monolight).  The power button can also tell you the remaining battery life.  If the power button is pressed (as in a test signal), the green LED light beside it will flash.  It flashes quickly when the battery is full, half-speed when it's half and very slowly when the battery is low.  In addition when the battery has less than 2 hours left, the LED will blink slowly.

The JrX transmitter has 3 dials on the side, one for each group that it can control.  The dials are on the left side of the transmitter.  I suppose they designed it that way so you can keep your right hand on your shutter.  Somewhat counterintuitively, the first group is controlled by the rightmost dial, and the maximum power is set when the dial is turned all the way counterclockwise.

The transmitter also has 6 DIP switches (at least they're not piano switches).  The switches can be used to set several options:
  • The first 4 switches are used to set any of 16 channels.
  • The 5th switch sets whether you want a group to be disabled when the dial is at the minimum.  This is useful for selectively turning off groups.
  • The last switch sets whether changes to power levels are set in realtime (each time the dial is turned, regardless of whether the shutter is released).
Receiver

The receiver has two ports: an RJ-11 (telephone type) jack, and a 1/8" miniplug jack.  When using the JrX to control a Paul C. Buff AlienBee, White Lightning or Zeus, you just need a phone cord to connect the receiver to the strobe.  You also need to insert a dummy plug in your strobe to disable the built-in optical slave,  otherwise the strobe will not work (I thought my strobe broke!).

To control a speedlight, you'll need a way to connect the miniplug jack to the TTL quench pin of the speedlight.  The official solution from Radiopopper is to use an RPCube that is specific to Nikon or Canon.  You insert your speedlight on the RPCube just like any other hotshoe.  The RPCube has a cable that connects to the JrX miniplug port.  The RPCube also has two extra ports - an RJ-11 and miniplug jack, which can be useful for daisy-chaining slave flashes.  It has a metal foot for hotshoes and has a 1/4"-20 insert.

However, besides the RPCube there are other alternatives:
  • DIY RPCube.
  • 3rd party equivalents of the RPCube, such as those from flashzebra and bufo1955 (note: at this time, only Nikon versions are available). What I like about bufo1955's cube is that it's based on a Nikon AS-E900, so it has two extra Nikon 3-pin TTL ports, which can be useful for daisy-chaining speedlights (see below).  On the other hand, the flashzebra cube doesn't have extra ports but does have a plastic foot at the bottom.  Both come with a 1/4"-20 insert. 
  • Some Nikon speedlights have the Nikon 3-pin TTL port, such as the SB-800, SB-80, and SB-26.  If you have a miniplug-to-TTL cable, you can connect the TTL port to the receiver's minijack.  I found a couple of sources for such a cable: again, flashzebra and bufo1955.  I haven't tested flashzebra's cable but I have bufo1955's cable and it works as advertised.
  • If you don't have a 3-pin TTL port but have a Nikon AS-E900 adapter, you can also use a miniplug-to-TTL cable to connect the JrX receiver to the AS-E900, and then mount your flash on the AS-E900.  The AS-E900 is available for just $3.95 from B&H (at the time of this writing).
Once everything is connected, you just switch the slave flash to TTL mode (not manual mode) then you're in business.

RELIABILITY
I haven't experienced any failure to trigger with the JrX.  I haven't experienced accidental firing either except for the fact that when the receiver is connected to the flash while the receiver is off, and then you turn it on, the flash usually goes off once.

The claimed range according to the manual is between 300 feet to 1750 feet, depending on conditions.  There are users who report that they have found that the SB800 emits radio interference that reduces the range of the JrX.  I use SB800s myself but haven't noticed any triggering problems.

USABILITY
Conceptually, the JrX controls are simple and intuitive.  Just turn the dial to adjust the power of each group.  For strobes, the power can be set from full power to 1/32.  For speedlights, the power can be set from full power to 1/128.

Compared to not having a remote adjustment system, the JrX makes shooting so much easier and smoother.  Without it, I need to run to each flash and adjust the power.  That can slow the pace of shooting and if you have to do it while the subject is waiting it can be a buzzkill.  (If you can setup the lights beforehand, then good for you -- until you decide you need to adjust or move the lights again...)

However, there are a couple of issues:
  • First, the scale is nonlinear for strobes (see EZset Studio scale below):
Excerpt from the Radiopopper JrX manual
  • Second, the dial is stepless and doesn't click or have any way to indicate where it's set exactly (other than a small raised dot on the dial).
Nonetheless, in practice, I haven't found it difficult to dial the power to a reasonable flash exposure.  In fact, a friend of mine tried it for the very first time and had no difficulties setting it as well (in fact it was also his first time to shoot with a Nikon and with a monolight).  It is not noticeably harder than adjusting the flash with buttons on the back of the flash.  I don't even think in my head about whether the power is 1/4 or 1/8 +1/3 or anything like that.  I just tweak the dial intuitively.

Purists may balk at this seemingly imprecise approach.  In the future, I may get a flashmeter, in which case I'll update this review based on how easy or difficult it is to get the exposure correct to within 1/10th of a stop.  Just don't hold your breath.

SYNC SPEED
The JrX does not support high-speed sync (its brother the PX does though).  However, the camera is never aware when the JrX is attached, thus your shutter speed won't be limited to your sync speed.  Well that's no use unless it can actually trigger above your sync speed, right?  Well you'll be glad to know it can be triggered at up to 1/1600 shutter speed.
D70 + Sigma 50-150. ISO 200, f/11, 1/1000. SOOC JPEG - no adjustments.
On a camera with unlimited sync speed (such as the D70 with its hybrid shutter), this can "multiply" your flash's power relative to ambient light.  In the shot above, for example, ambient was ISO 200, f/20, 1/250.  Yet we were able to provide adequate fill with a 24" shoot-through umbrella 10 feet away.  It testifies to the power of the B1600 but the shot was also made possible because we could shoot at 1/1000 shutter speed.  At that speed, ambient became the equivalent of f/10 (at ISO 200).  Shooting at f/11 we were even able to underexpose the super-bright ambient by a third of a stop while still getting enough light from the flash.

(Note: the unlimited sync speed party doesn't last forever.  At very high shutter speeds, flash duration instead becomes the bottleneck.)

Even on a camera with a mechanical shutter, the ability to trigger a slave above your sync speed can be useful if you don't need to illuminate the entire frame.

OTHER NOTES
Batteries
Both the transmitter and receiver are powered by CR123A batteries, which are not as common as I'd like it to be.  I considered getting rechargeables but went instead for disposables.  The best deal I found was on Amazon (Streamlight batteries).  It was over $2 per battery versus a rechargeable set (charger with 4 batteries) that would cost around $26.  Each battery lasts 40-50 hours of operational time.  Assuming I use 3 batteries at a time (1 transmitter plus 2 receivers), then my breakeven point is around 4 cycles, or 160 to 200 operational hours.  I think it will be a while before I reach that point.  Plus I didn't want to have to remind myself to charge these batteries.

Daisy-chained speedlights
If you are ganging two or more speedlights, you don't need to have a separate JrX receiver for each of them.  You could instead daisy-chain them.  For example, I had 3 speedlights connected on one receiver: I connected the JrX receiver via the bufo1955 cable to an AS-E900 (to which a speedlight was attached), which in turn was connected via the AS-E900's built-in TTL sync cable to another AS-E900, etc.  When connected this way, the power is adjusted for all the speedlights, not just the first one connected to the JrX.

Combination With Other Wireless Systems
The JrX can be combined with other wireless systems.  For example, I was able to use Nikon Advanced Wireless Lighting to control a slave flash while simultaneously controlling an AlienBee B1600.  All I had to do was connect the transmitter to either my camera's sync port or the sync port of my master flash.  Here are a couple of snaps with a JrX and AWL combination (bare SB-800 + B1600 with 60" reflective umbrella):


Another possibility is to combine it with the CyberCommander.  Here's one possible configuration:
  • CyberCommander mounted on camera
  • CSR+ connected to B1600
  • CSRB+ connected via stereo cable to Radiopopper JrX Studio transmitter
  • Radiopopper JrX Studio receiver connected to speedlight 1
  • Radiopopper JrX Studio receiver connected to speedlight 2
The benefits of such a setup:
  • The CyberCommander will be able to meter not only the B1600 but also the speedlights (although the speedlights triggered by the same JrX transmitter will be treated as a single light source).
  • I can use the JrX transmitter to selectively turn on and turn off certain speedlights and the CyberCommander can let me take flash meter readings each time (although only the most recent metered value for the speedlight(s) will be shown at any given time).
  • A CyberCommander alone can't control speedlights, and a JrX alone can't control an Einstein but with this combo you can control speedlights and Einsteins. =D
I haven't tried this yet but I asked the PCB tech support and they didn't see any reason it wouldn't work.  I'll update this review if and when I get a CyberCommander.

[PRELIMINARY] CONCLUSION
The JrX Studio is 100% reliable and is the most versatile remote adjustment option at the moment.  It is also an economical alternative that allows photographers with limited budgets to shoot with flashes that have the best power-to-value ratios: Paul Buff monolights and old Canon or Nikon TTL flashes.  If you're looking for a bulletproof remote adjustment system, plan to use speedlights (with or without monolights), and aren't afraid to shoot with manual flash, then this system is a great fit for you.

(As of now, I've only had the JrX for about a month so I will be updating this review from time to time.)

DISCLOSURE
I haven't received any monetary, financial, economic, or other compensation or consideration from Radiopopper or any other vendors mentioned here for this review.  I however participated in the just-concluded Radiopopper treasure hunt, under the same terms as everyone.  I also have an Amazon affiliate account and from time to time I link to products on Amazon and thereby receive a small percentage of any resulting sales (without any increase in price to the buyer). Thanks!
Read More
Posted in | No comments
Newer Posts Older Posts Home
Subscribe to: Posts (Atom)

Popular Posts

  • Samyang 24 f/3.5 Tilt Shift Lens Now Available
    A seller on ebay ( bestpriceoptics ) is now selling the Samyang 24 f/3.5 tilt shift lens, in Canon and Nikon mounts, for $999 shipped.  This...
  • Nikon 28 1.8G: Moody Artist?
    When Nikon had its recently-finished sale (now extended to end of March), the one lens that I considered buying was the Nikkor 28 1.8G.  To...
  • Olympus E-PL3 with 14-42 Lens $199; Moving from Nikon to MFT?
    I saw on 43rumors.com that the Olympus E-PL3 was being sold at Newegg for just $199 with the 14-42 kit lens included.  I checked it out and...
  • Double Camera Strap & BlackRapid RS-5 Review
    This is a review of two camera straps: - The first is a double camera strap that's -- let's be blunt -- a knockoff of the BlackRapid...
  • Price drops!!! Olympus XZ-2, Pentax MX-1. And about the Casio EX-10
    I just noticed a huge price drop on the Olympus XZ-2 (previously $500 now under $400) and Pentax MX-1 (previously $500 now under $300 ).  Pe...
  • Best Alternative to Nikon 24-70 2.8G: the Nikon 28-70 2.8D
    Every Nikon shooter knows that the Nikkor 24-70 2.8G is the best standard zoom for Nikon's full frame cameras.  However, at around $1900...
  • Abstract Fun
    In one of the rare times I put effort and setup a light stand and an umbrella to shoot my girls, I decided to make use of this burst of ener...
  • Coco Ring Flash - First Impressions
    A few weeks ago, after much deliberation, I finally decided to get a ring flash adapter.  My purpose was to use it as on-axis fill, much lik...
  • Nikon D7000 vs. Nikon D7100
    D7000 + Tokina 11-16 I've been using the Nikon D7000 for a couple of months now, and in this post I'd like to share my thoughts on t...
  • Sigma 18-35 1.8 Revisited; Where to Get It
    Back in April of this year, Sigma surprised everyone by announcing the Sigma 18-35 f/1.8 , the first zoom lens for a large sensor that had s...

Categories

  • "alien bee"
  • "april fool's"
  • "ring flash"
  • "yong nuo"
  • 1"
  • 1/1.7"
  • 10-17
  • 10-20
  • 11-16
  • 15-85mm
  • 15z
  • 17-50 vc
  • 190cx pro3
  • 2.8
  • 2.8G
  • 2/3"
  • 200 f2.8
  • 200 L
  • 200mm
  • 200mm f/2.8
  • 200mm f/2.8 L II
  • 200mm f2.8
  • 200mm f28
  • 200mm f28 L II
  • 2012
  • 2013
  • 23 Samsung led
  • 24-105 f4
  • 24-70
  • 25 1.4
  • 28-105
  • 28-70
  • 35mm
  • 35mm f/2
  • 35mm f2
  • 360
  • 3rd party
  • 4.1
  • 4/3
  • 40 pancake
  • 40 panckae
  • 40 stm
  • 40-150R
  • 40mm f/2.8
  • 430EX
  • 43rumors
  • 45 18
  • 45 AW
  • 4x4
  • 50 14
  • 50 f14
  • 50-150
  • 50mm
  • 50mm f/1.4
  • 55 AW
  • 55-250
  • 550D
  • 55aw
  • 560ex
  • 580 ex ii
  • 580EX
  • 580EX II
  • 5d
  • 5d mark 2
  • 5d mark 3
  • 5D Mark II
  • 5d mark iii
  • 5d2
  • 600d
  • 600ex-rt
  • 60d
  • 60fps
  • 60mm macro
  • 650d
  • 6d
  • 7.5mm
  • 720p
  • 75 f1.8
  • 85mm f1.8
  • 8x12
  • abbc
  • abstract
  • accuracy
  • active d-lighting
  • adjustment
  • adl
  • AF
  • af point
  • AF Point Expansion
  • aftermarket
  • airport
  • alexandria
  • alien bee
  • alien bees
  • alienbee
  • alienbees
  • alternative
  • ambient
  • ambient light
  • angle
  • aperture priority
  • APS-C
  • apsc
  • assignment
  • auto focus
  • auto white balance
  • autofocus
  • AWB
  • awl
  • back button focus
  • background
  • background blur
  • backlight
  • backlighting
  • backlit
  • bad behavior
  • bad photography
  • balance
  • bare flash
  • battery
  • BBF
  • beach
  • beams
  • beauty dish
  • bellagio
  • BFT
  • birthday
  • black
  • black foamie thing
  • black rapid
  • blackrapid
  • blogs
  • blower
  • blown
  • blur
  • bokeh
  • bounce
  • bounce card
  • bounce flash
  • bower
  • bracket
  • brightness
  • brilliance
  • brolly grip
  • brother
  • build
  • burst mode
  • butterflies
  • butterfly
  • C.Fn
  • cable
  • cake
  • camera
  • camera bag
  • camera releases
  • camera settings
  • candle
  • candlelight
  • canon
  • Canon 100mm Macro L IS
  • canon 200mm f28L
  • canon 24-105
  • canon 40 stm
  • canon 40mm f28 pancake
  • canon 50
  • canon 50 1.4
  • canon 55-250
  • canon 5d mark 2
  • canon 5d mark ii
  • canon 5d mark iii
  • canon 5d2
  • canon 5d3
  • Canon 60d
  • canon 6d
  • canon g11
  • canon speedlite
  • car
  • carbon fiber
  • catch lights
  • cheap
  • christmas
  • clean
  • cleaning
  • clipped
  • clipping
  • close up
  • clouds
  • cls
  • clustered
  • color
  • compact
  • comparison
  • composition
  • compositional aid
  • construction
  • contrast
  • cooler master
  • copyright
  • core i7
  • cowboy
  • cowboystudio
  • cpl
  • creepy
  • crop factor
  • crop sensor
  • cyber commander
  • cybersync
  • d-lux
  • d-lux5
  • d3
  • d300
  • D5100
  • D600
  • d70
  • d700
  • D7100
  • d90
  • dark background
  • david hobby
  • daylight
  • dell 24 inch
  • depth of field
  • desert
  • diamond
  • digital
  • directional
  • distance
  • diy
  • dlux
  • dlux5
  • dng
  • double
  • dslr
  • DSLR bag
  • dual
  • dust
  • dx
  • dynamic range
  • earthquake
  • ebay
  • ebay trigger
  • eclipse
  • editing
  • EF 40mm f/2.8
  • ef-s 60mm
  • einstein
  • Electro GN
  • engagement
  • environmental portrait
  • ep5
  • equipment
  • ETTL
  • ettr
  • europe
  • events
  • evf
  • ex600
  • existing light
  • expensive
  • exposing to the right
  • exposure
  • f/3.5
  • family
  • faq
  • fasten-r3
  • favorite
  • fayoum
  • Fayoum desert
  • fill
  • fill light
  • film
  • filter
  • finepix
  • fire
  • fireplace
  • first impressions
  • fish-eye
  • fisheye
  • fix
  • FL600R
  • flash
  • flash bounce
  • flash sync
  • flash trigger
  • flashmeter
  • flashright
  • focal length
  • focus
  • food
  • football
  • fotodiox
  • fountain
  • freexwire
  • fuji
  • fujifilm
  • Full Frame
  • fun
  • fx
  • galaxy s 3
  • galaxy s4
  • gecko
  • GeForce gtx570 OC
  • gel
  • geomag
  • ggs
  • ghost
  • gigabyte z77 ud3h
  • glass
  • gn
  • Goodbye
  • gorillapod
  • gregg
  • grid
  • grip
  • group shot
  • gskill ripjaws
  • guide
  • guide number
  • gx7
  • haf 912
  • handheld
  • hands on
  • hands-on
  • hdr
  • head shot
  • hiatus
  • high dynamic range
  • high iso
  • high speed sync
  • highlight
  • highlights
  • histogram
  • holder
  • holiday
  • home
  • home made
  • Honda civic
  • honeycomb
  • hotshoe
  • hoya
  • humor
  • i9500
  • id
  • image quality
  • impressions
  • indoor flash
  • infrared
  • infringement
  • insects
  • inverse square law
  • japan
  • jewel
  • jewelry
  • joby head
  • jpeg
  • Kingston hyperX SSD
  • kirk tuck
  • kl bird park
  • krakow
  • kuala lumpur
  • las vegas
  • lastolite
  • laurence kim
  • lax
  • lcd
  • leica
  • lens
  • lens cap
  • lens compression
  • lens review
  • lenses
  • lenspen
  • lensrentals
  • light
  • light painting
  • lighting
  • lightroom
  • lightroom 4
  • lightroom 5
  • location
  • long
  • long exposure
  • los angeles
  • low key
  • low light
  • Lowepro
  • Lowepro 45aw
  • Lowepro 55aw
  • lr4
  • lumiquest softbox III
  • lumix
  • lx-5
  • lx5
  • m4/3
  • m43
  • macro
  • macro adapter
  • makernotes
  • malaysia
  • manfrotto
  • manfrotto tripod
  • manual
  • mark ii
  • mark iii
  • MFT
  • mft. micro four thirds
  • micro four thirds
  • mielec
  • migration
  • mini review
  • mirror
  • mirror-less
  • mirrorless
  • mobile
  • modification
  • modifier
  • monobloc
  • monoblock
  • monolight
  • motion
  • motion blur
  • multi function printer
  • multiple
  • nano crystal
  • natural light
  • neil
  • Neil VN
  • niekerk
  • nikkor
  • nikon
  • nikon d600
  • noise
  • off camera
  • oil
  • olympus
  • olympus 12-50
  • Olympus 40-150
  • olympus 45
  • olympus 45 18
  • olympus om-d em-5
  • om-d
  • omd
  • omd em1
  • omd em5
  • omd em6
  • on-camera
  • one inch
  • overexposure
  • overpowering sun
  • panasonic
  • panasonic leica 25 14
  • pancake
  • party
  • passport
  • pastries
  • pastry
  • pc
  • pentax
  • peter
  • phone
  • phone photography
  • photo
  • photo tips
  • photography
  • photokina
  • photomerge
  • photoshop
  • photoshop elements
  • planning
  • pocketwizard
  • point and shoot
  • poland
  • polarizer
  • popup
  • popup flash
  • portrait
  • post processing
  • post-processing
  • postprocessing
  • product
  • product shots
  • profile
  • protection
  • protector
  • quad-flash
  • quantum
  • radiopopper
  • raid 0
  • Range finder
  • raw
  • raw editing
  • raw+jpeg
  • rays
  • real
  • recovery
  • reflection
  • reflector
  • resources
  • restaurant
  • review
  • rf-603
  • rf603
  • ricoh
  • ring
  • ringflash
  • robin wong
  • roger cicala
  • rogue
  • rokinon
  • roll off
  • roll-off
  • rolloff
  • rs-5
  • rs-7
  • rumors
  • s5
  • s5 pro
  • s5pro
  • samples
  • samsung
  • samyang
  • sb-26
  • sb-80
  • sb26
  • sb800
  • screen protector
  • sensor
  • sensor swab
  • sensorclear
  • sensorklean
  • sensorklear
  • separation
  • shadow
  • shadow pulling
  • shadows
  • shards
  • sharpening
  • sharpness
  • shoot through
  • shoot-through
  • shoot-thru
  • shooting technique
  • shootout
  • short
  • sigma
  • sigma 50-150
  • skin tones
  • skylight
  • Slik Mini Tripod
  • slingshot
  • slow
  • small
  • smooth
  • soft
  • softbox
  • sony
  • sony a99
  • sony rx100
  • sony t10
  • specular
  • speed
  • speedlight
  • speedlite
  • spinlight
  • spots
  • standard
  • stockholm
  • story
  • strap
  • strobe
  • strobist
  • studio
  • studio strobe
  • subject
  • substitute
  • sudden
  • summilux
  • sunrise
  • sunset
  • sweden
  • swivel
  • sync speed
  • t2i
  • t3i
  • Table top tripod
  • tamron
  • technique
  • techniques
  • tele
  • telephoto
  • thinktank retrospective 5
  • third party
  • tips
  • tokina
  • tonal
  • tonality
  • tone curve
  • toploader
  • toys
  • translucent
  • travel photography
  • tri-flash
  • Tribute
  • trifold
  • trigger
  • tripod
  • truth
  • ttl
  • TTL Cord
  • u43
  • ultra-wide
  • ultrawide
  • umbrella
  • underexposure
  • unlimited sync speed
  • up-rise
  • up-rise 15z
  • update
  • uprise
  • USM
  • uv
  • uwa
  • vanguard
  • versus
  • vertical
  • video
  • view nx2
  • visual science lab
  • vs
  • wadi rayan
  • wd caviar black
  • web
  • weekend
  • westin
  • white balance
  • white lightning
  • wide
  • wide angle
  • window
  • wireless
  • wireless flash
  • wireless release
  • wireless trigger
  • workflow
  • Yashica
  • yashica gtn
  • yashica st-7
  • yn-560
  • yn-560ex
  • yn-ex600
  • yn560
  • yong nuo
  • yongnuo
  • zack arias
  • zoom
  • zoom toploader
  • zuiko

Blog Archive

  • ▼  2013 (165)
    • ▼  December (5)
      • Olympus E-PL3 with 14-42 Lens $199; Moving from Ni...
      • Sigma 18-35 1.8 Revisited; Where to Get It
      • Speedlight Modifiers - 50% discount at Fotodiox
      • Olympus M.Zuiko 45mm f/1.8 Mini Review
      • Evening Portraits with Flash
    • ►  November (10)
    • ►  October (8)
    • ►  September (7)
    • ►  August (3)
    • ►  July (11)
    • ►  June (10)
    • ►  May (15)
    • ►  April (19)
    • ►  March (33)
    • ►  February (24)
    • ►  January (20)
  • ►  2012 (193)
    • ►  December (17)
    • ►  November (22)
    • ►  October (34)
    • ►  September (47)
    • ►  August (12)
    • ►  July (11)
    • ►  June (10)
    • ►  May (13)
    • ►  April (13)
    • ►  March (8)
    • ►  February (1)
    • ►  January (5)
  • ►  2011 (141)
    • ►  December (8)
    • ►  November (8)
    • ►  October (7)
    • ►  September (9)
    • ►  August (13)
    • ►  July (13)
    • ►  June (19)
    • ►  May (17)
    • ►  April (25)
    • ►  March (22)
Powered by Blogger.

About Me

Unknown
View my complete profile