Better Family Photos

  • Subscribe to our RSS feed.
  • Twitter
  • StumbleUpon
  • Reddit
  • Facebook
  • Digg
Showing posts with label flash. Show all posts

Friday, 11 October 2013

The Dead Gecko

Posted on 12:51 by Unknown

Remember my recent Abstracts post? It was during the same day that me and my friend found a dead gecko on the bathroom floor. It was tiny, but it presented a good photographic opportunity and allowed us to occupy some of the long free boring time we had on hand, hit the jump for the full story.


Before I start, I want to show you how tiny this gecko is, the camera in the picture is a Canon 60D and that's my very own Canon 60mm Macro f/2.8. The tripod is my Manfrotto 190CX Pro3.

My friend is still learning about lighting, so I let him lead to see what he would do, and every now and then I gave some pointers and suggestions. So, he started with the obvious, a slightly high angle, shooting directly on the same table where we put the gecko, and shooting from the same direction where the light came from (a large door-sized window with sunset light, which you can see from the shadow).


Here is what came out:


Not the best background, lots of dust specks (we really didn't notice it with our eyes), and it turns out the gecko had some string attached to its front left leg. And more importantly, the light didn't look good. I did a few spot removal in lightroom, and this is what I was able to get, still not good enough.


For the next attempt, I suggested that we should get rid of the brown background, and use something black instead. The only thing we had that worked was my friend's leather tablet cover.

As for lighting, I suggested shooting through the gecko with the sun coming from behind and opposite to the lens (backlighting). We also improved the composition, and shot from a much lower angle, almost from the eye-level of the gecko. Here's the setup shot, but after the sunset light went away (notice the useful tilting LCD, and the extremely useful tripod's extending center column):


And here's how it looked like with just the sunset backlighting the gecko, you'll notice we cleaned the tablet cover thoroughly, yet I had to do a little bit of spot removal.


We were shooting at f/6.3, with the lowest ISO, and the sun was setting down quickly, consecutive shots looked slightly different because of moving light. For the next iteration, I decided we should use flash, and have complete control over our lighting.

The 60D had a commander pop-up flash that triggered a remote 580EX (also my very own) in TTL mode, we were able to adjust the flash compensation either from the camera or the flash itself (which I held in my hand).

For the lighting setup, I decided to mimic the backlight as in the shot above, but with some fill from the front. To diffuse the light, and in the same spirit of the place we were staying at, I used a large (1m x 1.5m) plastic bag to diffuse the flash light and soften it. It is transparent with some writing on it that didn't affect the color of the light. I held the bag behind the gecko, and held the flash almost one meter away from the bag. It acted as a huge (compared to the gecko's size) diffuser, and gave some very soft light. For fill, I used an idea that I used previously with great results. I used a yellow piece of paper in front of the gecko to reflect the diffused light on his eye, and open up the shadows. The benefit of the yellow paper is that it reflect the light with a golden tint. Here's how it came out:


You can see the effect of the yellow reflection on his eye. And to show you the difference, here is the same shot with a normal white paper, and without the vignetting. Much less appealing in my opinion.


At that stage, we were quite satisfied with what we got, but we decided to play with the position of the backlight and the diffuser a bit, sometimes raising the light and sometimes lowering it. It resulted in different pictures for the same subject, especially for the background, and the rim light.

Finally, here's the opening picture (my favorite) again:


RELATED POSTS

Sharing Some Macros
Macro Talk: Canon EF-S 60mm f/2.8 Macro USM
Macro Fun @ Home
Abstracts With The Olympus 40-150R
Flash Series - Part 1: Canon Speedlites Chat (580EX II vs 580EX vs 430EX)


Read More
Posted in 190cx pro3, 580EX, 60d, 60mm macro, flash, gecko, lighting, macro, manfrotto | No comments

Monday, 25 February 2013

OM-D, Bits & Pieces

Posted on 12:52 by Unknown
 
Today I will talk for a bit about my recent experiences with my OMD, and I would like to start with the image you see above, this was taken during an auto-cross event that I attended last Saturday, it is a wheel of a Mitsubishi Evo wearing a slick tire as you can see, the car was stationary for a moment before starting the race.
 
I captured the image you see above @ 300mm equivalent with my Olympus 40-150mm f/4-5.6 lens wide-open, I like the lighting, the grooves on the brake disc and the worn out slick tire. That lens is quite sharp and incredible considering the $100 price when purchased as a kit.

 
I am hardly using zoom lenses anymore, I find pleasure when using a fast prime, it gives me fast shutter speeds, shallow DOF and one less thing to think about when shooting (focal length, obviously). However, I wanted to get to know my zoom lenses more, currently the Olympus 12-50mm f3.5-6.3 lens and the 40-150 tele-zoom I mentioned above, the first lens I hardly used other than for macro shots and video, and I still have to get used to it, maybe when I go to desert next time.
 
The 40-150 I have tried a couple of times, and I am impressed with the sharpness and contrast so far, it's no secret that I love portraits with long focal lengths, I love that background compression effect and the shallow DOF that results from the extra background magnification, so I was apprehensive I wouldn't get that with the small m4/3 sensor, but looking at the portrait shown above, I say nice, not as nice as my 200 f/2.8 on the 5D of course, but quite good, and that was 105mm (205mm eq.) @ f/5.6.
 
 
I gave it another try as you can see above, this one was taken at 62mm (124mm eq.), great colors, contrast and sharpness, so good so far except for the lousy zoom ring, which is too stiff right now, but I bet will get smoother with more mileage.
 
One thing to mention when shooting portraits, I almost forgot how to focus on the eye, the OMD's auto near-eye detection and focusing is simply the best invention in all of the recent cameras in my opinion, I leave it on all of the time, and I just compose and shoot, never worrying about the whereabouts of my focusing point, it immediately snaps to the nearest eye and gets it in focus no matter how shallow the DOF is, I'd say the hit rate is 85% with another 5% lost for focusing on the wrong eye.
 
I was using my friend's 60D with the 200mm f/2.8 the other day, and I immediately remembered how hard it was to get sharp eyes with such a combo, 320mm equivalent, no image stabilization; so the finder is wobbly, and I have to put one of the nine tiny dots on my subjects eye while I hit the shutter button, if Sony's A99 has that feature, I would consider it next time I am going back to FF, it makes life much easier.
 
 
And here's one last shot from that auto-cross event, a dandy-green handsome looking VW Beetle, I have special love for this car having owned a 1972 VW Beetle 1300.
 
One thing I am learning about with the OMD and the RX100, those Sony sensors doesn't give as much highlight recovery headroom as I am used to from my Canon sensors, while on the other hand they are extremely tolerant for extreme shadow pushing without showing banding or noise blotches, and in the worst cases noise shows up as fine grain that I can easily cleanup, this caused me to start under-exposing the images with very bright highlights like this shiny VW Beetle, and push the shadows later on post. That's exactly the opposite of what I was to do with Canon, where I usually exposed for the right instead, interesting, and will see how it works, Mic tells me that he's used to the same behavior from Nikon sensors.
 
 
On a different note, we went to a burger restaurant called Fuddruckers, I believe it is American, it was a lot of fun for the kids and for me, since it presented me with a new environment to take pictures of my kids in, the shot you see above is taken there, and this gave me a pleasant surprise regarding the OMD's AWB for the second time.
 
The first time (if you read my posts carefully) was when I used it under incandescent light at my home, for some reason the correct WB under my home lighting is around 2500 kelvin, and none of the cameras I have ever used was able to get the correct WB except for the OMD, this list includes several P&S and mobile phone cameras, the Canon G11, 550D, 60D, 5D2, 5D3, Sony RX100, Nikon D3100 and D7000. Back to the restaurant, there were lots of light sources, incandescent, CFL, flourescent and deeply colored walls, we had a deep yellow wall to the camera left, and you can see the red wall in the background, and the OMD got the WB perfectly, the image you see above is the RAW output with some blacks added and highlights reduced.
 
 
As usual, I was shooting with the Panasonic 25 f/1.4 lens, which my favorite focal length, I don't find much reason to stop-down this lens at all (unless I need more DOF, obviously), it is quite sharp at f/1.4, add that to the OMD's auto near-eye focusing, and you always get sharp eyes, the obvious benefit (which is one of the main reasons that got me thinking about MFT in the first place) is that I get a fast shutter speed and enough DOF at the same time to get the eyes in sharp focus, and a comprehensible background which is still convincingly out of focus. I was shooting wide-open @ ISO 1600 and was getting 1/125 shutter speeds that enabled me to get sharp shots of my girls.
 
 
TTL flash, finally!
 
I received my Olympus FL-600R finally after a long waiting period, first impressions are:
 
  • It's tiny, incredibly tiny, I will show it in a separate article beside Canon's 600EX behemoth.
  • It features a quite powerful continuous LED light (with variable power).
  • Head rotates 180 degrees both sides, though it is quite stiff.
  • Plastic foot with the new quick locking mechanism, not an issue if the head wasn't so stiff.
  • Touch button for power, it powers on with the camera, and turns off when I turn it off.
  • Not as powerful as a 580EX, obviously, but I was used to pushing the 580EX hard by bouncing indoors at sync speed and ISO 400.
  • Accurate TTL metering, more so than the Canon.
  • When I press the shutter, the camera hesitates for a split second before firing the shutter, TTL measurement?
  • It can act as a full featured master or a salve, and can be triggered with the OMD’s accessory flash.
The above shot was taken with the 25 f/1.4 lens (wide-open as usual) and bounce flash to camera right and a bit behind my shoulder, who said MFT can't get shallow DOF?
 
More to come soon.
 
Posted with BlogsyPosted with Blogsy
Read More
Posted in FL600R, flash, hands-on, olympus, Olympus 40-150, olympus om-d em-5 | No comments

Monday, 28 January 2013

Silver umbrellas made obsolete by new octagonal softboxes

Posted on 07:39 by Unknown

I was looking for a silver umbrella, but found out they are pretty much obsolete. That's because of the Westcott Orb and similar octagonal softboxes on eBay, Amazon, and elsewhere.  In this post, I review the CowboyStudio version of this octagon softbox.  In a first for me, the review will be in video form.

The video will cover these topics:
- Why you might want one for your lighting gear.
- Comparison with other octagon softbox designs.
- Demonstration of how the octagon softbox is mounted with a regular umbrella adapter, a speedlight bracket, and an Alien Bee.
- Advantages of the octagon softbox.
- Disadvantage of the octagon softbox and how to remedy it.
- Demo of its usage.


Here's our video review (https://www.youtube.com/watch?v=pa4Fywt43B0):


Here are the sample photos I took.


Click on the pictures to zoom in.  I did not deepen the shadows in post.  Note that the wall was only about 3-4 feet behind the subject yet looks very dark.  That speaks well of the control afforded by the octagon softbox (here of course I was using it more as a silver umbrella -- if I had used the diffuser I would expect more spill on the background).

Additional notes:
  • The umbrella's ribs don't look very sturdy.  I think they could bend or break if a wind blows down the light stand.
  • Longer studio strobes such as the White Lightning might not fit into the softbox, but the modifier can still be used as a silver umbrella.
  • At this point in time, these Apollo Orb clones are available only in one size -- 80cm (31.5 inches), whereas the Apollo Orb is available as a 36-inch or 43-inch version.
  • The Apollo Orb can use a grid.  At least one version of these clones can use a grid as well.  However, mine cannot (the velcro is too narrow to accommodate anything other than the diffuser).  If that's something you would like, be sure to check with the seller if their softbox can use a grid.
Errata:
  • In the video I said, there is no hotspot because the bulb is not facing the "camera".  I meant to say the subject.
  • The camera I used for the shots was the Fuji S5, not the D300S.
I'm a newbie at video editing so if you have any suggestions for that or anything else pls. let me know in the comments or via email.  Thanks!

If you are interested in this product, you can support our blog by buying it through our Amazon affiliate link below.  At this time, Amazon offers the lowest price on this product ($26 with free 2-day shipping for Amazon Prime).


UPDATE:  Found this similar product on Amazon, except it has a grid.  If I were to need another silver umbrella or small octagon softbox, this is what I would probably order instead.


RELATED POSTS:
How to get a black background without a backdrop
Read More
Posted in alien bees, cowboy, cowboystudio, flash, lighting, review, softbox, studio, umbrella | No comments

Lighting Technique: Taking Photos of Dark Objects

Posted on 00:22 by Unknown

With most subjects, the form and its texture is revealed by shadows.  With black or very dark subjects, the shadows blend into the subject, therefore the shadows don't show its form as easily.  Instead, we see the form through the specular highlights and reflections.

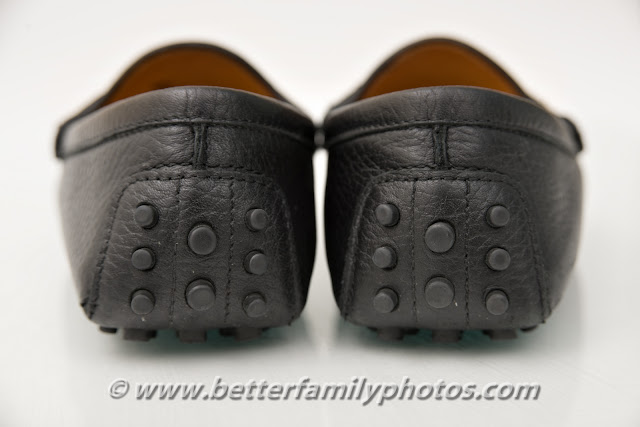
I took some photos of a pair of black leather shoes.  In this post, I discuss how I lit the shot.


Because of the shoes' dark tone, I decided to take a photo of the shoes against a white backdrop.  On some of the shots, I also wanted a cool-looking reflection below the shoes.  To do this, I got a white construction paper and then used a glass top from one of our tables.
The tools I used.
Here is my thought process as I was shooting.

The objective here was to make the shoes as desirable as possible (they were to be sold on eBay or craigslist).

First, I tried a lighting scheme where the shoes were somewhat backlit, a style that I often like.  To do this I placed one slave flash camera left, aimed at the left corner ceiling.  I aimed the on-camera flash to the right corner of the ceiling.  Here is the result:


The result looked somewhat ok, but did not show sufficient detail in the shoes.  I tried to add detail by aiming the on-camera flash to the side and a little bit behind the camera plane.  Here is the result:

Definitely had more detail but yuck the shiny specular reflection made the shoes look cheap.

A bit of explanation is in order.  With light colored objects, the quality of light can be most easily seen by the shadows.  Soft light produces soft-edged shadows.  With dark objects, the shadows aren't as noticeable.  Nonetheless, the quality of light still makes a difference -- through the specular highlights.  Hard light produces very shiny specular reflections.  Soft light produces a much more dull reflection.

The specular reflection here was because the wall to the right had a closet with a glass door.  The glass door reflected the flash as though the flash were aimed directly at the shoes.  To remedy this I aimed the on-camera flash at an angle that would not hit the glass door.  This was the result:


Better than the previous shot, but still, there was a shiny specular reflection that detracted from the shoes' appearance.  What I needed instead was to simulate a very large light source to create the softest-looking highlight.  I did that by bouncing one flash behind and to the left, and the other behind and to the right.  Together, the two bounced lights would act somewhat like a very large light source.  This was the result:


Much improved, in my view.  I then just adjusted the intensity.


In post, I removed some of the warm tint from the bounced flash.  I did that in Photoshop by creating an adjustment layer that removed all saturation.  To retain the color in the interior of the shoe I hid the adjustment layer over the interior of the shoe.   The result had absolutely no tint while there was still color in the shoes' interior.  However, I found the image a little too 'cold' looking, so I reduced the opacity of the adjustment layer to bring back just a little bit of the tint.  This was the final shot:


Here is another shot I worked on.  The initial shot had a highlight on the upper left that I found distracting, while the rest of the shoes were dark:

Once again, I adjusted the two flashes so that they bounced to the ceiling (behind the camera, because I was pointing the camera down).  One flash was to the left of the shoes, and the other was on camera, both aimed at the ceiling to combine into a gigantic light source.  The gigantic light source created a highlight that lit the shoes more evenly and gave the leather the soft appearance.


Here are the rest of the shots:


Read More
Posted in flash, lighting, product shots, technique | No comments

Wednesday, 24 October 2012

Flash Portrait in Fayoum Desert

Posted on 17:41 by Unknown
Flash Portrait - End Result
I want to share with you a few flash pictures I took during my second trip to Fayoum desert, you might remember my three-part post about my visit there four months ago. I repeated most of what I did before, but challenged myself not to take a single picture similar to the ones I took last time.
When I posted the lead picture you see above on Facebook, it got some nice comments, so here's how I did it. Can you guess how many lights were used? Can you guess the light modifiers used?
 
I started by taking a normal picture using aperture priority, to show you how the available light looked like, we were sitting under a wooden roof with full 3pm sun blazing outside, as expected, the camera was tricked by the strong back light and under-exposed the subject, I opened the shadows in Lightroom.
 
 
Next, I turned the camera to manual mode, I wanted to decrease the available light exposure as much as I can, so I started by choosing the fastest shutter speed possible with flash (sync speed), which is 1/200 in my case, I also reduced the ISO as much as I can, which is ISO 50, finally I closed my aperture and taking test frames, I ended up with f/18, I decided that I want this ambient level judging from the histogram and the back LCD preview, here's the final setting without flash.
 
Ambient light reduced greatly, see the backlight?
 
See that backlight on both shoulders and the head cloth? They will end up in the final picture, they give an edge to the subject. Next, I triggered my Canon 580EX II using another speedlite (600EX-RT) on the camera with it's output turned off, I used the flash on ETTL (i.e. both the camera and the flash worked together to determine the correct flash power), and started shooting. One of my friends was holding the flash, bare, without any light modifiers, we took two or three frames until I got one I liked, here it is straight out of the camera.
 
SOOC
 
Almost there, I like the effect and the shadow covering his mid-section caused by his hand, but I find the eyes that you can see through the sun glasses and the flash reflection quite distracting, so I used the local adjustment brush on the sun glasses to decrease the exposure until it looked natural, and then I cloned out the remaining flash hot spot, and here's the end result for your convenience.
 
Final result
 
I took a similar picture of one of my other friends, using the exact same method and a bare flash as well, but no bright background this time, there was a shaded area behind his back, what I like about this picture is his look, the light shape on his face and eyes, and the black and white conversion.
 
Looking at the future
 
I followed the exact same method with an interesting looking mini-cart outside in the sun, I started by taking an available light shot, but with reduced exposure, can't remember how much, probably -2 EC.
 
 
It looked quite ok, but its color was too close to the sand and the walls behind it, so I turned to manual mode and decreased the ambient exposure, my settings were the same, 1/200, f/18 and ISO 50, here's what I got.
 
 
I then added an external bare flash to the camera right, and slightly higher, mimicking the sun's position, I adjusted the flash exposure compensation until I got this frame.
 
 
I like it more than the available light shot, but the wheels are quite dark, and I wanted to lift the shadows a bit, so I enabled the on-camera flash and set its power to 1/2 the power of the other flash (remember, I'm using ETTL, the camera determines the suitable flash power and then uses half that power for the on-camera flash), but that looked like too much, so I changed the ratio to 1/4 power, and here's the end result, with almost no processing, a few tweaks in the color and some burning using the adjustment brush would yield a better image, but I just wanted to share the concept with you.
 
Final image
 
And just for kicks here's one more picture taken in the same way, I hope you've enjoyed this post. Any questions are welcome.
 
Hanging pot
 
Posted with BlogsyPosted with Blogsy
Read More
Posted in 580 ex ii, 5d mark iii, 600ex-rt, bare flash, canon, canon 24-105, desert, fayoum, Fayoum desert, flash, overpowering sun, speedlight, speedlite | No comments

Monday, 22 October 2012

Better Point-and-Shoot Shots with an External Flash

Posted on 03:48 by Unknown

Last weekend, one of our friends celebrated their daughter's birthday party.  On this kind of occasion, I don't usually bring a DSLR anymore - I feel it is a little too much when we're not the celebrants.  Instead, I brought our trusty Lumix LX5 (reviewed here).  However, to get the best image quality out of the LX5, I paired it with an external flash, the Yongnuo YN-560EX (reviewed here).


Yes, the 560EX is a manual not TTL flash.  (I don't have a dedicated TTL flash for the Lumix LX5.)  However, using a manual flash while shooting run-and-gun is actually easier than it sounds.  (See: Therapy for TTL Addiction: How to Use Manual Flash).

In this post, I'll discuss my thought process in setting the flash and ambient exposures.

THE LOCATION
The birthday party was at a My Gym play area.  The room was about 4 or 5 times as long as it was wide.  The ceilings were white, and about 12 to 15 feet high.  One side of the room had mirrors while the other side had a mural and colorful playsets.
Not the same party but the same location, showing the ceiling
OVERALL STRATEGY
The first thing I do is assess the ambient light.  The party was late in the afternoon, almost sunset.  The storefront windows were covered by blinds to prevent glare.  There were fluorescent lights all over the ceiling, so the ambient light from the ceiling was soft.  Direct sunlight was streaming through and illuminating part of the room.  The direct sunlight was of course hard but it was coming in at an angle, so at least it had an interesting direction.

One possibility is to use ambient only.  There were two issues with this.  First, the fluorescent would be too dim, forcing the LX5 to struggle with much higher ISOs.  Second, there would be strong contrast between the sunlight and the fluorescent-lit areas.  Flash was definitely a useful tool under these circumstances.

Since I've decided that flash would help, the next thing is to figure out the respective roles of the ambient and flash.  One option is to expose for the ambient then use flash as fill.  It would solve the contrast between sunlit and fluorescent-lit areas.  However, it would not fix the dim fluorescent light (I would have to use high ISO).

On the opposite extreme, I could use flash only with no ambient, for maximum control.  The LX5 has an unlimited sync speed which facilitates 'deleting' the ambient.  But in this case, the subjects and the rest of the room were evenly lit with the ambient.  If I deleted the ambient for the subject, I would also be deleting the ambient for the room.  If I did that and used flash on the subject, then it would look artificial, like this (one of my early flash photos):
11 pictures for you

Or I would have to simulate the light in the room, which would have required at least a couple more flashes given the size of the room.  Not practical.

The compromise here is to use flash as the dominant light source, but to allow enough ambient to look natural.  How much ambient to allow here depends on a number of factors, such as: does the ambient look good or not, how consistent are the ambient and the flash, etc.  In this case, the ambient was fine (it's soft, comes from a reasonable direction, has a reasonable color, is consistent with the flash).  The more ambient I allowed, the more natural the image looked and the less the flash would have to work.  But because the camera can't handle high ISOs, I had to allow as much ambient as the camera could handle competently then use the flash for the rest.

I used manual exposure for the ambient.  In this case, I used the highest ISO the camera could manage, the widest available aperture, and used the slowest shutter speed that would not result in blur.  In the case of the LX5, I chose 400 ISO.  As for aperture, the LX5 can go as wide as f/2.0 to f/3.3 depending on the zoom; DOF is not really an issue for point and shoot.  For the shutter speed, I tried 1/100 first but it was too slow to get sharp enough shots of the kids.  So I tried progressively faster shutter speeds.  Of course it would be nice to shoot at 1/500 for sharpness but again, there would not be enough ambient in that case.  I settled at 1/200.

The rest of the exposure was lifted by the flash.  I wanted the flash to blend with the ambient - soft, overhead, white.  The logical choice was to bounce the flash against the ceiling.  That's exactly what I did, although I varied it slightly from pointing just straight up.  I also made sure to shield the flash with my hand so it wouldn't shine directly on the subjects.  In terms of intensity I just chimped it to lift the underexposed ambient to the right level.  That was around 1/4 power at 105mm zoom, although I was adjusting it up and down from time to time.


ALTERNATIVE APPROACH
An alternative approach was to use automatic exposure, underexposed -1EV.  Closer to 0EV would be natural but again, the ambient was too dim -- plus shutter speed may be too slow).  I used aperture priority then chose the widest available aperture (again, DOF is not an issue for p&s), then I used flash to bring up the rest.  It's a simpler approach but with less control over the variables.


FILL FLASH
You recall that one of the issues is the contrast between the sunlit area and the fluorescent-lit area.  For those parts, the exposure was set for ambient, and the flash acted only as fill.
Aperture priority, 0EV.  No flash.

Aperture priority, 0EV. Flash added.


FLASH BLUR
One of the activities at the party was riding a zipline.  To capture that, I used intentional flash blur.  I set the exposure to a slow enough shutter speed.  Then, because the subject would be moving and the LX5 isn't fast enough to focus continuously, I used a narrower aperture to get a deep DOF.  Then I used the ISO to bring the exposure up to around normal.  Given that the aperture was somewhat narrow and the ISO on the low side, I set the flash to full power, then tweaked ISO upward as needed to get the desired exposure.

MORE SAMPLES
Here are a few more shots from the party.


Freeze!


Read More
Posted in 560ex, ambient, balance, blur, exposure, fill, flash, lighting, lx5, manual, party, point and shoot, yongnuo | No comments
Older Posts Home
Subscribe to: Posts (Atom)

Popular Posts

  • Olympus E-PL3 with 14-42 Lens $199; Moving from Nikon to MFT?
    I saw on 43rumors.com that the Olympus E-PL3 was being sold at Newegg for just $199 with the 14-42 kit lens included.  I checked it out and...
  • Samyang 24 f/3.5 Tilt Shift Lens Now Available
    A seller on ebay ( bestpriceoptics ) is now selling the Samyang 24 f/3.5 tilt shift lens, in Canon and Nikon mounts, for $999 shipped.  This...
  • Double Camera Strap & BlackRapid RS-5 Review
    This is a review of two camera straps: - The first is a double camera strap that's -- let's be blunt -- a knockoff of the BlackRapid...
  • Exploring 3D Photography with the Loreo 3D Lens in a Cap
    When I hear of 3D photos or videos, my first impression is that it's gimmicky.  Interesting for one or two shots maybe and then after th...
  • Toys for the Big Kids: Speedlight Softbox
    In this post, we will have a look at a softbox for speedlights.  This post is part of a series that will cover equipment reviews for committ...
  • Going Crazy With Tripods
    My Tabletop Tripod Trio I love tripods, I go all soft and wobbly when I see attractive looking ones, so here is my story with tripods, inclu...
  • 2x Lowepro Review: Toploader Zoom 45 AW & 55 AW + Unraveling The SlipLock™ Mystery
    Left: Lowepro Toploader Zoom 55AW, Right: 45AW, Middle: Canon 60D + 15-85 Welcome to a new rare photography accessory review as I'd lik...
  • Canon Professional Network
    I didn't know about Canon Professional Network until Syl Arena recently blogged about his 4-part article on speedlites.  I took a look ...
  • Minimizing Nikon D5200 and D7100 banding; Mysteries Remain
    Many people have noted that the Nikon D5200 and Nikon D7100 have banding in the shadows when the exposure is pushed.  In this post I'll ...
  • Nikon 28 1.8G: Moody Artist?
    When Nikon had its recently-finished sale (now extended to end of March), the one lens that I considered buying was the Nikkor 28 1.8G.  To...

Categories

  • "alien bee"
  • "april fool's"
  • "ring flash"
  • "yong nuo"
  • 1"
  • 1/1.7"
  • 10-17
  • 10-20
  • 11-16
  • 15-85mm
  • 15z
  • 17-50 vc
  • 190cx pro3
  • 2.8
  • 2.8G
  • 2/3"
  • 200 f2.8
  • 200 L
  • 200mm
  • 200mm f/2.8
  • 200mm f/2.8 L II
  • 200mm f2.8
  • 200mm f28
  • 200mm f28 L II
  • 2012
  • 2013
  • 23 Samsung led
  • 24-105 f4
  • 24-70
  • 25 1.4
  • 28-105
  • 28-70
  • 35mm
  • 35mm f/2
  • 35mm f2
  • 360
  • 3rd party
  • 4.1
  • 4/3
  • 40 pancake
  • 40 panckae
  • 40 stm
  • 40-150R
  • 40mm f/2.8
  • 430EX
  • 43rumors
  • 45 18
  • 45 AW
  • 4x4
  • 50 14
  • 50 f14
  • 50-150
  • 50mm
  • 50mm f/1.4
  • 55 AW
  • 55-250
  • 550D
  • 55aw
  • 560ex
  • 580 ex ii
  • 580EX
  • 580EX II
  • 5d
  • 5d mark 2
  • 5d mark 3
  • 5D Mark II
  • 5d mark iii
  • 5d2
  • 600d
  • 600ex-rt
  • 60d
  • 60fps
  • 60mm macro
  • 650d
  • 6d
  • 7.5mm
  • 720p
  • 75 f1.8
  • 85mm f1.8
  • 8x12
  • abbc
  • abstract
  • accuracy
  • active d-lighting
  • adjustment
  • adl
  • AF
  • af point
  • AF Point Expansion
  • aftermarket
  • airport
  • alexandria
  • alien bee
  • alien bees
  • alienbee
  • alienbees
  • alternative
  • ambient
  • ambient light
  • angle
  • aperture priority
  • APS-C
  • apsc
  • assignment
  • auto focus
  • auto white balance
  • autofocus
  • AWB
  • awl
  • back button focus
  • background
  • background blur
  • backlight
  • backlighting
  • backlit
  • bad behavior
  • bad photography
  • balance
  • bare flash
  • battery
  • BBF
  • beach
  • beams
  • beauty dish
  • bellagio
  • BFT
  • birthday
  • black
  • black foamie thing
  • black rapid
  • blackrapid
  • blogs
  • blower
  • blown
  • blur
  • bokeh
  • bounce
  • bounce card
  • bounce flash
  • bower
  • bracket
  • brightness
  • brilliance
  • brolly grip
  • brother
  • build
  • burst mode
  • butterflies
  • butterfly
  • C.Fn
  • cable
  • cake
  • camera
  • camera bag
  • camera releases
  • camera settings
  • candle
  • candlelight
  • canon
  • Canon 100mm Macro L IS
  • canon 200mm f28L
  • canon 24-105
  • canon 40 stm
  • canon 40mm f28 pancake
  • canon 50
  • canon 50 1.4
  • canon 55-250
  • canon 5d mark 2
  • canon 5d mark ii
  • canon 5d mark iii
  • canon 5d2
  • canon 5d3
  • Canon 60d
  • canon 6d
  • canon g11
  • canon speedlite
  • car
  • carbon fiber
  • catch lights
  • cheap
  • christmas
  • clean
  • cleaning
  • clipped
  • clipping
  • close up
  • clouds
  • cls
  • clustered
  • color
  • compact
  • comparison
  • composition
  • compositional aid
  • construction
  • contrast
  • cooler master
  • copyright
  • core i7
  • cowboy
  • cowboystudio
  • cpl
  • creepy
  • crop factor
  • crop sensor
  • cyber commander
  • cybersync
  • d-lux
  • d-lux5
  • d3
  • d300
  • D5100
  • D600
  • d70
  • d700
  • D7100
  • d90
  • dark background
  • david hobby
  • daylight
  • dell 24 inch
  • depth of field
  • desert
  • diamond
  • digital
  • directional
  • distance
  • diy
  • dlux
  • dlux5
  • dng
  • double
  • dslr
  • DSLR bag
  • dual
  • dust
  • dx
  • dynamic range
  • earthquake
  • ebay
  • ebay trigger
  • eclipse
  • editing
  • EF 40mm f/2.8
  • ef-s 60mm
  • einstein
  • Electro GN
  • engagement
  • environmental portrait
  • ep5
  • equipment
  • ETTL
  • ettr
  • europe
  • events
  • evf
  • ex600
  • existing light
  • expensive
  • exposing to the right
  • exposure
  • f/3.5
  • family
  • faq
  • fasten-r3
  • favorite
  • fayoum
  • Fayoum desert
  • fill
  • fill light
  • film
  • filter
  • finepix
  • fire
  • fireplace
  • first impressions
  • fish-eye
  • fisheye
  • fix
  • FL600R
  • flash
  • flash bounce
  • flash sync
  • flash trigger
  • flashmeter
  • flashright
  • focal length
  • focus
  • food
  • football
  • fotodiox
  • fountain
  • freexwire
  • fuji
  • fujifilm
  • Full Frame
  • fun
  • fx
  • galaxy s 3
  • galaxy s4
  • gecko
  • GeForce gtx570 OC
  • gel
  • geomag
  • ggs
  • ghost
  • gigabyte z77 ud3h
  • glass
  • gn
  • Goodbye
  • gorillapod
  • gregg
  • grid
  • grip
  • group shot
  • gskill ripjaws
  • guide
  • guide number
  • gx7
  • haf 912
  • handheld
  • hands on
  • hands-on
  • hdr
  • head shot
  • hiatus
  • high dynamic range
  • high iso
  • high speed sync
  • highlight
  • highlights
  • histogram
  • holder
  • holiday
  • home
  • home made
  • Honda civic
  • honeycomb
  • hotshoe
  • hoya
  • humor
  • i9500
  • id
  • image quality
  • impressions
  • indoor flash
  • infrared
  • infringement
  • insects
  • inverse square law
  • japan
  • jewel
  • jewelry
  • joby head
  • jpeg
  • Kingston hyperX SSD
  • kirk tuck
  • kl bird park
  • krakow
  • kuala lumpur
  • las vegas
  • lastolite
  • laurence kim
  • lax
  • lcd
  • leica
  • lens
  • lens cap
  • lens compression
  • lens review
  • lenses
  • lenspen
  • lensrentals
  • light
  • light painting
  • lighting
  • lightroom
  • lightroom 4
  • lightroom 5
  • location
  • long
  • long exposure
  • los angeles
  • low key
  • low light
  • Lowepro
  • Lowepro 45aw
  • Lowepro 55aw
  • lr4
  • lumiquest softbox III
  • lumix
  • lx-5
  • lx5
  • m4/3
  • m43
  • macro
  • macro adapter
  • makernotes
  • malaysia
  • manfrotto
  • manfrotto tripod
  • manual
  • mark ii
  • mark iii
  • MFT
  • mft. micro four thirds
  • micro four thirds
  • mielec
  • migration
  • mini review
  • mirror
  • mirror-less
  • mirrorless
  • mobile
  • modification
  • modifier
  • monobloc
  • monoblock
  • monolight
  • motion
  • motion blur
  • multi function printer
  • multiple
  • nano crystal
  • natural light
  • neil
  • Neil VN
  • niekerk
  • nikkor
  • nikon
  • nikon d600
  • noise
  • off camera
  • oil
  • olympus
  • olympus 12-50
  • Olympus 40-150
  • olympus 45
  • olympus 45 18
  • olympus om-d em-5
  • om-d
  • omd
  • omd em1
  • omd em5
  • omd em6
  • on-camera
  • one inch
  • overexposure
  • overpowering sun
  • panasonic
  • panasonic leica 25 14
  • pancake
  • party
  • passport
  • pastries
  • pastry
  • pc
  • pentax
  • peter
  • phone
  • phone photography
  • photo
  • photo tips
  • photography
  • photokina
  • photomerge
  • photoshop
  • photoshop elements
  • planning
  • pocketwizard
  • point and shoot
  • poland
  • polarizer
  • popup
  • popup flash
  • portrait
  • post processing
  • post-processing
  • postprocessing
  • product
  • product shots
  • profile
  • protection
  • protector
  • quad-flash
  • quantum
  • radiopopper
  • raid 0
  • Range finder
  • raw
  • raw editing
  • raw+jpeg
  • rays
  • real
  • recovery
  • reflection
  • reflector
  • resources
  • restaurant
  • review
  • rf-603
  • rf603
  • ricoh
  • ring
  • ringflash
  • robin wong
  • roger cicala
  • rogue
  • rokinon
  • roll off
  • roll-off
  • rolloff
  • rs-5
  • rs-7
  • rumors
  • s5
  • s5 pro
  • s5pro
  • samples
  • samsung
  • samyang
  • sb-26
  • sb-80
  • sb26
  • sb800
  • screen protector
  • sensor
  • sensor swab
  • sensorclear
  • sensorklean
  • sensorklear
  • separation
  • shadow
  • shadow pulling
  • shadows
  • shards
  • sharpening
  • sharpness
  • shoot through
  • shoot-through
  • shoot-thru
  • shooting technique
  • shootout
  • short
  • sigma
  • sigma 50-150
  • skin tones
  • skylight
  • Slik Mini Tripod
  • slingshot
  • slow
  • small
  • smooth
  • soft
  • softbox
  • sony
  • sony a99
  • sony rx100
  • sony t10
  • specular
  • speed
  • speedlight
  • speedlite
  • spinlight
  • spots
  • standard
  • stockholm
  • story
  • strap
  • strobe
  • strobist
  • studio
  • studio strobe
  • subject
  • substitute
  • sudden
  • summilux
  • sunrise
  • sunset
  • sweden
  • swivel
  • sync speed
  • t2i
  • t3i
  • Table top tripod
  • tamron
  • technique
  • techniques
  • tele
  • telephoto
  • thinktank retrospective 5
  • third party
  • tips
  • tokina
  • tonal
  • tonality
  • tone curve
  • toploader
  • toys
  • translucent
  • travel photography
  • tri-flash
  • Tribute
  • trifold
  • trigger
  • tripod
  • truth
  • ttl
  • TTL Cord
  • u43
  • ultra-wide
  • ultrawide
  • umbrella
  • underexposure
  • unlimited sync speed
  • up-rise
  • up-rise 15z
  • update
  • uprise
  • USM
  • uv
  • uwa
  • vanguard
  • versus
  • vertical
  • video
  • view nx2
  • visual science lab
  • vs
  • wadi rayan
  • wd caviar black
  • web
  • weekend
  • westin
  • white balance
  • white lightning
  • wide
  • wide angle
  • window
  • wireless
  • wireless flash
  • wireless release
  • wireless trigger
  • workflow
  • Yashica
  • yashica gtn
  • yashica st-7
  • yn-560
  • yn-560ex
  • yn-ex600
  • yn560
  • yong nuo
  • yongnuo
  • zack arias
  • zoom
  • zoom toploader
  • zuiko

Blog Archive

  • ▼  2013 (165)
    • ▼  December (5)
      • Olympus E-PL3 with 14-42 Lens $199; Moving from Ni...
      • Sigma 18-35 1.8 Revisited; Where to Get It
      • Speedlight Modifiers - 50% discount at Fotodiox
      • Olympus M.Zuiko 45mm f/1.8 Mini Review
      • Evening Portraits with Flash
    • ►  November (10)
    • ►  October (8)
    • ►  September (7)
    • ►  August (3)
    • ►  July (11)
    • ►  June (10)
    • ►  May (15)
    • ►  April (19)
    • ►  March (33)
    • ►  February (24)
    • ►  January (20)
  • ►  2012 (193)
    • ►  December (17)
    • ►  November (22)
    • ►  October (34)
    • ►  September (47)
    • ►  August (12)
    • ►  July (11)
    • ►  June (10)
    • ►  May (13)
    • ►  April (13)
    • ►  March (8)
    • ►  February (1)
    • ►  January (5)
  • ►  2011 (141)
    • ►  December (8)
    • ►  November (8)
    • ►  October (7)
    • ►  September (9)
    • ►  August (13)
    • ►  July (13)
    • ►  June (19)
    • ►  May (17)
    • ►  April (25)
    • ►  March (22)
Powered by Blogger.

About Me

Unknown
View my complete profile