Better Family Photos

  • Subscribe to our RSS feed.
  • Twitter
  • StumbleUpon
  • Reddit
  • Facebook
  • Digg
Showing posts with label portrait. Show all posts

Monday, 14 January 2013

Faces!

Posted on 15:24 by Unknown
You Serious?
 
This was a fun project, my friend which you see above showed me a portrait for a bearded man with lots of face details and wrinkles, and wanted to imitate the picture, so we gathered along with my brother and played a little with lights, hit the jump for more details.
 
I knew we would not be able create the exact same look becuase we didn't have enough time nor enough light modifiers to pull it off, but we did our best.
 
Rocky Balboa
 
For equipment we had three speedlites (580EX, 600EX-RT & YN-560 II, first two flashes were mine one day), three YN RF-603 wireless triggers, however we ended up using just 2 lights.
 
The camera was a Canon 60D and we used the 200mm f/2.8L (used to be mine as well), it was too long for indoor use (320mm equivalent), but we wanted to use it, especially that we had a very small black cardboard for the background.
 
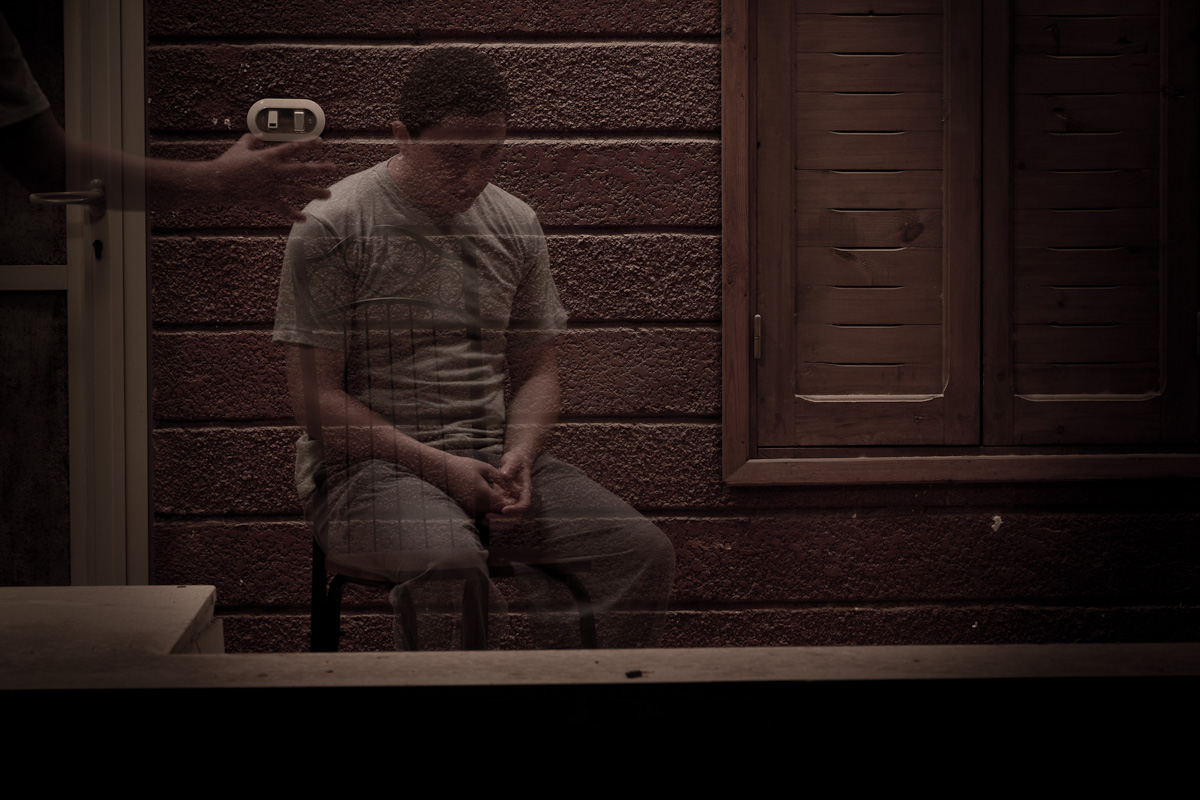
Lighting was quite simple, we started by killing the ambient in manual mode, exposure was 1/250, f/11, ISO 200. Key light was a bare flash with the full Rogue Grid, high and 20 degrees camera left, you can easily figure out its position if you connect the shadow of the nose tip to the nose tip itself in the opening picture, flash power was 1/64, then for fill, I used a shoot through umbrella, camera right and almost on axis, then we tried several power settings until we were satisfied with what we got, I believe it was 1/32 power, but it was much less effective than the key because of the umbrella and the distance.
 
Serial Killer
 
Post processing was fairly simple, we intended to shoot in B&W from the beginning, so I took the RAW files into LR, hit the B&W button in the colors panel, opened up the skin tones a bit (targeted dropper for saturation, then moved the mouse wheel upwards), added contrast and blacks, increased the clarity quite a bit, and finally used the adjustment brush to decrease the highlights and exposure at the surroundings of the face.
 
That's all, not bad for a couple of hours of fun, what do you think?
 
Astonished
Posted with BlogsyPosted with Blogsy
Read More
Posted in black, canon, canon 200mm f28L, Canon 60d, dark background, head shot, low key, portrait | No comments

Monday, 23 July 2012

Formal Portraits with a Flashmeter

Posted on 03:17 by Unknown
Over the weekend I had the opportunity to take portraits for two beautiful families.  I'll discuss the lighting setup as well as the equipment I used, including the Paul C. Buff CyberCommander, which not only controls Paul Buff strobes but also functions as a flashmeter.


My friend asked me to take her daughter's graduation portrait.  It turned out that the official photographer for their school took everyone's photos but omitted the cap.  They wanted to charge extra for another portrait session with the cap.  This irked my friend (rightly so, in my opinion) and she asked if I could instead take her daughter's portrait.

SETUP: LIGHTS and LENS
The shot was to be taken indoors in an area about 10 ft. x 10 ft, with a ceiling height of about 8 ft.  Because this was intended to be a formal portrait, I wanted to use a traditional setup with key light, fill light, hair light, and background light:
  • Key light - this is the primary light on the subject and creates the pattern of highlights and shadows.
  • Fill light - this light illuminates the shadows created by the key light.  Depending on its position, it often also contributes to the illumination on the subject.
  • Hair light - this light helps separate the subject from the background and is usually placed above and behind the subject.
  • Background light - illuminates the background.  Adds separation.
I wanted to create a very softly-lit (not edgy) portrait.  For my key, I used a 43-inch umbrellabox / softbrella (it looks like a reflective umbrella but with a diffusion sock, thus somewhat resembling a round softbox) with an SB-800.  The umbrellabox has a more controlled light compared to a shoot-through umbrella, though not as controlled as a beauty dish.  I didn't think we would have a lot of time to shoot, so I positioned the key light for maximum flexibility, about 3 feet above the camera, slightly to camera left, mounting it on a Linco 8310 light stand.

For the fill light, I wanted it to be as soft as possible so as not to create its own shadows.  I chose a 60-inch shoot-through umbrella, positioned slightly to camera right, at about the camera's height.  To illuminate this large light source evenly, I used an AlienBee B1600 monobloc, also mounted on a Linco 8310 light stand.

For the hair light, I used a Nikon SB-800.  To position it above and behind the subject without the stand being seen in the shot, I used a boom stand.  Because the hair light was going to be pointed somewhat toward the camera's direction, I didn't want it to create flare which would reduce the contrast or create ghosting therefore I used a honeycomb grid on the SB-800.

For the background light, I used an old Nikon SB-26, which I just placed on the floor, aimed at the 5 ft x 7 ft popup background.  I varied the intensity between the shots to achieve different effects.

Here's what the setup looked like.


For my lens, I chose a telephoto lens to have a smaller field of view so that I wouldn't capture the area outside the pop-up background, and I could shoot in between the light stands without the stands or umbrellas being in the shot.  I used the Nikkor 70-200 VR with the Nikon D90.

USING THE FLASHMETER
Because this was a formal portrait, I wanted to be very precise with the exposure.  To do that, I used a flashmeter.  I don't have a dedicated flashmeter.  Instead I use the flashmeter function of the Paul C. Buff CyberCommander, the dedicated radio trigger for Paul Buff strobes.

About the CyberCommander
Besides being able to remotely adjust Paul Buff strobes, the CC has several awesome features to make setting up very convenient.  First, it can control up to 16 different light sources.  When you tell the CC which light source(s) you're using (Einstein, X3200, B1600, ABR800 or whatever), it will know the output range (in watt-seconds), flash duration (which varies with power), and color temperature (which in the case of non-Einstein monoblocs, can vary quite a bit with power level).  Each light source can be assigned specific names such as fill light, background light, etc. 

The CC has a built-in flashmeter to allow you to take measurements in 10ths of a stop.  If the setting is not where you want it, you can remotely adjust the power level (and even the modeling light output of any light source) - all while remaining at the subject's position.  Plus you can measure and adjust any single light source or any combination of lights.  There are several remote adjustment options out there, just as there are several flashmeters available, but having the two together makes it extremely convenient to set up lights.

BTW, did I mention you can also use the CC as an incident light meter?  OK, enough about the CC - you'll just have to wait for my review.  Back to our show.

Flashmeter
The primary benefit of a flashmeter is the precision of the exposure.  As we know, the camera's reflective meter can be fooled, and when using manual flash, can't be used at all.  Gauging the exposure from the image preview on the LCD screen is convenient but wildly inaccurate.  I often need to adjust exposure in postprocessing when I do that.  A step above that would be using the blinkies, which can help me avoid blowing out highlights (even then sometimes it's inaccurate), but it doesn't necessarily mean that the exposure is correct.  Finally, using the histogram to measure exposure can be misleading.

Besides nailing exposure, another benefit of a flashmeter is that I can set the lighting ratios more precisely.  In portraiture, the ratio of the key light to the fill light is very important and can determine the primary mood of the portrait.  Generally, the stronger the contrast between the intensity of the key and fill, the more dramatic and moody the portrait becomes.

To use the CC's flashmeter function, I just input the ISO and shutter speed I'm using.  I specify the light I'm measuring, aim the flashmeter dome, then press the button to take a measurement.  The flashmeter will indicate the aperture for the given ISO and shutter speed.  As for aiming the dome, there are varying opinions about this.  Some say to point the dome at the light source while others say to point it at the camera.  I'm not about to try to resolve that debate here.  In my case I positioned it at my chin and pointed it at the camera.

First I decided what aperture I wanted to use for the final shot.  I decided on an aperture of f/5.6.  An aperture of f/8 would have given me slightly better sharpness and a deeper depth of field but it would require the speedlights to work harder.  If the aperture had been wider, I was worried that the depth of field would not be enough to keep the entire head in focus, given the long focal lengths I was using.  I thought f/5.6 would be a reasonable compromise.

Having decided the aperture for the shot, I measured the fill light.  Initially, I decided to set it at f/4.0.  That meant that the shadow would be at f/4.0, i.e., one stop less than the subject's highlight at f/5.6, which means the ratio is 2:1.  I then adjusted the key light until my overall measurement (key + fill) was at f/5.6.  BTW, this meant that the key light by itself would have also been at f/4.0.  The highlights of the subject would be illuminated by both the fill light and the key light, bringing their exposure up to f/5.6.

As for the hair light and background light, they weren't linked to the CC, so I just had to adjust them by estimate.

RESULTS

First, I took shots of my friend's daughter.


We had time to take some shots of my friend.

They also asked if their neighbor could take a portrait.  I didn't expect this but I figured we could use the same setup.  After a few shots, I thought a white background would look better, so I just flipped the popup background and increased the intensity of the background light.

Finally, we took a few shots of their dogs.  The larger one posed like a champ.  The poor little one though was really scared of being high up on a chair.


OBSERVATIONS
Is having a flashmeter a necessity?  I don't believe so.  There are many situations when using one is not possible (e.g. events), and we do just fine after all.  On the other hand, for setup shots, having a flashmeter makes setting up faster and postprocessing simpler.

RELATED POSTS:
  • Lighting technique:
    • Intro to Basic Lighting for Family Photographers
    • Quality vs. Contrast: Soft Light Ain't All That
    • TTL vs. Manual Flash: a False Dilemma
    • Therapy for TTL Addiction: How to Use Manual Flash
  • Lenses: Sigma 50-150 is TIGHT and Controlling Depth of Field
  • AlienBees: Intro to Studio Strobes and Are you ready for AlienBees?
  • Old hotshoe flashes: Old School
  • Triggering options: Triggering Hotshoe Flashes and Remote Adjustment Radio Trigger Options
Read More
Posted in alien bee, alienbee, cyber commander, cybersync, flashmeter, lighting, portrait | No comments

Wednesday, 27 June 2012

Reflection Portrait

Posted on 04:34 by Unknown

This was a self-portrait that I took on a recent trip to Las Vegas.  It was much harder than I expected to get this shot but it was a useful exercise to practice lighting skills.  In this post, I will discuss the steps I took to get the final result.


Step 1: Concept
I had taken a portrait with the Bellagio fountains before (blogged here) and this time I wanted to try something a little different.
I thought of doing a portrait where the focus was ostensibly on the fountain while my reflection is captured as if unintentionally.

Step 2:  Composing the Shot
Here is what the window looked like:
(BTW, the shot above was made possible by the Fuji S5's incredible dynamic range.  The sun was blazing outside, and lighting in our room was very dim in comparison.  Nonetheless, the S5 was able to capture the relatively dark room, dark furniture, and TV screen while also capturing all the detail outside the window, including the sky.)

I positioned the camera on a tripod and framed the shot of the fountain.  For this shot, I used the Nikon D90 and Tokina 11-16 2.8.  For low light, the D90 is way better than the S5 in terms of noise, plus I don't really need the S5's extreme dynamic range for this shot.

Step 3: Ambient exposure
Next, I set the exposure for the ambient light of the fountain.  In this case, I set the shutter to a speed that was slow enough to capture some of the fountain's movement, but not so slow that the fountain would merely look like undefined mushy blur.  I initially narrowed the aperture to f/5.6 to get both deep enough depth of field and better sharpness (usually, lenses are sharper when stopped down from wide open).  At that aperture, ISO for the desired exposure would have been 800 - a little too high, in my opinion, for a setup shot.  So I changed the aperture to f/4.0 and ISO to 400.  That aperture might seem fairly wide for this kind of shot, but I was using a wide angle lens, so the depth of field would still be deep, and the Tokina 11-16 is sharp anyway at all apertures.

Step 4:  Adding flash
I setup the flash below the window sill, to simulate the light coming from the fountain.  The window sill would also block the reflection of the flash in the window.  I wanted to soften the light but I couldn't use the full umbrella (the reflection of which would be so large that it couldn't be blocked by the low window sill), so I tried a partially collapsed umbrella.

Even collapsed, the umbrella was still showing up in the reflection.  More importantly, it was spreading light everywhere, thus illuminating more of the furniture and floor around me, which were showing up as reflections.

I changed to a bare flash.  I also had to readjust the flash intensity.  I found that with bare flash, even 1/128 was too powerful, so I switched to TTL -3.0 FEC to minimize the flash intensity.  (On some flashes such as the SB-800, TTL can decrease the flash intensity to a lower threshold than manual.)
The flash and umbrella were now gone from the reflection, but the floor, furniture, and tripod's reflection were still quite visible.  The hard light of the flash from a low angle also created a horror-movie look.

To solve the horror-movie issue, I moved the flash off to the side.  It would still look plausibly from the fountain's light.  At the same time, since it was no longer directly under me, it looked less scary.

Step 5: Remove unwanted reflections.
I next wanted to work on minimizing unwanted reflections -- in this case, the furniture and tripod.  Windows are similar to specular surfaces like mirrors and shiny metals.  If you want a reflection to show up, light the object you want to be reflected (not the specular surface itself).  Conversely, if you don't want a reflection to show up, the unwanted object should be in shadow.

Here, I wanted the light from the flash to hit only me.  I didn't have a snoot or grid, so I just used a combination of the curtain and my camera bag to block the flash from illuminating the floor and furniture.  I also turned down the desk lamp at the back.  I also experimented with a higher shutter speed to reduce ambient to see whether any of the unwanted reflections were due to the room's light (as opposed to the flash).

The tripod's reflection was still showing up, so I did a little more experimentation on the flash's positioning and narrowing its beam so that it would illuminate only me.

Step 6: Taking the Shot
When I was satisfied with the reflections, I got ready for the shot.  After some trial and error, I got a decent shot.
This one had some reflections in the upper part of the frame.  The reflections were from the TV (my wife was still watching).  Fortunately, because the reflections were in a relatively uncluttered area of the frame, I knew it would be easy to clone them out.

BTW in the final shot, I also adjusted the exposure for ambient, changing to a faster shutter speed (1/6) to get more definition from the fountain.  I increased the ISO to 640 to compensate.

Step 7:  Post-processing.
In Lightroom, I did the usual adjustments to the tone curve and such.  I also brightened my reflection and warmed it up to make it look more similar to the color temperature of the fountain light.

Finally, I took the image to Photoshop Elements to clone out the the reflections from the TV.  Voila.  Here is the final result again.


Read More
Posted in bellagio, flash, fountain, glass, las vegas, lighting, mirror, portrait, reflection, specular, window | No comments

Tuesday, 27 March 2012

Ultrawide Portraits with the Sigma 10-20

Posted on 06:53 by Unknown
This is a hands-on review of the Sigma 10-20 f/4-5.6, an affordable ultrawide lens for crop sensor cameras.

This lens has been around for a couple of years and has already been reviewed in detail in several websites.  If you would like to know how about its sharpness, distortion, chromatic aberration and so forth, check these reviews:

  • DPReview including their lens comparison tool.
  • Photozone (Canon version here and Nikon version here)
  • Thom Hogan

Instead, this review will focus on what it's like to use this lens in the field, particularly for people photos.  In Part 1 of this post, we'll have a look at some of the ways an ultrawide can be used for shots of people.  In Part 2, we'll discuss some characteristics of ultrawides to make better use of them.  In Part 3, we'll talk about the Sigma 10-20.


BACKSTORY
Prior to getting the Sigma 10-20, I saw little need for an ultrawide lens.  I thought that an ultrawide would be more useful for real estate photography, architectural photography, landscapes, cityscapes, and special effects.  I, on the other hand, take photos of people 95% of the time.  With photos of people, it's generally a good idea to be several feet away from the subject, hence the popularity of focal lengths between 85 to 105mm as portrait lenses.  If the subject is too close to the lens, the subject's face will seem distorted or the nose will appear disproportionately large.  Using a wide lens was furthest from my mind for taking portraits.

Recently, I decided to get an ultrawide anyway to take establishing shots (the ones you take to set the scene).  Having gotten one, I started using it for people shots and found it to be both challenging and exciting.  Here are some of the reasons I love this lens for people shots.


I.  Why I Love An Ultrawide for People Shots

1.  In the Middle of the Action
With an ultrawide, you can (and probably should) get very close to the action, and not surprisingly, it makes the viewer feel like they are part of the action, not a passive observer.

In this shot, the viewer feels like he's in on the huddle (but the little girl seems to mind :) ).
In the shot above, I was only a couple of feet away from the kids.  If I had been using a normal focal length, I would have captured only the faces of the two girls in the middle.  And if I had stepped back to capture the group with the normal lens, the perspective would have been very different, and would have created a different feeling.


2.  Dramatic Shots.

As a general rule, wide angle lenses do not distort the subjects any more than do telephoto lenses.  The usual distortion that we associate with wide angle lenses is due to perspective distortion when the camera is thisclose to the subject, near objects seem even closer/larger, and far objects seem even farther/smaller.

However, ultrawide lenses do have distortion on their sides.  Rectilinear lenses (the kind of ultrawide where straight lines appear straight) tend to have sides that stretch to the edge of the frame.  Fisheye lenses tend to have sides that cause straight lines to bend around the middle of the frame.  Both kinds of ultrawides don't have a lot of distortion (if any) toward the middle of the frame.

The distortion from ultrawides is not a bad thing per se.  It's just something to be aware of and take advantage of.  One effect of the distortion is that it can make a shot look more dramatic.

Here is a shot of my son at an almost normal focal length (28mm on APS-C, 42mm equivalent):

And here is a swing shot at the same location at 10mm (15mm equivalent):

3.  Being Pulled Into the Scene
The stretching from a rectilinear wide angle lens tends to create leading lines to the middle of the frame, which can also give a sensation of pulling the viewer into the scene.

Come on up my rocket ship!

4.  Emphasize a Subject
With an ultrawide, you can get very close to a subject, emphasizing that subject among other potential subjects in the scene, even if they are at similar distances.


5.  Environmental Portraits
Well, duh. :)

II.  Ultrawide Quirks
Here are some of the things I've learned about using ultrawides.

  • As mentioned before, it's generally a good idea to get very close to the subject when using an ultrawide.  Yes, it can be a bit intrusive (as the little girl would attest), but I just do it really quickly.  If I can't (or don't want to) get that close myself, sometimes I thrust the camera closer and shoot blindly.
  • An ultrawide is very sensitive to tilting vertically and horizontally, and to a slightly less extent rotationally (around the z-axis).  When an ultrawide is used perfectly straight on, it doesn't have that much distortion except at the edges.  But when it's tilted vertically or horizontally, things get crazy real fast.  And if you think that's wild, just think of how much fun you can have when you combine tilting angles. :)
  • In my opinion, using an ultrawide requires a very deliberate artistic intention.  It's not something you can do with just your left brain (apologies to left-handed readers).  If you use it as an information-gathering tool ("getting it all in") rather than an artistic instrument, your shots may look very boring.
  • Because an ultrawide can capture so much of the scene (including the sun or other light sources), flare and ghosting are significant concerns.  Some lenses tend to be more flare-resistant than others.  I read on a forum that Zeiss lenses and lenses with fewer elements are more flare-resistant, but I have no experience about that so I can't confirm either way.
  • My cameras usually have dependable automatic exposure modes (P, A, S).  However, with an ultrawide, my cameras seem to underexpose more often (possibly because the shot includes much of the sky or overhead lights).  I just have to pay closer attention to exposure. 
10mm (15mm equivalent)


III. Sigma 10-20 f/4-5.6 EX DC HSM I got the Sigma 10-20 f/4-5.6 because it is one of the most affordable ultrawide lenses, and it has decent performance and a useful focal length range.

1. Build Quality.
The Sigma 10-20 has Sigma's "EX" designation, which means it has a higher build quality than their other lenses.  Although the Sigma 10-20 is not an expensive lens, it feels substantial and well-made.  It also has a metal mount.

2.  Focal Length.
I love the focal length range of this lens.  At its widest, the Sigma 10-20 is deep in ultrawide territory at 15mm equivalent.  I thought that the 15mm equivalent would be too wide for people photos, but I've been using it most often at its 10mm focal length and have occasionally wished it be even wider.  So, no, 10mm is not too wide.  On the other hand, at its longest, it is almost a normal lens (30mm equivalent) with none of the distortion usually associated with ultrawides.  It thus functions both as a specialty lens and a general purpose lens.
20mm
3.  Aperture Range.
The Sigma 10-20 is a slow lens with a variable aperture.  When used traditionally outdoors, the smallish aperture presents no issues.  When used indoors, it requires me to push the ISO to the camera's limit.  I honestly expected to use this lens primarily to take photos of scenery and locations, when I can use a tripod.  In retrospect, I would have found it useful to have a faster aperture, like that of the Tokina 11-16 f/2.8.  However, I find that I can sort of get away with slower shutter speeds because of the extreme wide angle, so it's not a dealbreaker.

4.  Focus speed and accuracy
With a wide angle lens, I have a fairly deep depth of field therefore focusing accuracy is not critical.  That said, I find that Sigma 10-20 focuses quickly enough that it doesn't interfere with getting the shot.  In terms of accuracy, I would say it focuses accurately, although sometimes I still get a slightly blurred subject because the shutter speed was too slow, or because the autofocus picked the wrong spot to focus on.

5.  Image quality
I find the Sigma 10-20 to be sharp.  The limiting factor in the sharpness of my images tends to be my slow shutter speed rather than the lens sharpness itself (evidenced by having sharp parts of the picture where there is not much motion).  One concern is flare resistance.  When the sun is in or near the frame, there is noticeable flare. Otherwise, I find flare resistance to be reasonable.


OTHER LENSES TO CONSIDER:

Crop sensor:
  • Tokina 12-24 f/4 - Sharper than Sigma 10-20 according to dpreview tests. Prone to flare and CA.  Has version I and version II.  Competitively priced.
  • Sigma 10-20 f/3.5 - Updated version of the Sigma 10-20 f/4-5.6.
  • Tamron 10-24 f/3.5-4.5 - Slightly wider aperture and longer reach.  When used wide open, the Sigma 10-20 is sharper.  But when the Tamron is stopped down to f/5.6, it is sharper at 10-15mm.  From 15mm to 20mm, the Sigma is sharper.  The Sigma 10-20 has less CA throughout.  Use the dpreview lens comparison tool to compare it with the Sigma 10-20.
  • Tamron 11-18 f/4.5-5.6
  • Tokina 11-16 2.8 - Among the sharpest lenses, even when used wide open, although prone to flare and CA.
  • Canon 10-22 - If I had a Canon, I would be very interested in this lens because of its flare resistance.
  • Nikon 12-24 f/4 - Nikon's first crop-sensor ultrawide.
  • Nikon 10-24 - Lower cost model released after the Nikon 12-24.
  • Sigma 8-16.  Currently the widest rectilinear lens for crop sensor cameras.  Very sharp.
Full frame:
  • Sigma 12-24.  Great focal length for full frame, but not that wide on a crop sensor.
  • Nikon 16-35, Nikon 17-35, Nikon 14-24 - They're out of my budget (for now ;) ).

CONCLUSION

Some photographers say that an ultrawide is the most challenging type of lens to use, and I tend to agree.  It definitely takes a lot of getting used to.  But with a little persistence I was rewarded with some shots that I could not have gotten with any other lens.


WHERE TO BUY
If you'd like to get a Sigma 10-20, you can support this blog by buying through these links to Amazon.  It will not increase your cost but you'll be helping us:
Sigma 10-20 4.5-5.6 for Nikon or Canon
Read More
Posted in 10-20, angle, environmental portrait, lens, portrait, sigma, ultra-wide, ultrawide, wide | No comments

Wednesday, 28 December 2011

Christmas Portrait On-Location

Posted on 19:20 by Unknown


We're sending our Christmas cards pretty late this year (it's now more like a Happy New Year card).  At least I'm pleased with the portrait that we finally got to do.  Rather than discuss the lighting itself, I want to talk about the shooting process.  (If you want to know about the lighting per se check out this post)  Here's how we put together this shot.


  1. Scope out the site beforehand.  I thought of a location for our family portrait.  Although we had been there before, I checked it out to see possible places to shoot our portrait and to note the sun's position.
  2. Have a plan.  I visualized our portrait and thought of the lighting equipment I would need to get the look I wanted.
  3. Test all equipment.  Before the day of the shoot, I made sure to test my equipment to confirm that they were functioning as expected.  I had been planning to use the Cyber Commander but I couldn't get it to trigger properly (will soon be posting how I resolved it).  Although I was disappointed, I was glad to find out then rather than on the field.  I switched to the Radiopopper JrX.
  4. Don't haul too much equipment.  Whenever I have a shooting session I often bring everything I can fit into a large storage chest so that I can address as many issues as possible.  Most of the time I don't use even half of the stuff I bring.  At the same time, hauling around the equipment is stressful not just physically but mentally, limiting my imagination for alternate locations (to avoid having to relocate the equipment).  This time I brought only what I needed, with only a few backups.  Worst case scenario?  Shoot ambient and fix it with postprocessing.
  5. Setup before the client gets there.  It usually takes me a while to set up the lights with care.  Meanwhile my wife has little patience and has to deal with two kids running around.  To avoid pressure, we planned for me to get to the location ahead of time and set everything up.  That worked very well and I was able to prepare at a relaxed pace even with my son looking around the area and asking lots of questions.  I looked for the best shooting angle, setup the tripod, took test shots, set my ambient exposure, adjusted my flash exposure, tinkered with the location of the lights.  By the time my wife and daughter got to the shoot, everything was ready and they just had to pose and smile.
  6. Be open to other possibilities.  Although I had a plan, I wasn't attached to it.  When I got to the location on the day of the shoot, I analyzed it with fresh eyes.  I saw that an alternate location would allow me to use the sun as a backlight/rimlight and I proceeded to create a new plan from there.
  7. Simple vs. Ambitious.  There were many techniques I wanted to try and I wanted to add fancy lighting effects.  In the past though that approach hasn't been easy and I wasn't able to execute the complex plan very well.  Instead I kept things simple.  Because the setup was so simple I was able to execute it very well, which freed my mind to focus on other things like facial expressions.
  8. Top-down vs. Bottom-up lighting.  Along the lines of having a simple plan, my plan wasn't built on eliminating ambient light and creating all the light sources I would need for a portrait that was designed according to my imagination.  Instead, I analyzed the ambient light first and because it was pretty good, I built my lighting plan around the existing light.
  9. Plan for merging group shots.  I took over 150 shots of us yet not one of those shots had us all with great expressions.  The fact is that when I'm not behind the camera I can't see everything, and it's virtually impossible to take a perfect portrait with kids.  Instead I just have to accept that I will need to merge faces.  To facilitate this, I take a background shot every time I move the tripod. I make the tripod as steady as possible (by hanging a bag off the hook for example) and I shoot a little wider than I want (for flexibility with cropping).
  10. Use manual focus mode.  Autofocus slows the camera down especially in challenging conditions such as strong backlight.  It's better to get the focus right then switch to manual focus so the camera won't have to take the time to autofocus.
  11. Vagabond II instead of Vagabond Mini.  For this shot I used a Vagabond Mini because it was lighter and I didn't need a lot of flash power.  However the Mini had a difficult time recycling the flash fast enough.  Note to self: use Vagabond II instead when I expect to take a lot of shots.

Equipment used:
  1. Nikon D300
  2. SanDisk UDMA CF Card. The fast CF card allowed me to take several shots in quick succession without worrying about locking up the camera.
  3. Tamron 17-50 VC.  I've come to rely on the very useful focal range of this lens.  I didn't need its fast 2.8 constant aperture on this occasion but it would have been there if I needed it for impromptu solo portraits with shallow depth of field.
  4. Linco light stand.  I love this light stand because of its extra wide base and sturdiness.
  5. Targus TG-P60T tripod.  This "cheap" tripod continues to serve me well.  It's not as rock-steady as "real" tripods but for my kind of photos (I rarely use long exposures) it works.
  6. Meike MK-RC7 remote shutter.  Performed perfectly on this shot.  No misses.  Hopefully it stays that way.
  7. AlienBees B1600.  Small and light relative to the amount of power it has.  Has always been very reliable.
  8. Radiopopper JrX Studio.  The most reliable radio trigger I have.
  9. Westcott 60" convertible shoot-through.  As long as it's not windy, it works well.
Thanks for visiting the blog.  We wish you and your family happiness throughout the new year! 

Read More
Posted in christmas, family, holiday, lighting, location, planning, portrait | No comments

Wednesday, 29 June 2011

Creepy Ghost Portrait

Posted on 15:16 by Unknown
Creepy Ghost Portrait

This photo would not be mistaken for being a better family photo, and I tend to agree, but at least it was a lot of fun to shoot, hit the jump for the full story.

I spent the past weekend on the beach shooting a lot, I will have a new post about a typical three light setup portrait using the Lastolite Ezybox as my key light. The photo you see above is one of the better photos we got, we were shooting in a very dark place with no one around for a long distance and it just occurred to us to create this creepy picture, here's how the surroundings looked like.

Dark & creepy surroundings, this must be where they write horror stories!  The lights you see on the building was a test we did for light painting

The setup was easy, camera on tripod in aperture priority mode, aperture = f/8 to get everything in focus. When I checked my histogram the picture looked too bright compared to the look I wanted to achieve, so I dialed the exposure down by one and two thirds of a stop until it looked good to me. No scientific measurement at all, just my eyes and the histogram.

It took several tries until to get the desired poses and to get the timing right. The resulting shutter speed was 13 seconds, so after several tries I decided to make my subjects stay still for 10 seconds then run out of the frame so that the background would start overwriting the subjects on the sensor for the remaining 3 seconds, thus giving them this faded look. Here's the original picture.

Original Picture, too much exposure and too much orange, I could even say it is quite cheerful. :-D

All the post processing was done in lightroom and in no more than 5 minutes, I increased the blacks, decreased the vibrance and the saturation, then added a post crop vignette and played with it's parameters for a while, then finally I decided to decrease the overall exposure by 0.2 stops. That's it, very simple and a different portrait that intrigued lots of my friends. Here's the final image again for your convenience, click it to see a larger version.

Final result, click to see a larger version
Read More
Posted in creepy, ghost, portrait | No comments

Thursday, 28 April 2011

Getting Directional Light Using Your Popup Flash

Posted on 00:47 by Unknown
 
 
Ever wondered if you can get good quality directional light from your DSLR's popup flash just like the big boys with external speedlites do? This is what we'll try to find today. Hit the jump for the details.

DISCLAIMER: If you feel this post is hastily made, then you're probably correct, I had only one hour to prepare the images and write the post because of time constraints, so excuse me, I will be revisiting this topic later on with more finesse.

Ever since I bought my first speedlite I wanted a Sto-Fen Omni Bounce diffuser, I had almost zero lighting knowledge back then and I thought this was how everyone used their external flash, but since we don't have great camera accessories shops in Egypt, all I was able to find was this strange looking thing:


Excuse the lousy quality of the pictures but I really had no time (available light, handheld, ISO 1600), anyway, as you can see, this diffuser has a translucent white material at the top part, the sides and the front part, while the back part which looks black from the outside is lined with a bumpy reflective silver material from the inside. I think I bought this contraption for less than $6, and I also think it is supposed to fit on the speedlite's head some way or another, but I was never able to find any use for it with my flashes and it sat gathering dust for a long time.

Then one day I had the idea of using it on my camera's popup flash to bounce light of walls, can it work? Does the popup flash have enough power to get through the diffusing material, bounce from the wall and back to the subject and still give acceptable exposure? I know that new sensors now can deal with ISO 1600 with almost no noise, but will this be enough?

 
I think my camera's popup flash  guide number is 13 or something, while the speedlites have guide numbers of 40 and more, but even then, I remember that in several situations my speedlite didn't need to use full power to successfully bounce and give me a good exposure. So to try this idea I started off with a high shutter speed to kill the ambient and see how the flash did on it's own, I even started with ISO 400 to challenge the flash even more. I will be using f/2.8 aperture throughout the post, needless to say, this whole article is talking about indoor shooting.

Base Exposure - f/2.8, 1/250 sec, ISO 400

Direct Flash - f/2.8, 1/250 sec, ISO 400
I forgot how ugly direct flash looks, I left that years ago when I sold my point & shoot, and no matter what I tried to do with the white balance I was never able to get any better results.

Directional Popup Flash - f/2.8, 1/250 sec, ISO 400
As you can see here, the picture looks way better than direct flash alone, I put the diffuser thing over my popup flash with the reflective material facing almost towards me but an angle to reflect on my right side. I also put my hand in front of the flash to prevent any stray direct flash from reaching my subject, but as you can see from the catch lights I was not 100% successful.

Directional Popup Flash - f/2.8, 1/250 sec, ISO 800
I was not getting enough light from the flash, so I pumped the ISO to 800 and the result looked even better. Next I wanted to try getting some ambient light to work in my favor, remember that in bounce flash situations we don't always get light by using the flash alone, we use it to enhance the available light, so I dialed my shutter speed to 1/160 sec and kept the ISO at 800.

Base Exposure - f/2.8, 1/160 sec, ISO 800

Directional Popup Flash - f/2.8, 1/160 sec, ISO 800
You can see even better results with the ambient light (fluorescent lamps) contributing to the exposure, and I was able to shield the direct flash with my hand better in this one.

You might be wondering by now why go through this hassle and not shoot available light directly, two reasons, first, for the sake of experimentation, I am a geek and I like to try things, and secondly, because it looks way better than overhead available light that throws ugly shadows, see for yourself.

Available Light Only

Popup Flash Diffused Light (and no, the difference is not in WB alone)
Anyway, to sum this up, I was very happy with the results and I will definitely return to this topic with more ideas, but because of the short time I have to end here, if you have any comments or ideas please share them, and excuse any typos, I didn't proof read this post.
Read More
Posted in directional, flash, light, popup, portrait | No comments
Older Posts Home
Subscribe to: Posts (Atom)

Popular Posts

  • Olympus E-PL3 with 14-42 Lens $199; Moving from Nikon to MFT?
    I saw on 43rumors.com that the Olympus E-PL3 was being sold at Newegg for just $199 with the 14-42 kit lens included.  I checked it out and...
  • Samyang 24 f/3.5 Tilt Shift Lens Now Available
    A seller on ebay ( bestpriceoptics ) is now selling the Samyang 24 f/3.5 tilt shift lens, in Canon and Nikon mounts, for $999 shipped.  This...
  • Double Camera Strap & BlackRapid RS-5 Review
    This is a review of two camera straps: - The first is a double camera strap that's -- let's be blunt -- a knockoff of the BlackRapid...
  • Exploring 3D Photography with the Loreo 3D Lens in a Cap
    When I hear of 3D photos or videos, my first impression is that it's gimmicky.  Interesting for one or two shots maybe and then after th...
  • Toys for the Big Kids: Speedlight Softbox
    In this post, we will have a look at a softbox for speedlights.  This post is part of a series that will cover equipment reviews for committ...
  • Going Crazy With Tripods
    My Tabletop Tripod Trio I love tripods, I go all soft and wobbly when I see attractive looking ones, so here is my story with tripods, inclu...
  • 2x Lowepro Review: Toploader Zoom 45 AW & 55 AW + Unraveling The SlipLock™ Mystery
    Left: Lowepro Toploader Zoom 55AW, Right: 45AW, Middle: Canon 60D + 15-85 Welcome to a new rare photography accessory review as I'd lik...
  • Canon Professional Network
    I didn't know about Canon Professional Network until Syl Arena recently blogged about his 4-part article on speedlites.  I took a look ...
  • Minimizing Nikon D5200 and D7100 banding; Mysteries Remain
    Many people have noted that the Nikon D5200 and Nikon D7100 have banding in the shadows when the exposure is pushed.  In this post I'll ...
  • Nikon 28 1.8G: Moody Artist?
    When Nikon had its recently-finished sale (now extended to end of March), the one lens that I considered buying was the Nikkor 28 1.8G.  To...

Categories

  • "alien bee"
  • "april fool's"
  • "ring flash"
  • "yong nuo"
  • 1"
  • 1/1.7"
  • 10-17
  • 10-20
  • 11-16
  • 15-85mm
  • 15z
  • 17-50 vc
  • 190cx pro3
  • 2.8
  • 2.8G
  • 2/3"
  • 200 f2.8
  • 200 L
  • 200mm
  • 200mm f/2.8
  • 200mm f/2.8 L II
  • 200mm f2.8
  • 200mm f28
  • 200mm f28 L II
  • 2012
  • 2013
  • 23 Samsung led
  • 24-105 f4
  • 24-70
  • 25 1.4
  • 28-105
  • 28-70
  • 35mm
  • 35mm f/2
  • 35mm f2
  • 360
  • 3rd party
  • 4.1
  • 4/3
  • 40 pancake
  • 40 panckae
  • 40 stm
  • 40-150R
  • 40mm f/2.8
  • 430EX
  • 43rumors
  • 45 18
  • 45 AW
  • 4x4
  • 50 14
  • 50 f14
  • 50-150
  • 50mm
  • 50mm f/1.4
  • 55 AW
  • 55-250
  • 550D
  • 55aw
  • 560ex
  • 580 ex ii
  • 580EX
  • 580EX II
  • 5d
  • 5d mark 2
  • 5d mark 3
  • 5D Mark II
  • 5d mark iii
  • 5d2
  • 600d
  • 600ex-rt
  • 60d
  • 60fps
  • 60mm macro
  • 650d
  • 6d
  • 7.5mm
  • 720p
  • 75 f1.8
  • 85mm f1.8
  • 8x12
  • abbc
  • abstract
  • accuracy
  • active d-lighting
  • adjustment
  • adl
  • AF
  • af point
  • AF Point Expansion
  • aftermarket
  • airport
  • alexandria
  • alien bee
  • alien bees
  • alienbee
  • alienbees
  • alternative
  • ambient
  • ambient light
  • angle
  • aperture priority
  • APS-C
  • apsc
  • assignment
  • auto focus
  • auto white balance
  • autofocus
  • AWB
  • awl
  • back button focus
  • background
  • background blur
  • backlight
  • backlighting
  • backlit
  • bad behavior
  • bad photography
  • balance
  • bare flash
  • battery
  • BBF
  • beach
  • beams
  • beauty dish
  • bellagio
  • BFT
  • birthday
  • black
  • black foamie thing
  • black rapid
  • blackrapid
  • blogs
  • blower
  • blown
  • blur
  • bokeh
  • bounce
  • bounce card
  • bounce flash
  • bower
  • bracket
  • brightness
  • brilliance
  • brolly grip
  • brother
  • build
  • burst mode
  • butterflies
  • butterfly
  • C.Fn
  • cable
  • cake
  • camera
  • camera bag
  • camera releases
  • camera settings
  • candle
  • candlelight
  • canon
  • Canon 100mm Macro L IS
  • canon 200mm f28L
  • canon 24-105
  • canon 40 stm
  • canon 40mm f28 pancake
  • canon 50
  • canon 50 1.4
  • canon 55-250
  • canon 5d mark 2
  • canon 5d mark ii
  • canon 5d mark iii
  • canon 5d2
  • canon 5d3
  • Canon 60d
  • canon 6d
  • canon g11
  • canon speedlite
  • car
  • carbon fiber
  • catch lights
  • cheap
  • christmas
  • clean
  • cleaning
  • clipped
  • clipping
  • close up
  • clouds
  • cls
  • clustered
  • color
  • compact
  • comparison
  • composition
  • compositional aid
  • construction
  • contrast
  • cooler master
  • copyright
  • core i7
  • cowboy
  • cowboystudio
  • cpl
  • creepy
  • crop factor
  • crop sensor
  • cyber commander
  • cybersync
  • d-lux
  • d-lux5
  • d3
  • d300
  • D5100
  • D600
  • d70
  • d700
  • D7100
  • d90
  • dark background
  • david hobby
  • daylight
  • dell 24 inch
  • depth of field
  • desert
  • diamond
  • digital
  • directional
  • distance
  • diy
  • dlux
  • dlux5
  • dng
  • double
  • dslr
  • DSLR bag
  • dual
  • dust
  • dx
  • dynamic range
  • earthquake
  • ebay
  • ebay trigger
  • eclipse
  • editing
  • EF 40mm f/2.8
  • ef-s 60mm
  • einstein
  • Electro GN
  • engagement
  • environmental portrait
  • ep5
  • equipment
  • ETTL
  • ettr
  • europe
  • events
  • evf
  • ex600
  • existing light
  • expensive
  • exposing to the right
  • exposure
  • f/3.5
  • family
  • faq
  • fasten-r3
  • favorite
  • fayoum
  • Fayoum desert
  • fill
  • fill light
  • film
  • filter
  • finepix
  • fire
  • fireplace
  • first impressions
  • fish-eye
  • fisheye
  • fix
  • FL600R
  • flash
  • flash bounce
  • flash sync
  • flash trigger
  • flashmeter
  • flashright
  • focal length
  • focus
  • food
  • football
  • fotodiox
  • fountain
  • freexwire
  • fuji
  • fujifilm
  • Full Frame
  • fun
  • fx
  • galaxy s 3
  • galaxy s4
  • gecko
  • GeForce gtx570 OC
  • gel
  • geomag
  • ggs
  • ghost
  • gigabyte z77 ud3h
  • glass
  • gn
  • Goodbye
  • gorillapod
  • gregg
  • grid
  • grip
  • group shot
  • gskill ripjaws
  • guide
  • guide number
  • gx7
  • haf 912
  • handheld
  • hands on
  • hands-on
  • hdr
  • head shot
  • hiatus
  • high dynamic range
  • high iso
  • high speed sync
  • highlight
  • highlights
  • histogram
  • holder
  • holiday
  • home
  • home made
  • Honda civic
  • honeycomb
  • hotshoe
  • hoya
  • humor
  • i9500
  • id
  • image quality
  • impressions
  • indoor flash
  • infrared
  • infringement
  • insects
  • inverse square law
  • japan
  • jewel
  • jewelry
  • joby head
  • jpeg
  • Kingston hyperX SSD
  • kirk tuck
  • kl bird park
  • krakow
  • kuala lumpur
  • las vegas
  • lastolite
  • laurence kim
  • lax
  • lcd
  • leica
  • lens
  • lens cap
  • lens compression
  • lens review
  • lenses
  • lenspen
  • lensrentals
  • light
  • light painting
  • lighting
  • lightroom
  • lightroom 4
  • lightroom 5
  • location
  • long
  • long exposure
  • los angeles
  • low key
  • low light
  • Lowepro
  • Lowepro 45aw
  • Lowepro 55aw
  • lr4
  • lumiquest softbox III
  • lumix
  • lx-5
  • lx5
  • m4/3
  • m43
  • macro
  • macro adapter
  • makernotes
  • malaysia
  • manfrotto
  • manfrotto tripod
  • manual
  • mark ii
  • mark iii
  • MFT
  • mft. micro four thirds
  • micro four thirds
  • mielec
  • migration
  • mini review
  • mirror
  • mirror-less
  • mirrorless
  • mobile
  • modification
  • modifier
  • monobloc
  • monoblock
  • monolight
  • motion
  • motion blur
  • multi function printer
  • multiple
  • nano crystal
  • natural light
  • neil
  • Neil VN
  • niekerk
  • nikkor
  • nikon
  • nikon d600
  • noise
  • off camera
  • oil
  • olympus
  • olympus 12-50
  • Olympus 40-150
  • olympus 45
  • olympus 45 18
  • olympus om-d em-5
  • om-d
  • omd
  • omd em1
  • omd em5
  • omd em6
  • on-camera
  • one inch
  • overexposure
  • overpowering sun
  • panasonic
  • panasonic leica 25 14
  • pancake
  • party
  • passport
  • pastries
  • pastry
  • pc
  • pentax
  • peter
  • phone
  • phone photography
  • photo
  • photo tips
  • photography
  • photokina
  • photomerge
  • photoshop
  • photoshop elements
  • planning
  • pocketwizard
  • point and shoot
  • poland
  • polarizer
  • popup
  • popup flash
  • portrait
  • post processing
  • post-processing
  • postprocessing
  • product
  • product shots
  • profile
  • protection
  • protector
  • quad-flash
  • quantum
  • radiopopper
  • raid 0
  • Range finder
  • raw
  • raw editing
  • raw+jpeg
  • rays
  • real
  • recovery
  • reflection
  • reflector
  • resources
  • restaurant
  • review
  • rf-603
  • rf603
  • ricoh
  • ring
  • ringflash
  • robin wong
  • roger cicala
  • rogue
  • rokinon
  • roll off
  • roll-off
  • rolloff
  • rs-5
  • rs-7
  • rumors
  • s5
  • s5 pro
  • s5pro
  • samples
  • samsung
  • samyang
  • sb-26
  • sb-80
  • sb26
  • sb800
  • screen protector
  • sensor
  • sensor swab
  • sensorclear
  • sensorklean
  • sensorklear
  • separation
  • shadow
  • shadow pulling
  • shadows
  • shards
  • sharpening
  • sharpness
  • shoot through
  • shoot-through
  • shoot-thru
  • shooting technique
  • shootout
  • short
  • sigma
  • sigma 50-150
  • skin tones
  • skylight
  • Slik Mini Tripod
  • slingshot
  • slow
  • small
  • smooth
  • soft
  • softbox
  • sony
  • sony a99
  • sony rx100
  • sony t10
  • specular
  • speed
  • speedlight
  • speedlite
  • spinlight
  • spots
  • standard
  • stockholm
  • story
  • strap
  • strobe
  • strobist
  • studio
  • studio strobe
  • subject
  • substitute
  • sudden
  • summilux
  • sunrise
  • sunset
  • sweden
  • swivel
  • sync speed
  • t2i
  • t3i
  • Table top tripod
  • tamron
  • technique
  • techniques
  • tele
  • telephoto
  • thinktank retrospective 5
  • third party
  • tips
  • tokina
  • tonal
  • tonality
  • tone curve
  • toploader
  • toys
  • translucent
  • travel photography
  • tri-flash
  • Tribute
  • trifold
  • trigger
  • tripod
  • truth
  • ttl
  • TTL Cord
  • u43
  • ultra-wide
  • ultrawide
  • umbrella
  • underexposure
  • unlimited sync speed
  • up-rise
  • up-rise 15z
  • update
  • uprise
  • USM
  • uv
  • uwa
  • vanguard
  • versus
  • vertical
  • video
  • view nx2
  • visual science lab
  • vs
  • wadi rayan
  • wd caviar black
  • web
  • weekend
  • westin
  • white balance
  • white lightning
  • wide
  • wide angle
  • window
  • wireless
  • wireless flash
  • wireless release
  • wireless trigger
  • workflow
  • Yashica
  • yashica gtn
  • yashica st-7
  • yn-560
  • yn-560ex
  • yn-ex600
  • yn560
  • yong nuo
  • yongnuo
  • zack arias
  • zoom
  • zoom toploader
  • zuiko

Blog Archive

  • ▼  2013 (165)
    • ▼  December (5)
      • Olympus E-PL3 with 14-42 Lens $199; Moving from Ni...
      • Sigma 18-35 1.8 Revisited; Where to Get It
      • Speedlight Modifiers - 50% discount at Fotodiox
      • Olympus M.Zuiko 45mm f/1.8 Mini Review
      • Evening Portraits with Flash
    • ►  November (10)
    • ►  October (8)
    • ►  September (7)
    • ►  August (3)
    • ►  July (11)
    • ►  June (10)
    • ►  May (15)
    • ►  April (19)
    • ►  March (33)
    • ►  February (24)
    • ►  January (20)
  • ►  2012 (193)
    • ►  December (17)
    • ►  November (22)
    • ►  October (34)
    • ►  September (47)
    • ►  August (12)
    • ►  July (11)
    • ►  June (10)
    • ►  May (13)
    • ►  April (13)
    • ►  March (8)
    • ►  February (1)
    • ►  January (5)
  • ►  2011 (141)
    • ►  December (8)
    • ►  November (8)
    • ►  October (7)
    • ►  September (9)
    • ►  August (13)
    • ►  July (13)
    • ►  June (19)
    • ►  May (17)
    • ►  April (25)
    • ►  March (22)
Powered by Blogger.

About Me

Unknown
View my complete profile