Better Family Photos

  • Subscribe to our RSS feed.
  • Twitter
  • StumbleUpon
  • Reddit
  • Facebook
  • Digg
Showing posts with label diy. Show all posts

Tuesday, 19 November 2013

Yongnuo RF-603 + Olympus OM-D: Reloaded

Posted on 11:11 by Unknown

Do you remember my RF-603 modification post? In that post I was able to modify my Canon version of the Yongnuou RF-603 trigger to make it work with my Olympus camera to trigger external flashes.

Now thanks to member Earlack and his post in this dpreview thread, I was able to further modify the camera cable of the triggers so that they can also wirelessly trigger my camera. Full details after the jump.

Below is a typical YN RF-603 kit, except that there is another transceiver. I have bought two kits, so I have four transceivers in total. With these, I can trigger up to three external flashes, and I can even trigger the camera (from one of the other triggers) using the supplied cable, however, this cable has only a Canon connector, and Yongnuo doesn't sell cables with the Olympus USB connector.

This brings us to the modification, thanks to dpreview member mentioned above, I did exactly what he did, and instead of buying a USB connector and connecting it, I bought the cheapest wired trigger for Olympus I could find, the one shown in the opening picture.


Here's the Olympus USB connector, this is what I bought the intervalometer for, to salvage the USB connector (don't feel sad for the intervalometer, I have a much better one, with an on-off switch, not fully-on-until-the-battery-runs-out like this one).


Operation begins by cutting the two ends of the RF-603 cable, and the intervalometer. Thankfully, they both have the same color code.


I connected both whites together, red with yellow and yellow with red, the picture below is not the final one, just roughly made for demonstration.
 
 
 Once done and tested, I insulated each of the wires separately.
 

And because I didn't have a good black sealing tape, I used Gaffer's tape to hold both ends of the cable together. I will be removing the ugly looking tape and using a more elegant solution.


And it works, however not fully as expected, the half-press doesn't do anything, and only a full press initiates the focus and triggers the shutter, but I don't mind since most probably, when remotely triggering the camera as such, I will use fixed focus. In case you're wondering, it doesn't matter if the RF-603 is mounted to the camera hot-shoe or not, and I also tried connecting the reds and yellows together, but when I tested it, the camera had the shutter "half-pressed" all the time.

This modification will give me two important uses:
  1. I can trigger the camera wirelessly, useful for group photos, self photos, camera positioned far away (on a pole for example with a fisheye for a unique perspective).
  2. I can trigger both the camera and flash together, for example if I'm light painting a large area with flash, I can leave the camera on the tripod, and take the flash with me and point it at different areas of the photo, and every time I trigger the flash, the camera will snap a picture. How cool is that?

Finally, all these pictures were shot handheld with the OM-D and the 12-50 lens in macro mode, ISO 3200, shutter speeds ~ 1/10 to 1/20 seconds, ACR standard noise reduction.


RELATED POSTS

Yongnuo RF-603 + Olympus OM-D

Read More
Posted in cable, diy, fix, modification, olympus, olympus om-d em-5, om-d, omd, rf-603, rf603, wireless release, wireless trigger, yongnuo | No comments

Sunday, 8 July 2012

Testing the DIY Spinlight

Posted on 20:04 by Unknown

Recently, we posted about a DIY alternative to the Black Foamie Thing and Spinlight 360 using a Flashright Pro.  What you see above is yet another such DIY alternative.  This one was posted on the Strobist Flickr forum by photographer David Huy.

Hit the jump to see how I assembled mine, and how it performs against the modified Flashright.

COMPONENTS
The "DIY Spinlight 360" uses the following parts:

  • Flex mount flash gun adapter.  Variously branded as K-8, Interfit, and Strobies.  There is a specific adapter for the most common flashes.  For example, for the SB-800, the K-8 branded flex-mount adapter is the CA-1 model.  Available on ebay.  Some are white, some are black.  As low as $9.99
  • Honeycomb grid.  This is the matching grid for the flex mount above.  To my knowledge, the grid is the same for all types of flex mount.  Available on ebay (a bit harder to search for because of the variety of names used, including honeycomb, honey-comb, and grid).  As low as $11.99.
  • Optional: dome diffuser.  This is similar to the type of dome used for Gary Fong's lightsphere.  Available on ebay.  As low as $1.99.  I didn't attach a diffuser to mine.
  • black foamie thing (BFT).
I removed the grid on the honeycomb grid accessory, leaving just the outer frame.  Strictly speaking, you don't have to do this, but if you leave the grid on, the grid will eat up a lot of the light.


Removing the grid is not easy.  The grid's frame is held together by three clips, equally spaced apart:

In addition, there are three tabs that fit into three corresponding holes on the other part of the frame.

To disassemble the frame, I held the lip of the frame and pushed against the edges of the honeycomb until the frame started to separate.  Before disassembling the grid, I didn't know about the tabs so I tried to pry one side open, which broke two of the tabs.


Once the frame is separated, you can remove the grid and reassemble the grid's frame.  The frame attaches to the flex mount and rotates.  All you need to do is attach the BFT to the grid, and if you wish, a dome diffuser.


The flex mount itself is mounted to the flash head just by pressure and friction.  It's reasonably secure though I wouldn't dangle my flash by holding on to the flex mount.

IMAGE QUALITY
How does the DIY Spinlight 360 compare to the Flashright modification?  To me, they have almost identical performance in terms of light pattern and efficiency.  (The DIY Spinlight 360 seems to have a slight edge in efficiency.)


One subtle difference is that when aiming the flash to the rear corner, the Flashright mod may have a slightly lower lighting ratio (i.e. shadows are a bit brighter), possibly because a portion of the dome may not be entirely blocked by the BFT.  In the Flashright shot below, note the thin hard shadow below the jaw line - meaning that a second light source (in addition to the bounce) was illuminating the subject.


OTHER DIFFERENCES
Although I haven't tested them in the field, both the DIY Spinlight 360 and the Flashright Mod appear to work very well as replacements for the BFT and Spinlight 360.  If you are choosing between the two, here are some factors to consider:
  • Cost: the DIY Spinlight 360 can be had for about $21.99.  The Flashright Mod costs whatever the Flashright Pro costs (currently around $27 + shipping and handling with the 74PLEASE discount code).  I'm not sure though if the Flashright Pro discount will last.
  • Versatility: the Flashright Mod can be rotated to allow the dome to contribute to the exposure.  I suspect the same is true for the DIY Spinlight if you attach the dome diffuser, but I haven't tested it, and there may be a decrease in efficiency from the diffusion effect of the dome diffuser.   On the other hand, one benefit of the DIY Spinlight is that the flex mount can be used with other accessories that are produced for the flex mount, such as a globe, mini beauty dish, mini softbox, snoot, or barn doors.
  • Compatibility: the Flashright Mod can work with almost any speedlight.  The DIY Spinlight requires you to have the specific flex mount for your flash.  If you have another flash or are borrowing someone else's the flex mount might not fit.
  • Weight: the DIY Spinlight (part of which is made of a dense plastic/rubber) is much heavier than the Flashright Mod.  When the DIY Spinlight is mounted, it will make the flash a bit top heavy.  Sometimes, with a little movement, the flash head might not maintain a tilted angle.
  • Durability: I haven't tested the durability of either the DIY Spinlight or the Flashright Mod, but I think the DIY Spinlight would be more durable because it has a simpler design, and much of the flex mount is made of a plastic/synthetic rubber material.  It is not indestructible though -- its weakest part is likely to be the 4 small plastic clips that hold the grid frame.
  • Portability: the DIY Spinlight is larger than the Flashright Mod and will take up more space in your bag.
  • Speed: the DIY Spinlight is faster to attach and remove compared to the Flashright Mod.  All you need to do is push it on the flash head .  With the Flashright Mod, you need to use a velcro strap.
  • Stability: the DIY Spinlight is a snug fit on my flash but can be knocked off with moderate force.  By contrast, it is hard to remove the Flashright from the speedlight without undoing the velcro strap.
  • Ease of use: both the DIY Spinlight and Flashright Mod are easy to rotate, though I find the Flashright Mod slightly easier to rotate because you're turning a smallish dome compared to a wide ring with the DIY Spinlight 360.
  • Ease of construction:  FWIW, I think the Flashright Mod is easier to make because pulling apart the honeycomb grid for the DIY Spinlight is not easy.  Make sure no kids are around to hear you cussing.
  • Aesthetics: this is totally subjective but I think the Flashright Mod looks more sleek, elegant and high-tech than the DIY Spinlight though the rubber band (if you use one) can detract a bit from its appearance (maybe i'll use a black one).  I imagine the DIY Spinlight could look pretty cool too in black.
I will be switching between the DIY Spinlight and modified Flashright to test them both in the field, and will be updating these posts with my observations. (Note: the product shots for this post were taken with the Flashright mod.)
Read More
Posted in 360, alternative, BFT, black foamie thing, bounce, diy, flash, flashright, lighting, modification, neil, Neil VN, niekerk, spinlight | No comments

Wednesday, 18 May 2011

Flash Series - Part 2: Home Made (DIY) Gels & Gel Holder

Posted on 15:58 by Unknown

In this second part of the flash series (here's the first one) I will discuss home made gels and how do they perform in the real world, I might get a little philosophical (i.e. non-scientific) during the article, so please excuse me. Hit the jump for details and a bonus gel holder idea.

P.S. I wrote an introduction to white balance and color temperatures, but I found it to be too long, thus I have moved it to the bottom of the post, if you don't know what is a color temperature, read the bottom part first.

When I started my strobist path, I was hit in the face with the complete lack of gels in the photography shops in Egypt, and since I don't have a way to order and ship things from US (I do now, but it is expensive, so I leave it for urgent stuff) I had to look for DIY gel solutions, and after some looking around I found this amazing page where I downloaded my gel PDFs and was able to print them and use them. If you're living in the US you can get the ready made Rosco Strobist Gel Set for $9 instead.

The idea is that you have a PDF file with the main gel colors on it (you can make your own if you want), then you buy a laser transparency sheet and print these PDFs using a color laser printer, now you have a sheet with your gels ready, just cut them and find a way to put them in front of your flash head and you're ready to go. You can see my own set at the top of the post.

As far as endurance and heat resistance goes, I never had a problem in that regard. The laser transparencies I used are designed to handle the continuous heat from projector bulbs for extended periods of time, and although I have printed more than one sheet, I am still using the first one I printed.

DIY GELS SYNTHETIC TEST RESULTS

I have never used a real commercial gel on my flash, so I have no idea how they should perform. First, let me talk about tungsten white balance, there is no exact color temperature for tungsten, it depends heavily on the type of the bulb used and the furniture/walls the light reflects from. For example in my room the tungsten WB is around ~ 2200K, while in a different room in the house it is ~ 2650K, and my Canon camera considers tungsten WB to be 3200K, and lightroom has a different temperature!!!


So in order to determine what's what, I used my digital grey kard and tested the color temperatures in different lighting scenarios, my method involved shooting the grey card in RAW then importing the photos to lightroom and using the dropper to select the grey card and determine the correct white balance, here's what I found out:
  • Available light only (tungsten): 2650K
  • Direct flash with full CTO (zero ambient): 4500K
  • Bounce flash with full CTO (zero ambient): 4000K
As you can see, the full CTO doesn't bring the flash color temperature anywhere near the tungsten WB, so does this mean that they don't work? Let's see. Will the Rosco full CTO bring the flash WB to 2800K? I don't know, and if anyone can test this, please do and tell me.

DIY GELS REAL WORLD TEST RESULTS

In this part I will show you how these gels work for me in real life, then I will try to explain the results. When I finished shooting the pictures for this test I discovered that my camera was set on JPEG only and it was impossible for me to re-shoot the pictures or adjust the WB in post, fortunately enough I had the mind to set the WB to tungsten.

Available Light Only

Available Light + Bounce Flash (no gel), do you see the blue color cast?

Available Light + Bounce Flash (1/2 CTO), blue color cast still visible

Available Light + Bounce Flash (full CTO), a much better result


MY PHILOSOPHY:

I think the results speak about themselves, here's my own explanation (philosophy), first of all there is no certain defined white balance for each type of bulb or lighting, the light your camera picks comes from different sources, there is the direct light coming from the source hitting your subject, and there are a lot of other indirect reflections coming from lots of objects around your subject (ex. walls and furniture), these two reasons cause the color temperature to change from one place to another, even from a different position in the same room to another.

When you add bounce flash to the equation, you add a new non-controlled dimension, your flash will bounce from different surfaces and carry different color casts from these surfaces and will probably give you unexpected results. What's more is that when using bounce flash, one usually underexposes the ambient light by one or more stops, thus rendering the original ambient colors muted that it won't really have an apparent effect in the final picture.

Add to all of this the bless of using RAW files and the ability to change the white balance in post at will, and you have a pretty good way to get the results you desire. I almost always tweak the white balance in post processing and adjust it for the correct skin tones (you can use a digital card for a quick and easy adjustment), this adjustment won't have much effect on the rest of the picture (ambient lit) and even if it does, the ambient is already underexposed (muted) that it won't look bad.

In some rare situations when using bounce flash I get some strange color casts that I can't get rid of, my solution is to pull the saturation slider all the way to the left and have an artsy black and white picture.


DIY GEL HOLDER:

To continue with the DIY theme, I have made my own gel envelope (to carry the gels in) and a gel holder to mount the gels to the flash, I saw lots of different ones on the internet and I didn't like most of them, especially the velcro ones since it required me to stick velcro to my flash (which I didn't want to do back then) and will make me stick velcro to each and every gel, then in one of those brain-light moments I had the following idea.

I created a gel holder from the exact same transparency sheets that I used for printing gels, I cut it to size then bent it and pressed that bend with a ruler edge. To mount the gel holder to the flash I pull the diffuser slightly then insert the gel holder and push it with the diffuser, I think the pictures will explain it better.

This is an envelope created from cardboard to carry my gels in

DIY Gel Holder

DIY Gel Holder

Inserting the Gel Holder

Ready and Firing

This article took me a long time to write, so I hope it has been beneficial to you and I am ready to answer any questions you have. My next post will be a break from the flash series where I will discuss RAW vs JPEG, you wouldn't want to miss it. :-) 

__________________________________________________________________________________

INTRODUCTION TO WHITE BALANCE AND COLOR TEMPERATURES
 As you probably already know, each light source has a different color temperature, tungsten bulbs for example have a warm (more orange) color cast while the day light has a more cooler (more bluish) color temperature. Color temperatures are expressed in Kelvin, so for tungsten lights, the color temperature revolves around 2800K, while for day light it is more like 5200K.

What does this have to do with white balance? Imagine you have a white piece of paper and you're sitting in a room with tungsten lighting, when you take a picture with your camera the paper should look white, now if you take the same picture in a fluorescent lit room, the paper should still look white, are you getting my drift?

The white balance is the way you tell the camera that you are shooting in a certain light temperature, so it can correct the colors in the picture accordingly, otherwise the picture will have all the wrong colors, maybe with an orange tint, maybe with a blue color cast, so setting the correct white balance on the camera is very important to get correct looking skin tones.

SO WHAT DOES THIS HAVE TO DO WITH GELS?

Now you understand that when you're shooting in tungsten light you have to set your white balance to tungsten and so on, now imagine that you are using the flash in this same tungsten lit room, your picture would have a mix of warm color (tungsten ~ 2800K) and a cool color (flash ~ 5600K), it will look ugly with two color tones like many of the party pictures you see on facebook.

The solution to this is to change the color temperature of your flash to match the main light source (tungsten in our example), it is easier this way since you probably can't change the color temperature of your light source, the other reason is because the flash's color temperature is sort of neutral (white) where you can make it more warm or more cool by adding gels.

One of the very famous gels is the CTO gel, which is short for "Change To Orange", i.e. you will make the flash's color temperature warmer and closer to tungsten light, this way you can set your white balance to tungsten and use both the room light and the flash together without any strange color casts. Another less famous gel color is the CTS (Change To Straw) which is used by Neil VN, this one also changes the flash color temperature close to tungsten. There are a whole lot of gels like 1/2 CTO (less warm than full CTO) and CTG (changes flash temperature to match fluorescent light), and even other colors that can be used to have red or purple backgrounds or whatever, you are only limited by your imagination.

One final thing I want to mention before we dig into the gels is that a warm skin tone is usually preferred to a blue skin tone, that's why many photographers have a 1/4 or a 1/2 CTO gel on their main flash to get a slightly warmer skin tone even though they are only using flashes as their light source and don't have to color match something else.
__________________________________________________________________________________

RELATED POSTS:

Flash Series - Part 1: Canon Speedlites Chat (580EX II vs 580EX vs 430EX)
Read More
Posted in diy, flash, gel, holder, home made, speedlight, speedlite, strobe | No comments

Sunday, 8 May 2011

Easiest DIY Infrared Filter

Posted on 01:11 by Unknown

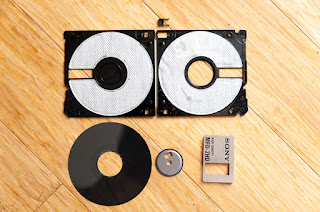
If you have a popup flash that can act as a wireless flash commander but want to block the popup from contributing to the exposure, there are a few options out there such as the Nikon SG-3IR infrared panel (which can also work for Canon with some modification).  You can also create your own infrared panel using negative film that has been exposed and developed.  But the easiest DIY version is to use a floppy disk.


It's a little hard to find a 5.25 inch diskette, but 3.5 inch disks can still be found every now and then.  Try thrift stores and dollar stores.  Once you find some, it's easy to take a disk apart even without tools.


What I then do is to fold the magnetic disk into half, then half again to 1/4th its original size, then wrap it around the popup flash with tape. Voila... an instant DIY infrared filter.


With this filter, the visible light from the popup flash will be reduced significantly, but you'll still be able to trigger other flashes optically.
Read More
Posted in diy, filter, infrared, popup flash | No comments
Older Posts Home
Subscribe to: Posts (Atom)

Popular Posts

  • Olympus E-PL3 with 14-42 Lens $199; Moving from Nikon to MFT?
    I saw on 43rumors.com that the Olympus E-PL3 was being sold at Newegg for just $199 with the 14-42 kit lens included.  I checked it out and...
  • Samyang 24 f/3.5 Tilt Shift Lens Now Available
    A seller on ebay ( bestpriceoptics ) is now selling the Samyang 24 f/3.5 tilt shift lens, in Canon and Nikon mounts, for $999 shipped.  This...
  • Double Camera Strap & BlackRapid RS-5 Review
    This is a review of two camera straps: - The first is a double camera strap that's -- let's be blunt -- a knockoff of the BlackRapid...
  • Exploring 3D Photography with the Loreo 3D Lens in a Cap
    When I hear of 3D photos or videos, my first impression is that it's gimmicky.  Interesting for one or two shots maybe and then after th...
  • Toys for the Big Kids: Speedlight Softbox
    In this post, we will have a look at a softbox for speedlights.  This post is part of a series that will cover equipment reviews for committ...
  • Going Crazy With Tripods
    My Tabletop Tripod Trio I love tripods, I go all soft and wobbly when I see attractive looking ones, so here is my story with tripods, inclu...
  • 2x Lowepro Review: Toploader Zoom 45 AW & 55 AW + Unraveling The SlipLock™ Mystery
    Left: Lowepro Toploader Zoom 55AW, Right: 45AW, Middle: Canon 60D + 15-85 Welcome to a new rare photography accessory review as I'd lik...
  • Canon Professional Network
    I didn't know about Canon Professional Network until Syl Arena recently blogged about his 4-part article on speedlites.  I took a look ...
  • Minimizing Nikon D5200 and D7100 banding; Mysteries Remain
    Many people have noted that the Nikon D5200 and Nikon D7100 have banding in the shadows when the exposure is pushed.  In this post I'll ...
  • Nikon 28 1.8G: Moody Artist?
    When Nikon had its recently-finished sale (now extended to end of March), the one lens that I considered buying was the Nikkor 28 1.8G.  To...

Categories

  • "alien bee"
  • "april fool's"
  • "ring flash"
  • "yong nuo"
  • 1"
  • 1/1.7"
  • 10-17
  • 10-20
  • 11-16
  • 15-85mm
  • 15z
  • 17-50 vc
  • 190cx pro3
  • 2.8
  • 2.8G
  • 2/3"
  • 200 f2.8
  • 200 L
  • 200mm
  • 200mm f/2.8
  • 200mm f/2.8 L II
  • 200mm f2.8
  • 200mm f28
  • 200mm f28 L II
  • 2012
  • 2013
  • 23 Samsung led
  • 24-105 f4
  • 24-70
  • 25 1.4
  • 28-105
  • 28-70
  • 35mm
  • 35mm f/2
  • 35mm f2
  • 360
  • 3rd party
  • 4.1
  • 4/3
  • 40 pancake
  • 40 panckae
  • 40 stm
  • 40-150R
  • 40mm f/2.8
  • 430EX
  • 43rumors
  • 45 18
  • 45 AW
  • 4x4
  • 50 14
  • 50 f14
  • 50-150
  • 50mm
  • 50mm f/1.4
  • 55 AW
  • 55-250
  • 550D
  • 55aw
  • 560ex
  • 580 ex ii
  • 580EX
  • 580EX II
  • 5d
  • 5d mark 2
  • 5d mark 3
  • 5D Mark II
  • 5d mark iii
  • 5d2
  • 600d
  • 600ex-rt
  • 60d
  • 60fps
  • 60mm macro
  • 650d
  • 6d
  • 7.5mm
  • 720p
  • 75 f1.8
  • 85mm f1.8
  • 8x12
  • abbc
  • abstract
  • accuracy
  • active d-lighting
  • adjustment
  • adl
  • AF
  • af point
  • AF Point Expansion
  • aftermarket
  • airport
  • alexandria
  • alien bee
  • alien bees
  • alienbee
  • alienbees
  • alternative
  • ambient
  • ambient light
  • angle
  • aperture priority
  • APS-C
  • apsc
  • assignment
  • auto focus
  • auto white balance
  • autofocus
  • AWB
  • awl
  • back button focus
  • background
  • background blur
  • backlight
  • backlighting
  • backlit
  • bad behavior
  • bad photography
  • balance
  • bare flash
  • battery
  • BBF
  • beach
  • beams
  • beauty dish
  • bellagio
  • BFT
  • birthday
  • black
  • black foamie thing
  • black rapid
  • blackrapid
  • blogs
  • blower
  • blown
  • blur
  • bokeh
  • bounce
  • bounce card
  • bounce flash
  • bower
  • bracket
  • brightness
  • brilliance
  • brolly grip
  • brother
  • build
  • burst mode
  • butterflies
  • butterfly
  • C.Fn
  • cable
  • cake
  • camera
  • camera bag
  • camera releases
  • camera settings
  • candle
  • candlelight
  • canon
  • Canon 100mm Macro L IS
  • canon 200mm f28L
  • canon 24-105
  • canon 40 stm
  • canon 40mm f28 pancake
  • canon 50
  • canon 50 1.4
  • canon 55-250
  • canon 5d mark 2
  • canon 5d mark ii
  • canon 5d mark iii
  • canon 5d2
  • canon 5d3
  • Canon 60d
  • canon 6d
  • canon g11
  • canon speedlite
  • car
  • carbon fiber
  • catch lights
  • cheap
  • christmas
  • clean
  • cleaning
  • clipped
  • clipping
  • close up
  • clouds
  • cls
  • clustered
  • color
  • compact
  • comparison
  • composition
  • compositional aid
  • construction
  • contrast
  • cooler master
  • copyright
  • core i7
  • cowboy
  • cowboystudio
  • cpl
  • creepy
  • crop factor
  • crop sensor
  • cyber commander
  • cybersync
  • d-lux
  • d-lux5
  • d3
  • d300
  • D5100
  • D600
  • d70
  • d700
  • D7100
  • d90
  • dark background
  • david hobby
  • daylight
  • dell 24 inch
  • depth of field
  • desert
  • diamond
  • digital
  • directional
  • distance
  • diy
  • dlux
  • dlux5
  • dng
  • double
  • dslr
  • DSLR bag
  • dual
  • dust
  • dx
  • dynamic range
  • earthquake
  • ebay
  • ebay trigger
  • eclipse
  • editing
  • EF 40mm f/2.8
  • ef-s 60mm
  • einstein
  • Electro GN
  • engagement
  • environmental portrait
  • ep5
  • equipment
  • ETTL
  • ettr
  • europe
  • events
  • evf
  • ex600
  • existing light
  • expensive
  • exposing to the right
  • exposure
  • f/3.5
  • family
  • faq
  • fasten-r3
  • favorite
  • fayoum
  • Fayoum desert
  • fill
  • fill light
  • film
  • filter
  • finepix
  • fire
  • fireplace
  • first impressions
  • fish-eye
  • fisheye
  • fix
  • FL600R
  • flash
  • flash bounce
  • flash sync
  • flash trigger
  • flashmeter
  • flashright
  • focal length
  • focus
  • food
  • football
  • fotodiox
  • fountain
  • freexwire
  • fuji
  • fujifilm
  • Full Frame
  • fun
  • fx
  • galaxy s 3
  • galaxy s4
  • gecko
  • GeForce gtx570 OC
  • gel
  • geomag
  • ggs
  • ghost
  • gigabyte z77 ud3h
  • glass
  • gn
  • Goodbye
  • gorillapod
  • gregg
  • grid
  • grip
  • group shot
  • gskill ripjaws
  • guide
  • guide number
  • gx7
  • haf 912
  • handheld
  • hands on
  • hands-on
  • hdr
  • head shot
  • hiatus
  • high dynamic range
  • high iso
  • high speed sync
  • highlight
  • highlights
  • histogram
  • holder
  • holiday
  • home
  • home made
  • Honda civic
  • honeycomb
  • hotshoe
  • hoya
  • humor
  • i9500
  • id
  • image quality
  • impressions
  • indoor flash
  • infrared
  • infringement
  • insects
  • inverse square law
  • japan
  • jewel
  • jewelry
  • joby head
  • jpeg
  • Kingston hyperX SSD
  • kirk tuck
  • kl bird park
  • krakow
  • kuala lumpur
  • las vegas
  • lastolite
  • laurence kim
  • lax
  • lcd
  • leica
  • lens
  • lens cap
  • lens compression
  • lens review
  • lenses
  • lenspen
  • lensrentals
  • light
  • light painting
  • lighting
  • lightroom
  • lightroom 4
  • lightroom 5
  • location
  • long
  • long exposure
  • los angeles
  • low key
  • low light
  • Lowepro
  • Lowepro 45aw
  • Lowepro 55aw
  • lr4
  • lumiquest softbox III
  • lumix
  • lx-5
  • lx5
  • m4/3
  • m43
  • macro
  • macro adapter
  • makernotes
  • malaysia
  • manfrotto
  • manfrotto tripod
  • manual
  • mark ii
  • mark iii
  • MFT
  • mft. micro four thirds
  • micro four thirds
  • mielec
  • migration
  • mini review
  • mirror
  • mirror-less
  • mirrorless
  • mobile
  • modification
  • modifier
  • monobloc
  • monoblock
  • monolight
  • motion
  • motion blur
  • multi function printer
  • multiple
  • nano crystal
  • natural light
  • neil
  • Neil VN
  • niekerk
  • nikkor
  • nikon
  • nikon d600
  • noise
  • off camera
  • oil
  • olympus
  • olympus 12-50
  • Olympus 40-150
  • olympus 45
  • olympus 45 18
  • olympus om-d em-5
  • om-d
  • omd
  • omd em1
  • omd em5
  • omd em6
  • on-camera
  • one inch
  • overexposure
  • overpowering sun
  • panasonic
  • panasonic leica 25 14
  • pancake
  • party
  • passport
  • pastries
  • pastry
  • pc
  • pentax
  • peter
  • phone
  • phone photography
  • photo
  • photo tips
  • photography
  • photokina
  • photomerge
  • photoshop
  • photoshop elements
  • planning
  • pocketwizard
  • point and shoot
  • poland
  • polarizer
  • popup
  • popup flash
  • portrait
  • post processing
  • post-processing
  • postprocessing
  • product
  • product shots
  • profile
  • protection
  • protector
  • quad-flash
  • quantum
  • radiopopper
  • raid 0
  • Range finder
  • raw
  • raw editing
  • raw+jpeg
  • rays
  • real
  • recovery
  • reflection
  • reflector
  • resources
  • restaurant
  • review
  • rf-603
  • rf603
  • ricoh
  • ring
  • ringflash
  • robin wong
  • roger cicala
  • rogue
  • rokinon
  • roll off
  • roll-off
  • rolloff
  • rs-5
  • rs-7
  • rumors
  • s5
  • s5 pro
  • s5pro
  • samples
  • samsung
  • samyang
  • sb-26
  • sb-80
  • sb26
  • sb800
  • screen protector
  • sensor
  • sensor swab
  • sensorclear
  • sensorklean
  • sensorklear
  • separation
  • shadow
  • shadow pulling
  • shadows
  • shards
  • sharpening
  • sharpness
  • shoot through
  • shoot-through
  • shoot-thru
  • shooting technique
  • shootout
  • short
  • sigma
  • sigma 50-150
  • skin tones
  • skylight
  • Slik Mini Tripod
  • slingshot
  • slow
  • small
  • smooth
  • soft
  • softbox
  • sony
  • sony a99
  • sony rx100
  • sony t10
  • specular
  • speed
  • speedlight
  • speedlite
  • spinlight
  • spots
  • standard
  • stockholm
  • story
  • strap
  • strobe
  • strobist
  • studio
  • studio strobe
  • subject
  • substitute
  • sudden
  • summilux
  • sunrise
  • sunset
  • sweden
  • swivel
  • sync speed
  • t2i
  • t3i
  • Table top tripod
  • tamron
  • technique
  • techniques
  • tele
  • telephoto
  • thinktank retrospective 5
  • third party
  • tips
  • tokina
  • tonal
  • tonality
  • tone curve
  • toploader
  • toys
  • translucent
  • travel photography
  • tri-flash
  • Tribute
  • trifold
  • trigger
  • tripod
  • truth
  • ttl
  • TTL Cord
  • u43
  • ultra-wide
  • ultrawide
  • umbrella
  • underexposure
  • unlimited sync speed
  • up-rise
  • up-rise 15z
  • update
  • uprise
  • USM
  • uv
  • uwa
  • vanguard
  • versus
  • vertical
  • video
  • view nx2
  • visual science lab
  • vs
  • wadi rayan
  • wd caviar black
  • web
  • weekend
  • westin
  • white balance
  • white lightning
  • wide
  • wide angle
  • window
  • wireless
  • wireless flash
  • wireless release
  • wireless trigger
  • workflow
  • Yashica
  • yashica gtn
  • yashica st-7
  • yn-560
  • yn-560ex
  • yn-ex600
  • yn560
  • yong nuo
  • yongnuo
  • zack arias
  • zoom
  • zoom toploader
  • zuiko

Blog Archive

  • ▼  2013 (165)
    • ▼  December (5)
      • Olympus E-PL3 with 14-42 Lens $199; Moving from Ni...
      • Sigma 18-35 1.8 Revisited; Where to Get It
      • Speedlight Modifiers - 50% discount at Fotodiox
      • Olympus M.Zuiko 45mm f/1.8 Mini Review
      • Evening Portraits with Flash
    • ►  November (10)
    • ►  October (8)
    • ►  September (7)
    • ►  August (3)
    • ►  July (11)
    • ►  June (10)
    • ►  May (15)
    • ►  April (19)
    • ►  March (33)
    • ►  February (24)
    • ►  January (20)
  • ►  2012 (193)
    • ►  December (17)
    • ►  November (22)
    • ►  October (34)
    • ►  September (47)
    • ►  August (12)
    • ►  July (11)
    • ►  June (10)
    • ►  May (13)
    • ►  April (13)
    • ►  March (8)
    • ►  February (1)
    • ►  January (5)
  • ►  2011 (141)
    • ►  December (8)
    • ►  November (8)
    • ►  October (7)
    • ►  September (9)
    • ►  August (13)
    • ►  July (13)
    • ►  June (19)
    • ►  May (17)
    • ►  April (25)
    • ►  March (22)
Powered by Blogger.

About Me

Unknown
View my complete profile