Better Family Photos

  • Subscribe to our RSS feed.
  • Twitter
  • StumbleUpon
  • Reddit
  • Facebook
  • Digg
Showing posts with label s5pro. Show all posts

Saturday, 1 September 2012

A Lighting Opportunity You Shouldn't Miss

Posted on 22:59 by Unknown
The spot above shows one of my favorite kinds of photo opportunities.  It allows me to get dramatic lighting effortlessly.  Hit the jump for a few samples.


BACKLIGHTING
I love backlighting because it emphasizes the subjects and allows them to stand out from the background.  The kind of backlighting I like best for this purpose is one where the light is not directly behind the subject, but is instead above and behind the subject (sometimes called separation light or shoulder light).

To get that kind of light with flash normally requires using at least a tall light stand, if not a boom stand (so that the light stand won't be visible in the shot), so it's not often that I have the chance to shoot with it.
One of the few occasions when I was able to add separation light to a casual portrait.
(Funny how fat I was back then.  Thank goodness for Brazilian Jiu-Jitsu!)
Fortunately, sometimes nature does the work for us.  When the sun is at a sufficiently low angle (not directly overhead), I often position the subject to use the sun as backlight.

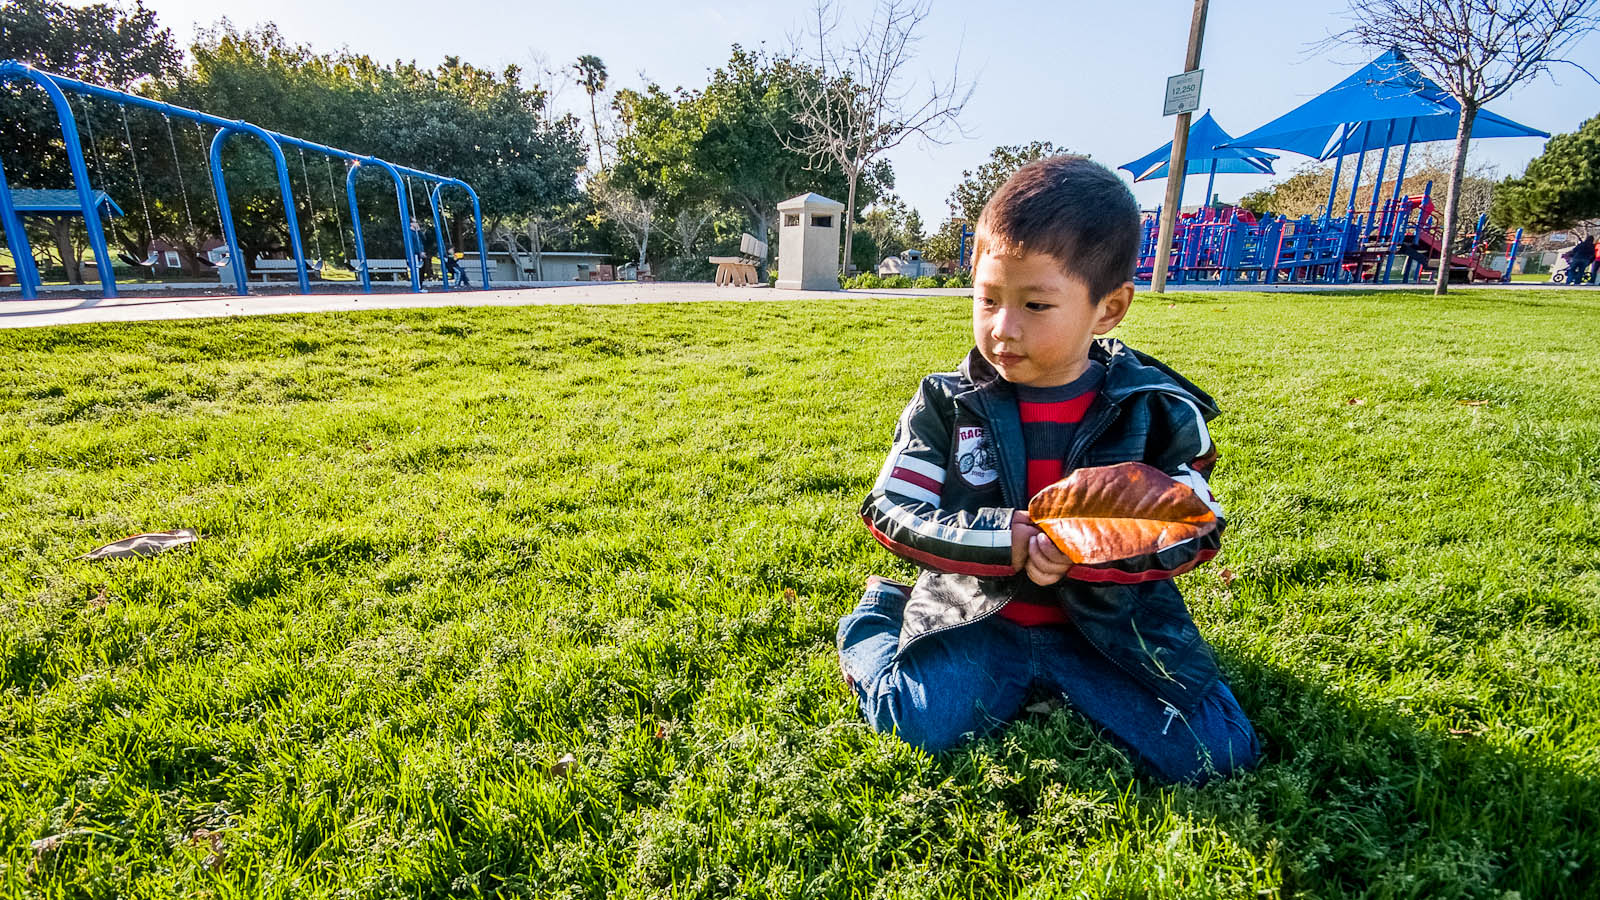
The effect is most noticeable when there is a dark background, which makes the separation light prominent.  That's why I like areas like the spot at the beginning of the story.  It is a backlit area next to a shaded area.  As a further bonus, the dark background tends to reduce the dynamic range of the scene (compared to a backlit shot without a shade).  Finally, if the backlit area is a light-toned surface such as concrete, it can reflect light into the subject, adding a bit of fill.  In short, instant studio-style lighting, without any effort at all.

On this particular morning, it was a "costume day" at our kids' school, and my wife asked me to take a shot of the kids.  I looked out at the backyard, saw the shaded and backlit area and did an internal fist pump. :)  I chose to use the Fuji S5 and Sigma 50-150.

To position the subject, I have the subject in the shaded area, facing away from the light, close to the sunlit portion so that they're casting a shadow.  The part of the subject that is casting a shadow will be the part that has a separation light.  It could be the whole subject, or just the head, or anywhere in between.  (BTW the light doesn't have to be behind the subject.  It can be at an angle for effect.)  And here's what that light did for my shot:


When the subject has hair with volume (e.g. frizzy or curly hair), or is wearing something translucent, then the effect is even better.


EXPOSURE
One challenge with backlit shots like this is that a camera may be fooled into underexposure.  The correct exposure will depend on your camera and your intent.  Some cameras will seriously underexpose backlit shots, while others will do fine.  In this case, I was using the Fuji S5, which has a tendency to underexpose.  With that tendency in mind, I set the exposure compensation at +1.3EV but when I processed the shot, I found that I had to add another +0.85EV.


FLARE
Something else to watch out for with a strong backlight is flare.  Flare can reduce the contrast of the image, making it look washed-out.  Depending on your lens, you may also see ghosting.  To minimize these issues, use a lens hood (or use your hand to shade your lens) and if you have a choice, consider using a longer focal length.  Alternatively, instead of avoiding flare, you can allow flare into the shot for effect.


RELATED POSTS
Using Midday Sunlight
Turnabout is Fair Play
Fill Flash: Summer Pool Party

--
Happy Labor Day and have a great weekend!
(BTW, did you notice anything different about the post-processing of these shots?  That will be something I will discuss soon.)
Read More
Posted in 50-150, backlight, backlit, fuji, lighting, s5, s5 pro, s5pro, separation, sigma | No comments

Tuesday, 14 August 2012

Choosing the Exposure for Dynamic Range

Posted on 04:43 by Unknown

Over the weekend, we visited Knott's Berry Farm, one of the first theme parks in the U.S.  What I like about Knott's is that the lines are much shorter than those of Disneyland therefore we get to experience more rides within the same amount of time.  I also think Knott's has a more interesting variety of rides for young children like our 5-year old, and has more thrill rides (though not as many as Magic Mountain).  Although the production value is not as high as that of Disneyland, it is still quite high.

During our visit the heat was intense, reaching 95°F (35°C), just one degree below the all-time record of 96 for that area, and 10 degrees hotter than the average for this time of the year.  With the sun blazing overhead, the dynamic range was very wide.  I used two different exposure strategies to deal with the dynamic range.

PROTECTING HIGHLIGHTS
When the ambient is very bright, it is very easy to exceed the highlight range of a digital camera and blow the highlights.  I used to not care so much about it myself.  In the shot below, you can see that the highlights from the sunlight-as-kicker have no detail at all.


However, when I started learning about shooting film, I became more attentive to highlights. With print film (negative film) I have tremendous latitude for exposing highlights, and it's almost impossible to blow highlights.  With digital, once a certain threshold of light is reached, the sensor can't record any more details, and all I suddenly get is white (i.e. blown highlights).  Blown highlights are therefore one indicator that the image was shot digitally.

(BTW there's nothing wrong per se with looking digital.  It's just a personal preference.  I grew up during a time when digital video was used mostly for lower-budget movies and shows.)

On this occasion I was using two cameras, the Fuji S5 Pro and the Nikon D90.  They have different amounts of shadow range and highlight range therefore I used different exposure strategies.  In the shots below, I took some test shots to show the effect of the exposure strategies.  For the S5, I took a baseline shot using its 'standard' dynamic range mode, and another shot at the same exposure but this time activating its full 400% dynamic range (you can ignore the absence of a highlight on the neck of the baseline shot -- the sun was going down and a shadow fell on the cheek and neck of the mannequin head).  I also took a pair of shots with the Nikon D90: first a baseline shot with a normal exposure, and a second shot that was deliberately underexposed by two stops.  BTW these were at ISO 400, the widest dynamic range for the D90.


In postprocessing I adjusted the shots to recover the highlights and in the case of the underexposed D90 shot, to normalize the exposure as well.  Here is the result:

With the S5's standard mode, there was almost no highlight recovered.  Conversely, with the 400% dynamic range mode, all highlights were fully recovered.  There was not a single pixel that was blown.

With the D90's normal exposure, I was able to recover a few of the highlights but you can see large patches that were blown (the temple, cheekbone and the entire side of the neck).  However, with the deliberately underexposed shot, most of the highlights could be recovered.  There is only a patch of lost highlight near the base of the neck.  

Full resolution S5 400% DR with adjustment (click to download)

Full resolution D90 -2EV with adjustment (click to download)

The downside of this deliberate underexposure is the greater amount of noise in the midtone and shadow areas (after all, I needed to increase exposure 2 stops in postprocessing to compensate for the underexposure).  For me, I usually prefer having extra noise (and using noise reduction) than losing relevant highlights.
---

Back to Knott's Berry Farm.  The sky was cloudless for most of the afternoon, so with the S5, I used manual exposure and set the exposure for the shadow.  Here's a sample shot, straight-out-of-the-cam:

Looking only at the LCD screen, the bright patch of pavement might seem worrying (IIRC it was blinking), but I was confident that most, if not all, of the highlights would be recoverable with the S5, so I concerned myself with getting an adequate exposure of shadow areas to minimize noise.

And here's the adjusted shot (not a single pixel was lost).

As for the Nikon D90, I set the exposure to avoid losing highlights as much as possible.  First, when judging the exposure I paid attention to the blinkies and histogram, dialing down exposure as needed.  Second, I used the 'Extra High' setting of Active D-Lighting, which meant that the camera would underexpose slightly to avoid losing highlight detail.  For JPEGs, it would also boost the shadow and midtone areas to compensate for the underexposure.   However, I was shooting raw, so the boosting would be done in postprocessing.  Here's a sample shot, SOOC:

If I looked only at the LCD screen, it would look very underexposed.  However, I knew that for my purposes, this was the 'correct' exposure.  Here's how the shot looked after adjustment in post-processing.

Most of the highlights were preserved.  There is only a small patch lost, near my wife's elbow.

Here are a few more shots from our visit.  I used two lenses, the Tokina 10-17 fisheye (paired with the S5) and the Nikkor 28-105 3.5-4.5 AF-D (with the D90).


For when my kids are a little older
Knott's has a Peanuts-themed area for younger children, Camp Snoopy
A junior version of the elevator drop


We didn't spend as much time as we wanted because of the scorching heat, but we still had fun.
Read More
Posted in 10-17, 28-105, d90, digital, dynamic range, exposure, film, fuji, highlight, nikkor, nikon, postprocessing, s5, s5pro, tokina | No comments

Sunday, 29 July 2012

Capturing Epic Sunrises and Sunsets

Posted on 20:14 by Unknown


Epic sunrise or sunset shots -- the kind where the sky is ablaze with hues of red, yellow and lavender -- don't happen purely by luck.  We can't control the weather but we can pay attention to the kinds of conditions that are conducive to producing glorious sunrises and sunsets.  Here are some techniques I learned for capturing sunrises and sunsets.

1.  Gotta have some clouds.  Just like a movie projector needs a screen, the sun needs clouds to catch the light from sunrises and sunsets.

2.  Cleaner air is better.  I recall learning at school that sunrises and sunsets are red due to selective scattering of sunlight passing through the air molecules.  I therefore thought that with some air pollution, sunrises and sunsets would be more impressive.  I was wrong.  The problem is that particles from air pollution tend to vary in size, so rather than scattering only a certain portion (e.g. blue and green) of the visible spectrum, most of the spectrum is scattered, so that air pollution produces a grayish light.

3. High or medium altitude clouds are usually better.  A couple of reasons: First, there is more air pollution at low altitudes.  Sunlight illuminating low clouds has to pass through a thick layer of this low-hanging air pollution, making the light more grayish.  On the other hand, sunlight reaching higher clouds (cirrus, altocumulus) has less air pollution to scatter it.  Second, even assuming there is no air pollution, higher clouds can catch the rays of the sun when the sun is lower in the horizon.  At those steeper angles, the sunlight has to travel a longer distance to reach the clouds, resulting in more scattering and thus shifting the color to a deeper red.


Low altitude clouds include the cumulus and stratus family of clouds.  In the picture below you can see that with cumulus clouds, even the peak of sunset colors is usually not impressive.

High altitude clouds include the cirrus family of clouds.  The medium altitude clouds I like are the altocumulus clouds.  (Altostratus is also medium altitude but is formless, like a fog in the sky).   The shot below is a sample of a sunset with altocumulus clouds (unfortunately all I had with me at the time was a camera phone).


4.  No cloud cover.  Even if you have high or medium altitude clouds, too many low-hanging clouds can block the view of the high and medium altitude clouds.  If there are stratus clouds (the fog-like clouds), I usually don't even bother to check what the sunrise or sunset looks like.

5.  Timing.  Assuming there are high or medium altitude clouds and no low-hanging clouds, it is best to start shooting about 15 to 30 minutes before sunrise or after sunset.  With the sun below the horizon, the sunlight has to travel a little farther to reach the clouds, scattering more of the greens and blues and casting a deeper red light on the clouds.

SAMPLES
A couple of weeks ago, I noticed that we had cirrus and altocmulus clouds in the sky without too many low-hanging clouds, close to sunset.  Conditions like those seem to be rare in our area, occurring only a handful of times in a year.  I quickly drove to the airport and waited at a popular local spot for watching planes land. Fortunately I was rewarded with a beautiful sunset, and I took some photos of planes landing (my first time to try that).

The series of shots below are arranged in chronological order.  The first couple of shots were taken at around sunset.  You can see that after sunset, the colors become more intense before becoming darker.


BTW, for my equipment I used the Fuji S5 (I thought the S5's unparalleled highlight range would help protect the highlight details in the clouds) and the Tokina 11-16.

FOR FURTHER READING
The Colors of Sunset and Twilight
Fuji S5 Review
Tokina 11-16 Review

Read More
Posted in 11-16, clouds, fuji, s5, s5 pro, s5pro, sunrise, sunset, techniques, tokina | No comments

Friday, 6 April 2012

My First Crush: the Fuji S5 Pro

Posted on 02:20 by Unknown


This is a hands-on review of the Fuji Finepix S5 Pro, a DSLR released back in 2007 that combines the best characteristics of negative film and DSLRs.

Included here is a dynamic range comparison between the S5, the Nikon D3 and Nikon D70.


BACKSTORY
     I started taking photography seriously at the beginning of 2007.  My wife and I just found out that we were having a baby.  It was a time filled with joy, hope and anticipation.  I wanted to capture memories of our growing family beautifully.
     As I shopped for my first DSLR, I learned about the then-recently released Fujifilm FinePix S5 Pro.   I read the glowing reviews about its colors and dynamic range.  There were all sorts of stories about how this remarkable camera could capture images like no other.  Here is one of those famous S5 shots:


The S5 Pro Dynamic Range Stress Test

The shot that made the S5 famous.  Credit: Ryan Brenizer - blogged here.

FUJI S5 PRO
      The S5 is basically a Nikon D200 with a customized Fuji-designed sensor.  The S5 -- and its predecessor the S3 -- use Fuji's proprietary Super CCD sensor.  Unlike other sensors, the Super CCD sensor has two pixels in each photosite.  One of the pixels is like a regular CCD pixel.  The second pixel is a much smaller pixel that has a much lower sensitivity.  When the S5 takes a shot, the regular S-pixel records the image with the typical dynamic range of a CCD sensor.  At the same time, the smaller R-pixel, with lower sensitivity, is able to record the highlights and brighter parts of the image.  The information from both pixels is combined into an image that has a wider dynamic range than what would otherwise be possible.  It's like the S5 takes two shots at the same time and combines them into an HDR image.
      The other unique quality of the S5 is its colors -- specifically its skin tones, which many say is more flattering for lighter complexions than other cameras.
      These advantages made the S5 the perfect camera for people photos, and it was precisely what I wanted.  Unfortunately the S5 cost $1,899 then.  I couldn't wrap my head around that number, considering that I was looking for a DSLR under $500.  I sighed and mentally categorized the S5 as unobtanium.
      Eventually, like all cameras, the price started to decline.  But even as recently as a couple of years ago, it was still selling well above $1,000.  At the time I upgraded to a Nikon D300 in early 2010, I did consider getting an S5.  However, given the S5's limited resolution and older specs, I felt that spending that much money just to get the benefit of the extra dynamic range was a luxury I couldn't afford.
      Fast forward to a few weeks ago.  I felt it was time to upgrade and I sold my D300.  While researching which camera to get, I checked S5 prices on a whim and found to my surprise that some were selling for much more reasonable prices.  So, five years after pining for one, I finally got one.  (Cue the Carpenters' "Make Believe It's Your First Time" lol ).

DYNAMIC RANGE
I tested the S5's recovery limits.  As with the D3 and D70, I tested recovery from -5 stops below   the camera's metered exposure to +5 stops above.  Just for kicks, I also tested up to +10 stops above the metered exposure.

Here again is the test for the D70:

And the test for the D3:

And now the S5:

Note: for +8, +9 and +10, I only included black and white versions.

To me, the usable results for the S5 are between -4 stops to +5 stops (with the need to remove some magenta tints on highlights).  This is significantly better than the range of an old DSLR like the D70 (-3 stops to +3 stops).  It is not as good as the D3 in the shadows, but is better than the D3 in the highlights, so there is a net improvement of about 1 stop over the useful range of the D3 (-5 stops to +3 stops).  The S5's 2-stop highlight advantage makes sense because Fuji claims that the Super CCD sensor's R-pixels increases dynamic range to 400%.  Interestingly, both the D70 and D3 completely lose highlight detail above 3 stops, whereas the S5 manages to retain detail (but not color accuracy) up to +7 stops.  Indeed, at least one S5 user has been able to recover seemingly all color (with the need for some correction) at up to +6 stops.

PRACTICAL ADVANTAGES OF THE S5
You may be wondering: the S5's highlight range is amazing but you have to be a really terrible photographer to overexpose by THAT much.  Is the S5 only for incompetent photographers?  Is there any practical use for the S5's unique abilities?  I thought about this and came up with real world advantages of the S5 (with some overlap).  Here they are:

1. Correcting overexposure.  I can make mistakes with exposure (ambient or flash) in the heat of the moment.  It's nice to know that with the S5, those mistakes are probably recoverable, particularly for shots where there are no second chances.

2. JPEG shooting.  The S5's JPEG files are unlike other JPEG files.  They have about the same exposure latitude as the Nikon D70's raw files.
JPEG recovery from -3 stops

JPEG recovery from +3 stops
In addition, I find that the S5's automatic white balance is usually correct.  In the shots above for example, I did not correct the white balance from the yellow CFL lamp.  If you prefer to use JPEG instead of raw, or you hate postprocessing, the S5 provides some of the best quality JPEGs I've seen.

3. Raw editing.  If you like having complete control of the image and prefer to work with raw files, then the S5 provides immense (perhaps unparalleled) latitude with exposure adjustments, whether for correction or creative purposes.
.
4. Can shoot like negative film.  Because of the S5's exposure latitude, particularly with highlights, you can shoot with it like negative film.  If you want to shoot by exposing for the shadows without worrying about blowing highlights, just like negative film, you'll appreciate the S5.

Here's one shot where I got noise-free detail in the shadows by exposing for the ground (which consisted of black rubber tire fill):


This was the unedited shot:

5. High contrast scenes.  The S5 excels for capturing scenes with high contrast lighting.  In scenes like these, the challenge is to retain detail in both the highlights and shadows.  Here, I chose an exposure that I knew would allow the S5 to have sufficient detail in the shadows (increasing the camera's metered exposure by 0.3 stops).  I was confident that with the dynamic range set at maximum, the S5 would retain the highlight detail.

The SOOC shot (cropped)

In post, I merely pulled down highlights further and lifted the shadows to make the detail more apparent.

This is not to say that the S5's dynamic range is out of this world.  It can't capture both the solar disc and the shadow of a black cat in a backlit cave in the same scene.  Instead I would say it's close to what I can observe with my eyes.  If I can see it without squinting, it's very likely within the range of the S5.

6. HDR in motion.  The S5 combines information from two sets of pixels, almost like taking two shots at the same time at exposures that are two stops apart.  That may not seem like much, but unlike typical HDR shots, you have the ability to take HDR shots of moving subjects.


7. Wide angle shots and sky shots.  If you like using ultrawide angle lenses, you know that the sky is often a significant portion of the frame (especially if the camera is tilted upward as is commonly done with UWA), so you don't want it to be just blown out.  The S5 can help you retain color and detail in the sky while still having a workable exposure for the subject.


8. Photos of black and white subjects.  Who really needs 5 stops highlight range?  Isn't 3 stops (like that of the D3 and D70) more than enough?  Let's take a look at what "3 stops" really means. It does not always mean 3 stops overexposure.  If you look at the D3 or D70 recovery test at +3 overexposure, the parts that lost detail were the parts that were slightly brighter than middle gray, because at +3 stops overexposure those lighter areas were actually more than 3 stops above middle gray.  So by 3 stops, we actually mean 3 stops above middle gray.

If your whole scene is middle gray, then yes you can overexpose with the D70 or D3 by 3 stops and still recover it.  Great!  But what if there's something lighter toned in your scene such as let's say... average Caucasian skin?  At a normal exposure, that skin would be at around Zone VI, one stop above middle gray.  Now your 3 stops latitude has been reduced for the skin -- instead of 3 stops, you can only recover 2 stops overexposure of the skin.  Still no sweat so far.

But what if the subject is wearing a white dress that you wanted to look white (not gray)?  The resulting exposure of the white dress would be higher, maybe 1.7 or 2 stops above middle gray.  Now your 3-stop latitude has been reduced to 1 or 1.3 stops vis-a-vis that white dress.

Then what if it's a summer wedding, and there is direct sunlight on part of the white dress?  That sunlit part would probably be at least one stop brighter than the rest of the dress.  Now you are at the limit of your 3-stop latitude and if the sunlit part is significantly brighter, you would have spent all your 3-stop allowance and gotten 255, 255, 255.  And all of this assumes that you were exposing correctly.  We weren't even talking about overexposure yet.

But wait a minute, you say.  If all you're capturing is a blonde bride in a white dress surrounded by snow, then you're fine - you just expose the scene as if middle gray (retaining detail) and push everything in post to the limits of the paper or screen.  Yeah that would work unless of course in the rather "unlikely" scenario that your blonde bride is next to a groom in a black tux. hmmm.

With the S5 in the foregoing example, you could have a white dress that is partly sunlit up to 3 stops higher than the rest of the dress and still retain color and detail in the brightest highlights, while still capturing that detail in the groom's tux in Zone III (and shadows in Zone II).  In fact if you don't need color information in the white dress' highlights, your latitude is up to 5 stops higher than the rest of the dress.  That's why wedding photographers love(d?) the S5.

Black and white jacket, cloudless sky and black rubber tire fill in shade.  Not a problem for the S5.
9. Capturing highlight details.  Because the S5 has such a wide highlight range, it can capture very subtle highlight tones.

     Here is a demo snapshot of a house with white stucco in direct sunlight.  You can still see the texture of the stucco (even without me pulling down any highlights) - feel free to click on the file and zoom at 100% view.  In post all I did was crop it a bit, tweak the white balance slightly, lift the shadows, and increase the contrast.  I didn't have to recover the highlights and although the white stucco was illuminated by sunlight, not a square inch of the house was blown out.  In fact, the S5 still had room left in both shadow and highlight latitude, so I boosted the highlights a bit.  And BTW this was the JPEG file (not raw).


10. Backlit subjects.  Do you love taking backlit shots?  I do.  In terms of exposure backlit shots can be challenging because of the strong contrast.  This is another situation that plays into the strengths of the S5.


11. Flashless photography.  With a regular DSLR, I often use fill flash to lift shadows and reduce the dynamic range between the subject and a bright background.  With the S5 it is possible to omit the fill flash, get a decent exposure on the subject and recover the overexposed background.  Shooting without a flash allows me to work faster and not have to worry about making the direction, quality and color of the fill flash consistent with the existing light.

The original unedited shot:


The edited shot (lifted shadows, recovered highlights, increased contrast):


12. Underexposing the background.  [Caution: this is only hypothetical -  I haven't tried this out yet.]  

There are cameras that have unlimited or very high sync speeds such as the Canon 1D and the Nikon D70 (or most point-and-shoots).  They can be useful for deliberately underexposing the background for dramatic effect, then illuminating the subject with a flash.  However, for these cameras, the limiting factor becomes the flash duration.  For an SB-800 speedlight at full power, it's around 1/800.  For an AlienBee B1600 at full power, that's around 1/640.

Where does the S5 fit in this?  The S5 has a so-so sync speed of 1/250.  However, it has 2 additional stops of highlight range.  Assuming the subject is darker than the background, it should be possible to use the same flash power that you could use at a higher sync speed then pull down the background exposure.

Example:  Let's say you have sunny-16 conditions.  The exposure of the background at ISO 100 is f/16 and 1/125 (for simplicity).  To underexpose the ambient by 2 stops, you need an exposure of ISO 100, f/32 at 1/125.  If you could sync at 1/1000, then you could expose instead at ISO 100, f/11 at 1/1000.  To illuminate the subject, you would then need a flash that has sufficient power and distance to give you f/11 at ISO 100 to underexpose the background by 2 stops.

With the S5, our sync speed is only 1/250, which means that to underexpose the ambient by 2 stops, we would normally need an exposure of ISO 100, f/22 at 1/250.  Suppose however, that we nonetheless shoot at ISO 100, f/11, 1/250 and use a flash and distance that gives us f/11 at ISO 100.  The background would come out normally exposed and thus have all the detail.  In post, we could burn the background 2 stops.  In fact, assuming there are Zone VII white clouds in the background, we could place them in Zone X (by exposing 3 stops higher) and still recover color and detail in post thanks to the S5's 5-stop highlight headroom.  So we could instead shoot at ISO 100, f/4, 1/250 (resulting in a 3-stop overexposure), burn the background by 5 stops in post, and the background would appear 2 stops darker as we originally wanted.  A flash that could put out f/4 at ISO 100 is not asking much at all, and the undemanding 1/250 sync speed allows us to use even slower flash duration strobes such as the White Lightning X3200.

13.  Digital vs. Film Highlight Roll-off.  If you've been shooting negative film, you know that one way that negative film looks different from digital is the smoothness of the highlight roll-off.  With digital, the highlight tones get brighter then suddenly becomes totally white, like a car driving off a cliff.  With negative film, on the other hand, highlights get brighter very gradually until it finally reaches total white.

Untitled
Photo by Le Anh Khoa.  Shot with Kodak 200 film.  Note the amazing highlights.

Here are a couple of S5 demo shots.  In this shot, the sun is in the frame (albeit covered by the plants).  If you look at the sky, you can see that it builds gradually to white, retaining detail all the way.  You can also see this effect in some of the playground shots above.


Here's another demonstration of the S5's smooth roll-off, using a white porcelain sink.


At the 100% dynamic range setting (i.e. with the smaller pixels turned off), the S5 acts like any other DSLR.   There are two issues with the sink.  First, the right side of the sink that is being hit with the light is blown out.  Second, the part where the sensor is able to record highlight detail stops abruptly before blowing out.

Post-processing adjustments (e.g. burning, pulling highlights, etc.) will not restore lost detail.  Here I pulled down the highlights in LR4.  The blown out patch is now a light gray, but still has no detail.  Neither did the roll-off become any smoother.  You can pinpoint exactly where the detail stops and the blown out area begins.

Here's what the sink looks like with the S5's maximum dynamic range activated.  Even without editing, and even with my crappy office monitor, I can see that there was detail recorded everywhere in the sink, even in the patch that was directly lit by sunlight.  Perhaps less evident but just as important, the transition to peak highlight is very gradual.

In post, I pulled down the highlights to make the tonality a little more obvious.  You can see that the tones built up very gradually, just like negative film.  The effect on this particular subject is that it revealed the delicate contour of the sink with finesse.

14. Skin tones.  This one is more subjective.  There's something about the way the S5 renders skin tones that is not 'neutral' but which many people find more pleasant.  It's not easy for me to articulate it, but the best way I can describe it is that the skin tone looks like the hues I usually see on foundation for makeup (before it is applied).

Here is a shot from the Nikon D3, which to me has skin tones that look the most natural among all the cameras I've used.


Here is how the same subjects look with the S5:


And here's another set.


(On the second set, S5's on top, D3's at the bottom.)

FUJI S5 IDIOSYNCRASIES
The S5 is not perfect and has some issues.

1. Speed (or lack thereof).  The biggest weakness of the S5 is that it is a relatively slow camera.  Very low frame rate in continuous shooting, the buffer fills up quickly, and takes a while to empty.  This is not a sports camera, and you can't just keep pressing the shutter thoughtlessly.  [I guess it really is like shooting with a film camera. :) ]  If you tend to pick your shots rather than spray-and-pray, it is not a big deal.

2.  Resolution.  It is true that the S5 has 12 million pixels, but the information from the second set of 6 million pixels is used together with those of the first set of 6 million pixels, therefore the real resolution is closer to 6 megapixels.  I don't mind -- 6mp is enough for me to print 12'x18' without any problem.  However, raw files have a resolution of 12mp.  Since the 12mp resolution is mostly just through interpolation, it is far less detailed than a real 12mp file.  I wish Fuji just kept it at 6mp. Or even better, I wish Fuji makes a successor to the S5 that has real 12mp.

3.  Handling.  One of the S5's quirks is its handling.  Its ergonomics are great - it is physically identical to the Nikon D200 after all.  It also shares with the D200 the ability to change many settings without going through the menus by pressing a button and turning the front or rear dial.

However, the S5's menu system is completely different from Nikon's.  That's too bad because one of the things I like with my Nikon DSLRs is the intuitive interface.  Unfortunately the S5's system is nowhere near as elegant as Nikon's, and the S5 has gotten a lot of criticism for it from Nikon users, particularly with the cumbersome playback controls.  In my opinion, however, the menu is usable once you become familiar with its quirks.  I certainly can't fly through the options the way I do with my other Nikons.  But using the S5 is only slightly harder than using a camera from a different manufacturer.  Seen that way, it's a bit less frustrating.

4.  File sizes.  Raw files with extended dynamic range are around 25MB each, whether you use 125% or 400% dynamic range.  If you use only 100% dynamic range it doesn't take up as much space but the S5's advantages over other cameras disappear.

5.  Exposure weirdness.  The S5 has a couple of exposure-related weirdness.  First, its metered matrix exposure tends to underexpose especially when there are bright highlights in the scene.  This is particularly strange because it fails to take advantage of the S5's highlight headroom.  I tend to get better results either by applying a +0.7 or +1 exposure compensation or by using center-weighted metering.

Another weird characteristic of the S5 is that when automatic exposure modes are used (P, A, S) shutter speeds can show up in strange fractions.  For example, before pressing the shutter you might see that the shutter speed in P mode is at 1/60, but when you shoot it might be 1/60 or it might be 1/55.

6.  High ISO Noise.  By today's standards, the S5's high ISO noise is not impressive.  I would say that ISO 1600 is usable.

7.  Film modes.  One of the S5's features is that it has film emulation modes.  My problem with those modes is that you can't control the dynamic range.  Each film mode has its own dynamic range setting.

8.  Postprocessing.  Although SOOC JPEGs from the S5 can look fine, the S5 really benefits from postprocessing.  First, at maximum dynamic range, unedited images can appear flat.  Proper post-processing brings back the contrast while preserving the dynamic range that you captured.

Second, if you really want to squeeze the most out of the sensor, in my opinion you need to post-process the file, otherwise the highlight detail is there but difficult to observe -- as shown in the porcelain sink example.  (That's why if you read Ken Rockwell's review of the S5, he claims that the increased dynamic range is "invisible" -- Ken doesn't like postprocessing.)

9.  File format.  The .RAF raw files from the S5 can be converted into DNG in Lightroom without loss of any information or dynamic range.  As a bonus, the file size is reduced from 25MB to less than 14MB.

One quirk of S5 raw files (whether RAF or DNG) in Lightroom is that the render previews take longer than usual to load.  In addition, they can sometimes show weird artifacts or posterization -- even though the file doesn't have any actual artifacts or posterization problems.  The render artifacts disappear when a 1:1 render preview is made.

SUMMARY
The S5 had been the undisputed leader in dynamic range when it was released in 2007 but two camera generations later, some cameras have caught up with (or even possibly exceeded) the S5's total dynamic range.  Nonetheless, the S5's highlight range remains unsurpassed.  The S5's extreme highlight range and nonlinear response allow it to function and provide shots like a camera with negative film, with tremendous exposure latitude and a very smooth highlight roll-off.  The result is an image that, in my opinion, comes closest to the look of film, a quality that is not necessarily reflected in numbers about total dynamic range, resolution or high ISO noise.


Update: FUJI S5 VS. NEWER CAMERAS
There are now cameras that have greater total dynamic range than the S5.  One could argue that even though the S5 has unparalleled highlight range, a newer camera with greater total DR can match that highlight range if it is sufficiently underexposed (and the shadows are enhanced in post-processing).  I did exactly that in a comparison between S5 and D90.  See here.  You can decide for yourself whether the D90 adequately matched the S5.

FUJI S5 RESOURCES

Other S5 Reviews:
  • Ryan Brenizer
  • Kirk Tuck
  • Jonathan Ryan
  • DPReview
  • Alexander Kunz
  • Collection of S5 Reviews

Other S5 dynamic range comparisons:
  • S5 vs D3x
  • S5 vs D700 (and a comment from a D300, D700 and S5 user)
  • S5 vs D200

Here are some of my favorite S5 shots and galleries:
Leeisaku - note the skin tones in his portraits (as far as I can tell, they're all with the S5)

"On the Stairs" by AJT Images.  I love the dynamic range and the detail captured in the dress.

"Stern Lil' Lola" by Denyer - I like the subtle range of highlight tones captured in the model's face.
Stern Lil' Lola

"At the arcade" by Alex Brown.  I love the skin tone, delicate tonality, and the detail in the hat.  If you told me this was shot with film, I would have believed you (perhaps Kodak Portra?).
At the arcade

"Rivert y sus ventanas" by Cristina Perea. That shaft of sunlight there isn't blown out.
"tuxedo park Ny" by SKGPhotos.  Nice showcase of the S5's highlight range.

RELATED POSTS
Comparing Digital with Film: Dynamic Range
Read More
Posted in comparison, d3, d70, digital, dynamic range, film, finepix, fuji, fujifilm, hdr, high dynamic range, highlight, review, roll off, roll-off, rolloff, s5, s5 pro, s5pro | No comments
Older Posts Home
Subscribe to: Posts (Atom)

Popular Posts

  • Olympus E-PL3 with 14-42 Lens $199; Moving from Nikon to MFT?
    I saw on 43rumors.com that the Olympus E-PL3 was being sold at Newegg for just $199 with the 14-42 kit lens included.  I checked it out and...
  • Samyang 24 f/3.5 Tilt Shift Lens Now Available
    A seller on ebay ( bestpriceoptics ) is now selling the Samyang 24 f/3.5 tilt shift lens, in Canon and Nikon mounts, for $999 shipped.  This...
  • Double Camera Strap & BlackRapid RS-5 Review
    This is a review of two camera straps: - The first is a double camera strap that's -- let's be blunt -- a knockoff of the BlackRapid...
  • Exploring 3D Photography with the Loreo 3D Lens in a Cap
    When I hear of 3D photos or videos, my first impression is that it's gimmicky.  Interesting for one or two shots maybe and then after th...
  • Toys for the Big Kids: Speedlight Softbox
    In this post, we will have a look at a softbox for speedlights.  This post is part of a series that will cover equipment reviews for committ...
  • Going Crazy With Tripods
    My Tabletop Tripod Trio I love tripods, I go all soft and wobbly when I see attractive looking ones, so here is my story with tripods, inclu...
  • 2x Lowepro Review: Toploader Zoom 45 AW & 55 AW + Unraveling The SlipLock™ Mystery
    Left: Lowepro Toploader Zoom 55AW, Right: 45AW, Middle: Canon 60D + 15-85 Welcome to a new rare photography accessory review as I'd lik...
  • Canon Professional Network
    I didn't know about Canon Professional Network until Syl Arena recently blogged about his 4-part article on speedlites.  I took a look ...
  • Minimizing Nikon D5200 and D7100 banding; Mysteries Remain
    Many people have noted that the Nikon D5200 and Nikon D7100 have banding in the shadows when the exposure is pushed.  In this post I'll ...
  • Nikon 28 1.8G: Moody Artist?
    When Nikon had its recently-finished sale (now extended to end of March), the one lens that I considered buying was the Nikkor 28 1.8G.  To...

Categories

  • "alien bee"
  • "april fool's"
  • "ring flash"
  • "yong nuo"
  • 1"
  • 1/1.7"
  • 10-17
  • 10-20
  • 11-16
  • 15-85mm
  • 15z
  • 17-50 vc
  • 190cx pro3
  • 2.8
  • 2.8G
  • 2/3"
  • 200 f2.8
  • 200 L
  • 200mm
  • 200mm f/2.8
  • 200mm f/2.8 L II
  • 200mm f2.8
  • 200mm f28
  • 200mm f28 L II
  • 2012
  • 2013
  • 23 Samsung led
  • 24-105 f4
  • 24-70
  • 25 1.4
  • 28-105
  • 28-70
  • 35mm
  • 35mm f/2
  • 35mm f2
  • 360
  • 3rd party
  • 4.1
  • 4/3
  • 40 pancake
  • 40 panckae
  • 40 stm
  • 40-150R
  • 40mm f/2.8
  • 430EX
  • 43rumors
  • 45 18
  • 45 AW
  • 4x4
  • 50 14
  • 50 f14
  • 50-150
  • 50mm
  • 50mm f/1.4
  • 55 AW
  • 55-250
  • 550D
  • 55aw
  • 560ex
  • 580 ex ii
  • 580EX
  • 580EX II
  • 5d
  • 5d mark 2
  • 5d mark 3
  • 5D Mark II
  • 5d mark iii
  • 5d2
  • 600d
  • 600ex-rt
  • 60d
  • 60fps
  • 60mm macro
  • 650d
  • 6d
  • 7.5mm
  • 720p
  • 75 f1.8
  • 85mm f1.8
  • 8x12
  • abbc
  • abstract
  • accuracy
  • active d-lighting
  • adjustment
  • adl
  • AF
  • af point
  • AF Point Expansion
  • aftermarket
  • airport
  • alexandria
  • alien bee
  • alien bees
  • alienbee
  • alienbees
  • alternative
  • ambient
  • ambient light
  • angle
  • aperture priority
  • APS-C
  • apsc
  • assignment
  • auto focus
  • auto white balance
  • autofocus
  • AWB
  • awl
  • back button focus
  • background
  • background blur
  • backlight
  • backlighting
  • backlit
  • bad behavior
  • bad photography
  • balance
  • bare flash
  • battery
  • BBF
  • beach
  • beams
  • beauty dish
  • bellagio
  • BFT
  • birthday
  • black
  • black foamie thing
  • black rapid
  • blackrapid
  • blogs
  • blower
  • blown
  • blur
  • bokeh
  • bounce
  • bounce card
  • bounce flash
  • bower
  • bracket
  • brightness
  • brilliance
  • brolly grip
  • brother
  • build
  • burst mode
  • butterflies
  • butterfly
  • C.Fn
  • cable
  • cake
  • camera
  • camera bag
  • camera releases
  • camera settings
  • candle
  • candlelight
  • canon
  • Canon 100mm Macro L IS
  • canon 200mm f28L
  • canon 24-105
  • canon 40 stm
  • canon 40mm f28 pancake
  • canon 50
  • canon 50 1.4
  • canon 55-250
  • canon 5d mark 2
  • canon 5d mark ii
  • canon 5d mark iii
  • canon 5d2
  • canon 5d3
  • Canon 60d
  • canon 6d
  • canon g11
  • canon speedlite
  • car
  • carbon fiber
  • catch lights
  • cheap
  • christmas
  • clean
  • cleaning
  • clipped
  • clipping
  • close up
  • clouds
  • cls
  • clustered
  • color
  • compact
  • comparison
  • composition
  • compositional aid
  • construction
  • contrast
  • cooler master
  • copyright
  • core i7
  • cowboy
  • cowboystudio
  • cpl
  • creepy
  • crop factor
  • crop sensor
  • cyber commander
  • cybersync
  • d-lux
  • d-lux5
  • d3
  • d300
  • D5100
  • D600
  • d70
  • d700
  • D7100
  • d90
  • dark background
  • david hobby
  • daylight
  • dell 24 inch
  • depth of field
  • desert
  • diamond
  • digital
  • directional
  • distance
  • diy
  • dlux
  • dlux5
  • dng
  • double
  • dslr
  • DSLR bag
  • dual
  • dust
  • dx
  • dynamic range
  • earthquake
  • ebay
  • ebay trigger
  • eclipse
  • editing
  • EF 40mm f/2.8
  • ef-s 60mm
  • einstein
  • Electro GN
  • engagement
  • environmental portrait
  • ep5
  • equipment
  • ETTL
  • ettr
  • europe
  • events
  • evf
  • ex600
  • existing light
  • expensive
  • exposing to the right
  • exposure
  • f/3.5
  • family
  • faq
  • fasten-r3
  • favorite
  • fayoum
  • Fayoum desert
  • fill
  • fill light
  • film
  • filter
  • finepix
  • fire
  • fireplace
  • first impressions
  • fish-eye
  • fisheye
  • fix
  • FL600R
  • flash
  • flash bounce
  • flash sync
  • flash trigger
  • flashmeter
  • flashright
  • focal length
  • focus
  • food
  • football
  • fotodiox
  • fountain
  • freexwire
  • fuji
  • fujifilm
  • Full Frame
  • fun
  • fx
  • galaxy s 3
  • galaxy s4
  • gecko
  • GeForce gtx570 OC
  • gel
  • geomag
  • ggs
  • ghost
  • gigabyte z77 ud3h
  • glass
  • gn
  • Goodbye
  • gorillapod
  • gregg
  • grid
  • grip
  • group shot
  • gskill ripjaws
  • guide
  • guide number
  • gx7
  • haf 912
  • handheld
  • hands on
  • hands-on
  • hdr
  • head shot
  • hiatus
  • high dynamic range
  • high iso
  • high speed sync
  • highlight
  • highlights
  • histogram
  • holder
  • holiday
  • home
  • home made
  • Honda civic
  • honeycomb
  • hotshoe
  • hoya
  • humor
  • i9500
  • id
  • image quality
  • impressions
  • indoor flash
  • infrared
  • infringement
  • insects
  • inverse square law
  • japan
  • jewel
  • jewelry
  • joby head
  • jpeg
  • Kingston hyperX SSD
  • kirk tuck
  • kl bird park
  • krakow
  • kuala lumpur
  • las vegas
  • lastolite
  • laurence kim
  • lax
  • lcd
  • leica
  • lens
  • lens cap
  • lens compression
  • lens review
  • lenses
  • lenspen
  • lensrentals
  • light
  • light painting
  • lighting
  • lightroom
  • lightroom 4
  • lightroom 5
  • location
  • long
  • long exposure
  • los angeles
  • low key
  • low light
  • Lowepro
  • Lowepro 45aw
  • Lowepro 55aw
  • lr4
  • lumiquest softbox III
  • lumix
  • lx-5
  • lx5
  • m4/3
  • m43
  • macro
  • macro adapter
  • makernotes
  • malaysia
  • manfrotto
  • manfrotto tripod
  • manual
  • mark ii
  • mark iii
  • MFT
  • mft. micro four thirds
  • micro four thirds
  • mielec
  • migration
  • mini review
  • mirror
  • mirror-less
  • mirrorless
  • mobile
  • modification
  • modifier
  • monobloc
  • monoblock
  • monolight
  • motion
  • motion blur
  • multi function printer
  • multiple
  • nano crystal
  • natural light
  • neil
  • Neil VN
  • niekerk
  • nikkor
  • nikon
  • nikon d600
  • noise
  • off camera
  • oil
  • olympus
  • olympus 12-50
  • Olympus 40-150
  • olympus 45
  • olympus 45 18
  • olympus om-d em-5
  • om-d
  • omd
  • omd em1
  • omd em5
  • omd em6
  • on-camera
  • one inch
  • overexposure
  • overpowering sun
  • panasonic
  • panasonic leica 25 14
  • pancake
  • party
  • passport
  • pastries
  • pastry
  • pc
  • pentax
  • peter
  • phone
  • phone photography
  • photo
  • photo tips
  • photography
  • photokina
  • photomerge
  • photoshop
  • photoshop elements
  • planning
  • pocketwizard
  • point and shoot
  • poland
  • polarizer
  • popup
  • popup flash
  • portrait
  • post processing
  • post-processing
  • postprocessing
  • product
  • product shots
  • profile
  • protection
  • protector
  • quad-flash
  • quantum
  • radiopopper
  • raid 0
  • Range finder
  • raw
  • raw editing
  • raw+jpeg
  • rays
  • real
  • recovery
  • reflection
  • reflector
  • resources
  • restaurant
  • review
  • rf-603
  • rf603
  • ricoh
  • ring
  • ringflash
  • robin wong
  • roger cicala
  • rogue
  • rokinon
  • roll off
  • roll-off
  • rolloff
  • rs-5
  • rs-7
  • rumors
  • s5
  • s5 pro
  • s5pro
  • samples
  • samsung
  • samyang
  • sb-26
  • sb-80
  • sb26
  • sb800
  • screen protector
  • sensor
  • sensor swab
  • sensorclear
  • sensorklean
  • sensorklear
  • separation
  • shadow
  • shadow pulling
  • shadows
  • shards
  • sharpening
  • sharpness
  • shoot through
  • shoot-through
  • shoot-thru
  • shooting technique
  • shootout
  • short
  • sigma
  • sigma 50-150
  • skin tones
  • skylight
  • Slik Mini Tripod
  • slingshot
  • slow
  • small
  • smooth
  • soft
  • softbox
  • sony
  • sony a99
  • sony rx100
  • sony t10
  • specular
  • speed
  • speedlight
  • speedlite
  • spinlight
  • spots
  • standard
  • stockholm
  • story
  • strap
  • strobe
  • strobist
  • studio
  • studio strobe
  • subject
  • substitute
  • sudden
  • summilux
  • sunrise
  • sunset
  • sweden
  • swivel
  • sync speed
  • t2i
  • t3i
  • Table top tripod
  • tamron
  • technique
  • techniques
  • tele
  • telephoto
  • thinktank retrospective 5
  • third party
  • tips
  • tokina
  • tonal
  • tonality
  • tone curve
  • toploader
  • toys
  • translucent
  • travel photography
  • tri-flash
  • Tribute
  • trifold
  • trigger
  • tripod
  • truth
  • ttl
  • TTL Cord
  • u43
  • ultra-wide
  • ultrawide
  • umbrella
  • underexposure
  • unlimited sync speed
  • up-rise
  • up-rise 15z
  • update
  • uprise
  • USM
  • uv
  • uwa
  • vanguard
  • versus
  • vertical
  • video
  • view nx2
  • visual science lab
  • vs
  • wadi rayan
  • wd caviar black
  • web
  • weekend
  • westin
  • white balance
  • white lightning
  • wide
  • wide angle
  • window
  • wireless
  • wireless flash
  • wireless release
  • wireless trigger
  • workflow
  • Yashica
  • yashica gtn
  • yashica st-7
  • yn-560
  • yn-560ex
  • yn-ex600
  • yn560
  • yong nuo
  • yongnuo
  • zack arias
  • zoom
  • zoom toploader
  • zuiko

Blog Archive

  • ▼  2013 (165)
    • ▼  December (5)
      • Olympus E-PL3 with 14-42 Lens $199; Moving from Ni...
      • Sigma 18-35 1.8 Revisited; Where to Get It
      • Speedlight Modifiers - 50% discount at Fotodiox
      • Olympus M.Zuiko 45mm f/1.8 Mini Review
      • Evening Portraits with Flash
    • ►  November (10)
    • ►  October (8)
    • ►  September (7)
    • ►  August (3)
    • ►  July (11)
    • ►  June (10)
    • ►  May (15)
    • ►  April (19)
    • ►  March (33)
    • ►  February (24)
    • ►  January (20)
  • ►  2012 (193)
    • ►  December (17)
    • ►  November (22)
    • ►  October (34)
    • ►  September (47)
    • ►  August (12)
    • ►  July (11)
    • ►  June (10)
    • ►  May (13)
    • ►  April (13)
    • ►  March (8)
    • ►  February (1)
    • ►  January (5)
  • ►  2011 (141)
    • ►  December (8)
    • ►  November (8)
    • ►  October (7)
    • ►  September (9)
    • ►  August (13)
    • ►  July (13)
    • ►  June (19)
    • ►  May (17)
    • ►  April (25)
    • ►  March (22)
Powered by Blogger.

About Me

Unknown
View my complete profile