Better Family Photos

  • Subscribe to our RSS feed.
  • Twitter
  • StumbleUpon
  • Reddit
  • Facebook
  • Digg
Showing posts with label lightroom 5. Show all posts

Sunday, 6 October 2013

Post Processing Series: Episode 3

Posted on 08:41 by Unknown

In the third episode of this series, I will show you how I post processed the picture you see above, this is dedicated to Muhammad Usman based on his comments on the original post where I posted this photo. Hit the jump for the full post.

This photo was part of a macro shoot that I did at home, this is a small lock that I use to lock my bag during travel. I originally shot that same lock with my Canon 60mm macro a while ago, and I liked it so much that I decided to do it again with my OM-D and 12-50 lens.

On with the post then, here's the original shot:


NOTE: You can click on any of the screenshots below to see the full 1920x1080 picture.

And here's how it looked like in lightroom, with the default adjustments, you'll notice a specular highlights around the numbers 9 and 6 (shown in red), this is a useful feature in lightroom, you can press "J" while in develop module, and it will show any blown highlights in red, and deep blacks in blue:


Next I increased the blacks using the black slider until there were a few black parts in the picture, which is what I like to have in most pictures, they are shown in blue below:


And since this is a photo of an object, and not a portrait, I increased the clarity until it the picture had enough bite and a little more micro-contrast.


Now that I am done with global adjustments, it is time to crop the picture to show just the lock dials, which is what I had in mind when I was shooting:


Time for black and white, there are a few ways to do that in lightroom, and my favorite is to click the B&W button in the "HSL / Color / B&W" module on the right hand, this provides me with some color control (yes, in B&W, similar to gelled filters used in front of B&W film cameras) which I find useful in portrait and landscape shots, I will be using it in a small bit.


Usually I like more contrast and more blacks in B&W photos, unless I am going for a soft high key look, and I don't mind having large areas with crushed blacks as long as they don't contribute to the details of the image. So my next modification will be adding more blacks, since you can see the lock  looks gray-ish instead of black.


Then I reduce the highlights more to bring some of the missing details around the numbers 9 and 6 which is the focus of the image.


And here's where I use the colors under the B&W section, I click the targeted adjustment tool (the small circle on the top left corner of the B&W module), and move my mouse to the part where I want to change the color, and use the scroll wheel, scrolling up lightens that color, and scrolling down makes it darker. After a few scrolls down, the lock looks better.


Still missing something, I don't like the logo at the top of the photo. Cropping to a 16 x 9 ratio will solve the issue.


And some post-crop vignetting, I don't mind going a bit strong in a B&W picture.
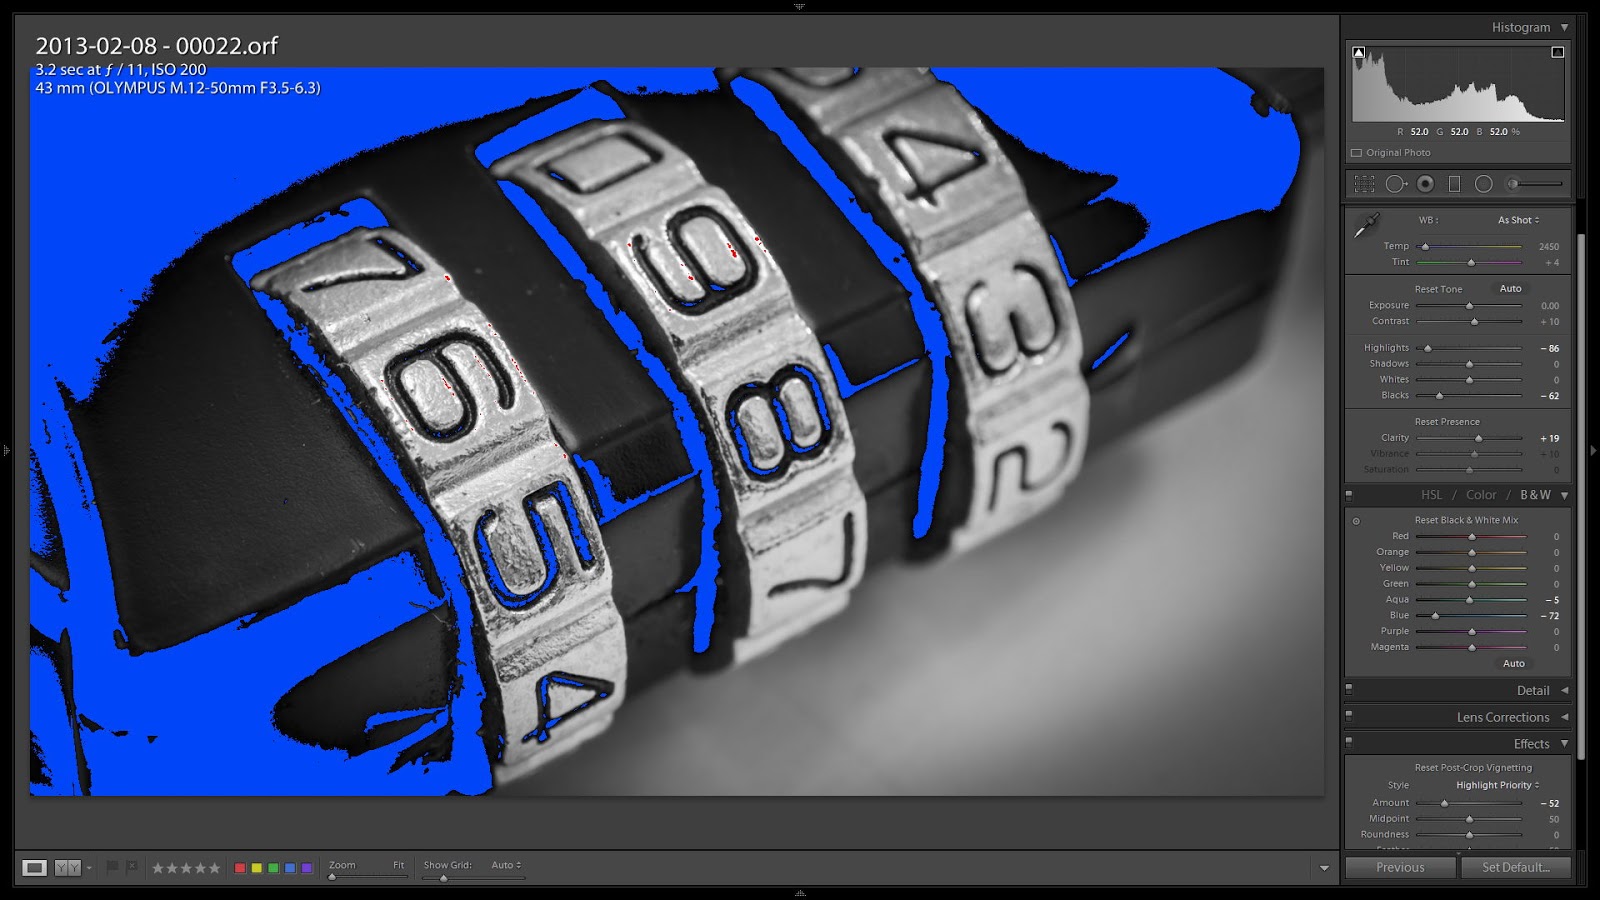

And for the final touches, some spot-removal to remove the spots and dust particles. There is a very useful feature in Lightroom 5 when using the spot-healing brush, you have at the bottom of the picture a square which when you tick, helps you visualize the spots in the picture.


A few clicks to remove the spots, and we're done.


I hope this has been a useful post. Finally here's the before and after.


RELATED POSTS

Post Processing Series: Episode 1 - Indoor Portrait
Post Processing Series: Episode 2 - Landscape
Macro Fun @ Home 

Read More
Posted in lightroom, lightroom 5, post processing, raw, raw editing, tips | No comments

Friday, 6 September 2013

Post Processing Series: Episode 2

Posted on 09:12 by Unknown


I promised you 6 months ago that I'll be posting a bi-weekly "Post Processing" episode, but I didn't keep my promise. I am really sorry, but things have been hectic both on the personal level, and on the country level. However, I promise to make it up for you, and I promise to keep this series alive, especially that I am now using a nice AutoHotKey script that makes it very easy and quick to take screenshots from Lightroom and save them.

You can see above the image we're going to edit today, and this is how it originally looked like, don't be shocked.


I took this image during a boat tour around Stockholm, I didn't have much time or chance to capture the tree from a proper angle, the boat was moving quickly, and I decided to capture whatever I can. I was using my Zuiko 12-50 zoom lens, aperture priority mode, f/8 in order to get maximum sharpness out of this mediocre lens, and to have proper depth of field. ISO was set to 400, and I was getting fast enough shutter speeds.

What drew me to this tree, was its unique shape, protruding out of the water-side at an angle, with the lowest branch submerged in the water. It looked like it was drinking water. I took a couple of shots, with the second shot looking better composition-wise, but I used this one instead because of the lucky rainbow just below where the tree touches the water.

NOTE: You can click on any of the screenshots below to see the full 1920x1080 picture.


So here is how it looked like in lightroom, you can see a few parameters of my default preset (Contrast +10, Highlights -10, Blacks -10, Clarity +10, Vibrance +10) that are applied automatically to each OMD image imported into lightroom. Remember the previous post in this series when I mentioned that subtlety is important when using the sliders to get good looking; realistic effects?


Not this time though, I usually use the sliders aggressively when I am processing a landscape shot with no people, especially in this picture where you can see how cloudy the sky was, lighting was very flat and there was a lack of contrast due to the lack of direct sunlight, so I had to punch the colors and the contrast a bit.

Here's how I reached the values you see above, which is what I do almost in most of my processing:
  1. I usually start with the 2 most important exposure sliders, highlights & shadows, even before the exposure itself. So here I brought the highlights down to have the clouds look more dramatic, then I opened up the shadows until it looked ok to my taste, and not flat.
  2. Next I used the blacks slider, I hit the "Alt" key and move the slider to the left until I see some blacks in the image, then I release the "Alt" key and check the image visually, sometimes I will see it better to reduce the blacks a bit.
  3. Clarity and vibrance are always bumped for outdoor scenery pictures. I never push the clarity beyond +40, but here I pushed the vibrance up until the green in the tree looked where I wanted it to be. Notice that saturation is not used yet, this is my least used slider, and I keep it to the end, and use it sparingly, as it really saturates all the colors making them look ugly sometimes. Vibrance; on the other hand only punches those muted colors in a less extravagant manner.
  4. Finally, I check if the image could use an exposure (or the "whites" slider) boost, which is not really needed, and the same for contrast, which got bumped slightly.
There is no certain guidelines for this, I move the sliders to taste, and that's why having a calibrated screen is very important. I will post about that soon.


Next I opened up the shadows a bit more. After adding blacks and contrast, the image had good contrast, it was too dark, so I opened up the shadows more. Now here is where the Sony/Nikon sensors excel the most, in shadow recovery. If I were using an image from my Canon 60D, there would be a lot of color noise and banding in the shadow areas, and it would look ugly. And to be fair to the Canons, they have incredible highlight recovery latitude, I was just using both the 60D and the OMD to shoot product shots, and the difference in highlight and shadow recovery between both was like day and night. That's why I used to expose to the right (ETTR) in my Canons, and that's why Mic never seemed to understand what I was on about, exposing to the right on the OMD (and I expect the Nikons as well) doesn't seem to work as well as it did on the Canon.


I was happy with the image at that stage, but before I finished it, I decided to push the saturation a bit and see what happens. Good things as it turned out.


Now a square crop to really emphasize that tree, and cut out the distractions at the background and the sides.


And one of my favorite tools, "Post Crop Vignetting", I am sorry the screenshot doesn't show the slider, but I pull it backwards (-ve numbers) very slightly until I like the look. Be careful with that slider, you can get carried away very easily, I use it just to give a little bit pop to the center of the image.


Finally, a small crop adjustment to get rid of the column at the bottom right. And we're done, here's the before and after once more. I hope you've enjoyed this post, and please don't hesitate to ask if you have any questions. Keep the comments coming.


RELATED POSTS

Post Processing Series: Episode 1 - Indoor Portrait
Post Processing Series: Episode 3 - B&W Macro
 

Read More
Posted in lightroom, lightroom 5, post processing, raw, raw editing, tips | No comments
Older Posts Home
Subscribe to: Posts (Atom)

Popular Posts

  • Best Alternative to Nikon 24-70 2.8G: the Nikon 28-70 2.8D
    Every Nikon shooter knows that the Nikkor 24-70 2.8G is the best standard zoom for Nikon's full frame cameras.  However, at around $1900...
  • Double Camera Strap & BlackRapid RS-5 Review
    This is a review of two camera straps: - The first is a double camera strap that's -- let's be blunt -- a knockoff of the BlackRapid...
  • Price drops!!! Olympus XZ-2, Pentax MX-1. And about the Casio EX-10
    I just noticed a huge price drop on the Olympus XZ-2 (previously $500 now under $400) and Pentax MX-1 (previously $500 now under $300 ).  Pe...
  • Nikon 28 1.8G: Moody Artist?
    When Nikon had its recently-finished sale (now extended to end of March), the one lens that I considered buying was the Nikkor 28 1.8G.  To...
  • Olympus E-PL3 with 14-42 Lens $199; Moving from Nikon to MFT?
    I saw on 43rumors.com that the Olympus E-PL3 was being sold at Newegg for just $199 with the 14-42 kit lens included.  I checked it out and...
  • Abstract Fun
    In one of the rare times I put effort and setup a light stand and an umbrella to shoot my girls, I decided to make use of this burst of ener...
  • Update: Nikon D7100 Lightroom raw profiles
    UPDATE: The raw profiles don't seem to work.  I'm trying to find a workaround. UPDATE 2: The workaround is here: http://betterfamily...
  • Capturing Epic Sunrises and Sunsets
    Epic sunrise or sunset shots -- the kind where the sky is ablaze with hues of red, yellow and lavender -- don't happen purely by luck.  ...
  • Coco Ring Flash - First Impressions
    A few weeks ago, after much deliberation, I finally decided to get a ring flash adapter.  My purpose was to use it as on-axis fill, much lik...
  • Nikon D7000 vs. Nikon D7100
    D7000 + Tokina 11-16 I've been using the Nikon D7000 for a couple of months now, and in this post I'd like to share my thoughts on t...

Categories

  • "alien bee"
  • "april fool's"
  • "ring flash"
  • "yong nuo"
  • 1"
  • 1/1.7"
  • 10-17
  • 10-20
  • 11-16
  • 15-85mm
  • 15z
  • 17-50 vc
  • 190cx pro3
  • 2.8
  • 2.8G
  • 2/3"
  • 200 f2.8
  • 200 L
  • 200mm
  • 200mm f/2.8
  • 200mm f/2.8 L II
  • 200mm f2.8
  • 200mm f28
  • 200mm f28 L II
  • 2012
  • 2013
  • 23 Samsung led
  • 24-105 f4
  • 24-70
  • 25 1.4
  • 28-105
  • 28-70
  • 35mm
  • 35mm f/2
  • 35mm f2
  • 360
  • 3rd party
  • 4.1
  • 4/3
  • 40 pancake
  • 40 panckae
  • 40 stm
  • 40-150R
  • 40mm f/2.8
  • 430EX
  • 43rumors
  • 45 18
  • 45 AW
  • 4x4
  • 50 14
  • 50 f14
  • 50-150
  • 50mm
  • 50mm f/1.4
  • 55 AW
  • 55-250
  • 550D
  • 55aw
  • 560ex
  • 580 ex ii
  • 580EX
  • 580EX II
  • 5d
  • 5d mark 2
  • 5d mark 3
  • 5D Mark II
  • 5d mark iii
  • 5d2
  • 600d
  • 600ex-rt
  • 60d
  • 60fps
  • 60mm macro
  • 650d
  • 6d
  • 7.5mm
  • 720p
  • 75 f1.8
  • 85mm f1.8
  • 8x12
  • abbc
  • abstract
  • accuracy
  • active d-lighting
  • adjustment
  • adl
  • AF
  • af point
  • AF Point Expansion
  • aftermarket
  • airport
  • alexandria
  • alien bee
  • alien bees
  • alienbee
  • alienbees
  • alternative
  • ambient
  • ambient light
  • angle
  • aperture priority
  • APS-C
  • apsc
  • assignment
  • auto focus
  • auto white balance
  • autofocus
  • AWB
  • awl
  • back button focus
  • background
  • background blur
  • backlight
  • backlighting
  • backlit
  • bad behavior
  • bad photography
  • balance
  • bare flash
  • battery
  • BBF
  • beach
  • beams
  • beauty dish
  • bellagio
  • BFT
  • birthday
  • black
  • black foamie thing
  • black rapid
  • blackrapid
  • blogs
  • blower
  • blown
  • blur
  • bokeh
  • bounce
  • bounce card
  • bounce flash
  • bower
  • bracket
  • brightness
  • brilliance
  • brolly grip
  • brother
  • build
  • burst mode
  • butterflies
  • butterfly
  • C.Fn
  • cable
  • cake
  • camera
  • camera bag
  • camera releases
  • camera settings
  • candle
  • candlelight
  • canon
  • Canon 100mm Macro L IS
  • canon 200mm f28L
  • canon 24-105
  • canon 40 stm
  • canon 40mm f28 pancake
  • canon 50
  • canon 50 1.4
  • canon 55-250
  • canon 5d mark 2
  • canon 5d mark ii
  • canon 5d mark iii
  • canon 5d2
  • canon 5d3
  • Canon 60d
  • canon 6d
  • canon g11
  • canon speedlite
  • car
  • carbon fiber
  • catch lights
  • cheap
  • christmas
  • clean
  • cleaning
  • clipped
  • clipping
  • close up
  • clouds
  • cls
  • clustered
  • color
  • compact
  • comparison
  • composition
  • compositional aid
  • construction
  • contrast
  • cooler master
  • copyright
  • core i7
  • cowboy
  • cowboystudio
  • cpl
  • creepy
  • crop factor
  • crop sensor
  • cyber commander
  • cybersync
  • d-lux
  • d-lux5
  • d3
  • d300
  • D5100
  • D600
  • d70
  • d700
  • D7100
  • d90
  • dark background
  • david hobby
  • daylight
  • dell 24 inch
  • depth of field
  • desert
  • diamond
  • digital
  • directional
  • distance
  • diy
  • dlux
  • dlux5
  • dng
  • double
  • dslr
  • DSLR bag
  • dual
  • dust
  • dx
  • dynamic range
  • earthquake
  • ebay
  • ebay trigger
  • eclipse
  • editing
  • EF 40mm f/2.8
  • ef-s 60mm
  • einstein
  • Electro GN
  • engagement
  • environmental portrait
  • ep5
  • equipment
  • ETTL
  • ettr
  • europe
  • events
  • evf
  • ex600
  • existing light
  • expensive
  • exposing to the right
  • exposure
  • f/3.5
  • family
  • faq
  • fasten-r3
  • favorite
  • fayoum
  • Fayoum desert
  • fill
  • fill light
  • film
  • filter
  • finepix
  • fire
  • fireplace
  • first impressions
  • fish-eye
  • fisheye
  • fix
  • FL600R
  • flash
  • flash bounce
  • flash sync
  • flash trigger
  • flashmeter
  • flashright
  • focal length
  • focus
  • food
  • football
  • fotodiox
  • fountain
  • freexwire
  • fuji
  • fujifilm
  • Full Frame
  • fun
  • fx
  • galaxy s 3
  • galaxy s4
  • gecko
  • GeForce gtx570 OC
  • gel
  • geomag
  • ggs
  • ghost
  • gigabyte z77 ud3h
  • glass
  • gn
  • Goodbye
  • gorillapod
  • gregg
  • grid
  • grip
  • group shot
  • gskill ripjaws
  • guide
  • guide number
  • gx7
  • haf 912
  • handheld
  • hands on
  • hands-on
  • hdr
  • head shot
  • hiatus
  • high dynamic range
  • high iso
  • high speed sync
  • highlight
  • highlights
  • histogram
  • holder
  • holiday
  • home
  • home made
  • Honda civic
  • honeycomb
  • hotshoe
  • hoya
  • humor
  • i9500
  • id
  • image quality
  • impressions
  • indoor flash
  • infrared
  • infringement
  • insects
  • inverse square law
  • japan
  • jewel
  • jewelry
  • joby head
  • jpeg
  • Kingston hyperX SSD
  • kirk tuck
  • kl bird park
  • krakow
  • kuala lumpur
  • las vegas
  • lastolite
  • laurence kim
  • lax
  • lcd
  • leica
  • lens
  • lens cap
  • lens compression
  • lens review
  • lenses
  • lenspen
  • lensrentals
  • light
  • light painting
  • lighting
  • lightroom
  • lightroom 4
  • lightroom 5
  • location
  • long
  • long exposure
  • los angeles
  • low key
  • low light
  • Lowepro
  • Lowepro 45aw
  • Lowepro 55aw
  • lr4
  • lumiquest softbox III
  • lumix
  • lx-5
  • lx5
  • m4/3
  • m43
  • macro
  • macro adapter
  • makernotes
  • malaysia
  • manfrotto
  • manfrotto tripod
  • manual
  • mark ii
  • mark iii
  • MFT
  • mft. micro four thirds
  • micro four thirds
  • mielec
  • migration
  • mini review
  • mirror
  • mirror-less
  • mirrorless
  • mobile
  • modification
  • modifier
  • monobloc
  • monoblock
  • monolight
  • motion
  • motion blur
  • multi function printer
  • multiple
  • nano crystal
  • natural light
  • neil
  • Neil VN
  • niekerk
  • nikkor
  • nikon
  • nikon d600
  • noise
  • off camera
  • oil
  • olympus
  • olympus 12-50
  • Olympus 40-150
  • olympus 45
  • olympus 45 18
  • olympus om-d em-5
  • om-d
  • omd
  • omd em1
  • omd em5
  • omd em6
  • on-camera
  • one inch
  • overexposure
  • overpowering sun
  • panasonic
  • panasonic leica 25 14
  • pancake
  • party
  • passport
  • pastries
  • pastry
  • pc
  • pentax
  • peter
  • phone
  • phone photography
  • photo
  • photo tips
  • photography
  • photokina
  • photomerge
  • photoshop
  • photoshop elements
  • planning
  • pocketwizard
  • point and shoot
  • poland
  • polarizer
  • popup
  • popup flash
  • portrait
  • post processing
  • post-processing
  • postprocessing
  • product
  • product shots
  • profile
  • protection
  • protector
  • quad-flash
  • quantum
  • radiopopper
  • raid 0
  • Range finder
  • raw
  • raw editing
  • raw+jpeg
  • rays
  • real
  • recovery
  • reflection
  • reflector
  • resources
  • restaurant
  • review
  • rf-603
  • rf603
  • ricoh
  • ring
  • ringflash
  • robin wong
  • roger cicala
  • rogue
  • rokinon
  • roll off
  • roll-off
  • rolloff
  • rs-5
  • rs-7
  • rumors
  • s5
  • s5 pro
  • s5pro
  • samples
  • samsung
  • samyang
  • sb-26
  • sb-80
  • sb26
  • sb800
  • screen protector
  • sensor
  • sensor swab
  • sensorclear
  • sensorklean
  • sensorklear
  • separation
  • shadow
  • shadow pulling
  • shadows
  • shards
  • sharpening
  • sharpness
  • shoot through
  • shoot-through
  • shoot-thru
  • shooting technique
  • shootout
  • short
  • sigma
  • sigma 50-150
  • skin tones
  • skylight
  • Slik Mini Tripod
  • slingshot
  • slow
  • small
  • smooth
  • soft
  • softbox
  • sony
  • sony a99
  • sony rx100
  • sony t10
  • specular
  • speed
  • speedlight
  • speedlite
  • spinlight
  • spots
  • standard
  • stockholm
  • story
  • strap
  • strobe
  • strobist
  • studio
  • studio strobe
  • subject
  • substitute
  • sudden
  • summilux
  • sunrise
  • sunset
  • sweden
  • swivel
  • sync speed
  • t2i
  • t3i
  • Table top tripod
  • tamron
  • technique
  • techniques
  • tele
  • telephoto
  • thinktank retrospective 5
  • third party
  • tips
  • tokina
  • tonal
  • tonality
  • tone curve
  • toploader
  • toys
  • translucent
  • travel photography
  • tri-flash
  • Tribute
  • trifold
  • trigger
  • tripod
  • truth
  • ttl
  • TTL Cord
  • u43
  • ultra-wide
  • ultrawide
  • umbrella
  • underexposure
  • unlimited sync speed
  • up-rise
  • up-rise 15z
  • update
  • uprise
  • USM
  • uv
  • uwa
  • vanguard
  • versus
  • vertical
  • video
  • view nx2
  • visual science lab
  • vs
  • wadi rayan
  • wd caviar black
  • web
  • weekend
  • westin
  • white balance
  • white lightning
  • wide
  • wide angle
  • window
  • wireless
  • wireless flash
  • wireless release
  • wireless trigger
  • workflow
  • Yashica
  • yashica gtn
  • yashica st-7
  • yn-560
  • yn-560ex
  • yn-ex600
  • yn560
  • yong nuo
  • yongnuo
  • zack arias
  • zoom
  • zoom toploader
  • zuiko

Blog Archive

  • ▼  2013 (165)
    • ▼  December (5)
      • Olympus E-PL3 with 14-42 Lens $199; Moving from Ni...
      • Sigma 18-35 1.8 Revisited; Where to Get It
      • Speedlight Modifiers - 50% discount at Fotodiox
      • Olympus M.Zuiko 45mm f/1.8 Mini Review
      • Evening Portraits with Flash
    • ►  November (10)
    • ►  October (8)
    • ►  September (7)
    • ►  August (3)
    • ►  July (11)
    • ►  June (10)
    • ►  May (15)
    • ►  April (19)
    • ►  March (33)
    • ►  February (24)
    • ►  January (20)
  • ►  2012 (193)
    • ►  December (17)
    • ►  November (22)
    • ►  October (34)
    • ►  September (47)
    • ►  August (12)
    • ►  July (11)
    • ►  June (10)
    • ►  May (13)
    • ►  April (13)
    • ►  March (8)
    • ►  February (1)
    • ►  January (5)
  • ►  2011 (141)
    • ►  December (8)
    • ►  November (8)
    • ►  October (7)
    • ►  September (9)
    • ►  August (13)
    • ►  July (13)
    • ►  June (19)
    • ►  May (17)
    • ►  April (25)
    • ►  March (22)
Powered by Blogger.

About Me

Unknown
View my complete profile