


I came across this very useful post talking about tonal adjustments in lightroom, I believe this is a must read post, I enjoyed it a lot.
Showing posts with label light. Show all posts
Showing posts with label light. Show all posts
Sunday, 20 May 2012
Wednesday, 23 November 2011

This is a preliminary review of the Lastolite Brolly Grip. This unique lighting accessory allows you or an assistant to hold an umbrella, making it possible to get soft, directional light almost anywhere, without setting up.
In this review, I wanted to focus on using it by myself, without an assistant or light stand. I also wanted to have a lot of sample shots to show the real-world potential of the Brolly Grip.
When there is no feasible surface to bounce from, one of my favorite light modifiers is a handheld umbrella, a technique that I read about from Bob Krist. I put together my own version here and later found a rare handheld umbrella made by Propet (reviewed here). The Propet handheld umbrella worked well, but it had two significant weaknesses: First, the coldshoe does not hold a flash securely (on one occasion, my YN560 fell into the water). Second, the screws on some of the parts tend to come loose and are not easily replaced. Plus, the Propet handheld umbrella itself is very hard to find. In the last couple of years I've only seen it listed on eBay three times.
When Lastolite announced the Brolly Grip I was intrigued even though I already had the Propet bracket. I thought it was somewhat pricey but not ridiculously so. I finally took the leap and was surprised that it was actually out of stock. After a few weeks of waiting, my order came a couple of days ago.
 |
| The Lastolite Brolly Grip with Nikon SB-800 and a Creative Light 25" Shoot-Through Umbrella |

Just above the grip are two holes for an umbrella to accommodate an 8mm and 10mm shaft. The bottom of the grip has a hollow receptacle for a 5/8 studs commonly used in light stands.

Strangely, there is no thumbscrew to hold the umbrella. Instead, you just slide the umbrella shaft in and it is held with friction by an o-ring inside the shaft. This leads to a few problems as discussed below.
Lastolite has a video demonstrating how the product is used:
SOFT DIRECTIONAL LIGHT ANYWHERE
Lastolite's demo shows good results but the photographer had the benefit of an assistant. What about the rest of us who don't have VALs? One of the key benefits of the Brolly Grip after all is the possibility of using it by yourself. Is it really feasible to use it alone and does it really provide soft directional light in real world conditions?
I took my son to a playground and had the chance to use the Brolly Grip in sunny outdoors with no bounce surfaces available. I used a Creative Light 25-inch Translucent Umbrella . For my flash, I used a Nikon SB-800 triggered optically via CLS Advanced Wireless Lighting, using my Nikon D300's popup flash as a commander. I held the Brolly Grip with one hand and the camera with the other. When I was holding the Brolly Grip with my right hand, I would cradle the camera below the lens and press the shutter with my ring finger (it helps that I don't use a battery grip and my Tamron 17-50 VC isn't a huge lens). An alternative to this finger stretching method is to use a remote shutter.
Anyway, here are some of the shots:


Here are some shots where the flash use is more overt:


For testing purposes, I also made some comparison shots showing the difference between ambient only versus the shot with flash (note: in the first and third comparison, the flash shot was already edited in Lightroom; the second set of comparison shots are straight-out-of-the-camera):I took my son to a playground and had the chance to use the Brolly Grip in sunny outdoors with no bounce surfaces available. I used a Creative Light 25-inch Translucent Umbrella
Anyway, here are some of the shots:


Here are some shots where the flash use is more overt:


Even though I was using a small umbrella and I could only reach so far to the side with my arm, the light does look reasonably soft and directional. Certainly not always as soft as bounce flash but a huge improvement over direct flash. Plus, unlike bounce flash, I didn't have to worry about the color of the bounce surface.
CRITICISMS
I have some issues with the design. First of all, the umbrella holder doesn't have any kind of thumbscrew or clamp to hold an umbrella securely. Instead, there is a thin rubber o-ring inside each slot to hold an umbrella with friction. On one hand, it is easy to insert an umbrella. On the other hand, there is a risk that the umbrella might slide off. I'm especially worried about the inevitable wear on the o-ring, which may make the grip more loose in the future. Another disadvantage is that your umbrella shaft must be exactly 8mm or 10mm. That worked for two of my umbrellas but my 19" reflective umbrella was tapered so it's too loose for the 8mm. I also don't know how well the slots can hold umbrellas with hexagonal (as opposed to round) shafts. My workaround for this issue is to wrap a little tape around the shaft to make the shaft thicker and allow it to be held more tightly.
The second biggest issue I have with the design is the cold shoe. The cold shoe does not use a 1/4-20 hole. Instead, it uses a non-standard size. This makes it hard to use a third party cold shoe such as Nikon's AS-19 Flash Stand
I have a few other minor gripes such as:
- the grip angle is non-adjustable, making it less useful when paired with a light stand;
- I wish they included a 1/4 and 3/8 spigot so that the grip can be used with a tripod. Might as well include a hole in that spigot too so that the lower thumbscrew can securely hold the spigot and prevent the grip from rotating.

One of the challenges with the Brolly Grip is the need for reliable triggering. If you're using the grip handheld, then the simplest solution is a TTL cord. Triggering would be very reliable and simple - just like using the flash on-camera. Plus, you can position the flash in any direction without having to worry about whether the flash will receive the signal. Unfortunately, because of the non-standard screw size for the cold shoe, you'll need either a long enough screw to attach the TTL cord to the Brolly Grip or you'll need a shoe-to-1/4 adapter.
Using a radio trigger is another alternative. There are many reliable radio triggering solutions such as a Radiopopper. On the other hand, radio triggers with TTL capability are quite expensive.
The remaining alternative is optical triggering. Optical triggering is not ideal with the Brolly Grip for at least a few reasons. First, the Brolly Grip places the flash horizontally. On most flashes, the sensor for optical triggering faces the front or the side of the flash (on the SB-800, the sensor faces mostly to the side but slightly to the front). When the flash is placed horizontally, the sensor can only face one side of the flash. With the Brolly Grip that means that if you use switch the grip from one hand to the other, the sensor will face away from the popup flash. My workaround for this is to hold the grip upside down if I switch hands. If I will use that side for a while, then I rotate the cold shoe so that the flash sensor will again face the popup flash.
Second, if the Brolly Grip is used outdoors in bright sunlight, then a popup flash as commander may have difficulty putting out enough light to be detected by the remote flash.
Despite these limitations, optical triggering isn't so bad in the real world. Most of the time I was able to trigger the SB-800 successfully with my popup flash. Sometimes, when the SB-800 wasn't triggered, all I would need to do is to move the flash a bit forward to bring it within the scope of the popup flash. Considering that I was shooting mostly in bright sunlight (i.e. almost the worst case scenario), I would say that optical triggering is a realistic alternative, even if it isn't ideal.
 |
| Picking flowers for mommy |
We've already seen that it is possible to get soft directional light with the Brolly Grip. However, how practical is it for real world use?
In my view, if I have the option to use bounce flash, I would prefer to bounce for simplicity, softness and directional control. If bouncing is not an option but the ambient light is good, I might use a ring flash instead as fill for simplicity and ease of use. For other situations when bouncing is not an option and the ambient light is not favorable, a handheld umbrella would probably be my preferred solution. In that regard, the Brolly Grip is the best handheld umbrella I have right now.

UMBRELLA OPTIONS
The Brolly Grip can be ordered by itself or as a kit
RELATED POSTS:
- Handheld Umbrella - An Excellent Light Modifier
- Handheld Umbrella Indoors
- Small Umbrellas
- Ultimate Handheld Umbrella - Propet Umbrella Bracket
- Creative Light Shoot-Through Umbrella
- Do Small Modifiers Work?
- 12 Alternatives to Bouncing from Ceilings and Walls
DISCLOSURE: I'm not affiliated with Amazon or Lastolite nor am I sponsored by them. I bought the Brolly Grip for my own use and am providing this review for informational purposes. I do have an Amazon Associates account and in this article I've linked to Amazon pages for the products mentioned, which means if you purchase the product I will get an approximately 4% commission (without any additional cost to you and which is a welcome way of supporting this blog).
MORE SAMPLE SHOTS


Monday, 4 July 2011
 |
| Baywatch is getting a remake |

Fill light will lift the shadow detail and reduce the dynamic range of the scene (the difference between the relevant highlight and relevant shadows) to within the camera sensor's dynamic range, thus preserving both highlight detail and shadow detail.
However, the other problem with shooting in these conditions is that the sun is a very hard light source, creating sharply defined shadows (as in the shot of our toddler building sand castles). To address that issue, I like to use the sun as rim light instead of the key light. With the subject's face in shadow, there's no harsh light on the face. But that leads to the previous problem of dealing with the exposure of the subject's face which is now hidden in the shadow.
We could use a popup flash but that is a hard light source just like the sun, so we would be back at square one. It's possible to use an umbrella or softbox but the beach is usually very windy, making it hard to handle a suitably large umbrella or softbox.
An easy alternative is to use a ringlight (aka ring flash), which produces light that appears almost shadowless (as long as the subject is not next to a wall). A ringlight produces flat, even lighting that doesn't help reveal the subject's three-dimensional form - but that's ok under these circumstances because that's what we would expect a shaded subject to look like, thus making the use of the flash less obvious. The ringlight's reflection will show up on sunglasses and other reflective objects but it's easy to clone out if you want to. Here I left the reflections alone.


Besides real ring flashes from Profoto and Paul Buff, less expensive speedlight adapters are available from Ray Flash, Orbis, some eBay and Amazon sellers, and now from DIYPhotography.net.
RELATED POSTS:
Coco Ring Flash
Use Flash in Daylight?
Fill Flash: Summer Pool Party
Thursday, 28 April 2011

Ever wondered if you can get good quality directional light from your DSLR's popup flash just like the big boys with external speedlites do? This is what we'll try to find today. Hit the jump for the details.
DISCLAIMER: If you feel this post is hastily made, then you're probably correct, I had only one hour to prepare the images and write the post because of time constraints, so excuse me, I will be revisiting this topic later on with more finesse.
Ever since I bought my first speedlite I wanted a Sto-Fen Omni Bounce diffuser, I had almost zero lighting knowledge back then and I thought this was how everyone used their external flash, but since we don't have great camera accessories shops in Egypt, all I was able to find was this strange looking thing:
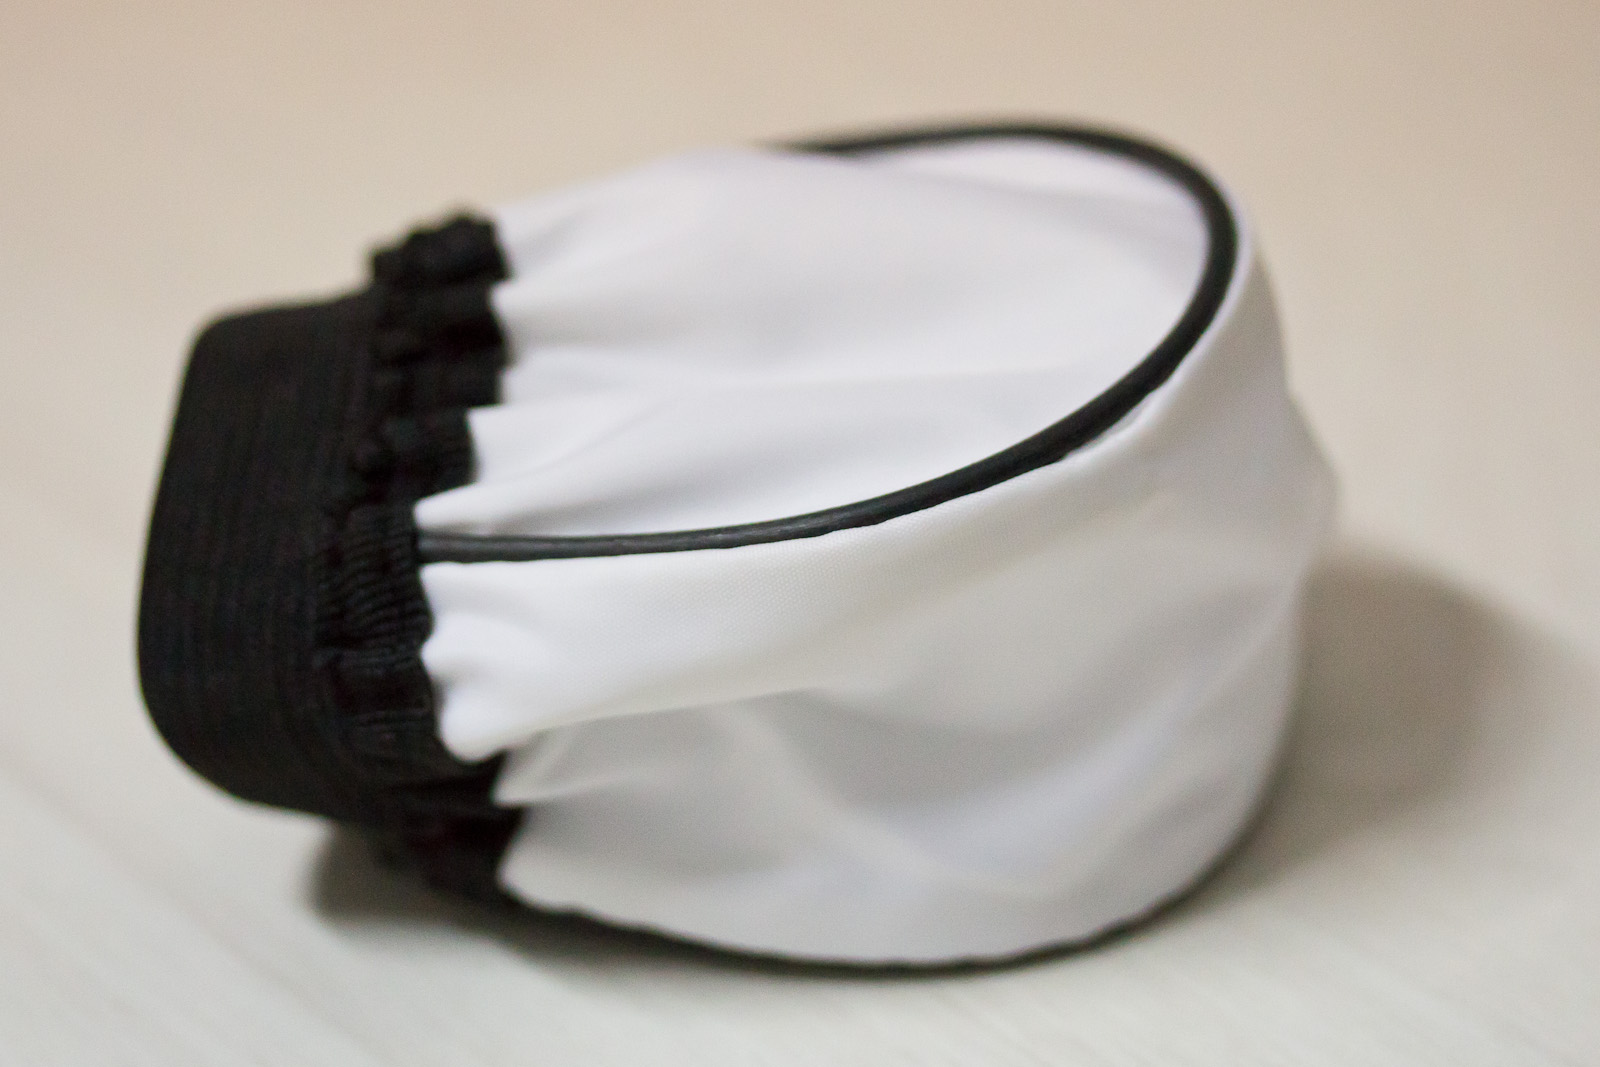


Excuse the lousy quality of the pictures but I really had no time (available light, handheld, ISO 1600), anyway, as you can see, this diffuser has a translucent white material at the top part, the sides and the front part, while the back part which looks black from the outside is lined with a bumpy reflective silver material from the inside. I think I bought this contraption for less than $6, and I also think it is supposed to fit on the speedlite's head some way or another, but I was never able to find any use for it with my flashes and it sat gathering dust for a long time.
Then one day I had the idea of using it on my camera's popup flash to bounce light of walls, can it work? Does the popup flash have enough power to get through the diffusing material, bounce from the wall and back to the subject and still give acceptable exposure? I know that new sensors now can deal with ISO 1600 with almost no noise, but will this be enough?

I think my camera's popup flash guide number is 13 or something, while the speedlites have guide numbers of 40 and more, but even then, I remember that in several situations my speedlite didn't need to use full power to successfully bounce and give me a good exposure. So to try this idea I started off with a high shutter speed to kill the ambient and see how the flash did on it's own, I even started with ISO 400 to challenge the flash even more. I will be using f/2.8 aperture throughout the post, needless to say, this whole article is talking about indoor shooting.
 |
| Base Exposure - f/2.8, 1/250 sec, ISO 400 |
 |
| Direct Flash - f/2.8, 1/250 sec, ISO 400 |
 |
| Directional Popup Flash - f/2.8, 1/250 sec, ISO 400 |
|
| Directional Popup Flash - f/2.8, 1/250 sec, ISO 800 |
 |
| Base Exposure - f/2.8, 1/160 sec, ISO 800 |
 |
| Directional Popup Flash - f/2.8, 1/160 sec, ISO 800 |
You might be wondering by now why go through this hassle and not shoot available light directly, two reasons, first, for the sake of experimentation, I am a geek and I like to try things, and secondly, because it looks way better than overhead available light that throws ugly shadows, see for yourself.
 |
| Available Light Only |
 |
| Popup Flash Diffused Light (and no, the difference is not in WB alone) |
Subscribe to:
Posts (Atom)


