Better Family Photos

  • Subscribe to our RSS feed.
  • Twitter
  • StumbleUpon
  • Reddit
  • Facebook
  • Digg

Friday, 11 October 2013

Recovering from Underexposure - A New Approach

Posted on 21:35 by Unknown

In my last post, I discussed my strategy for exposure for digital cameras, which usually results in images that are underexposed when downloaded straight-out-of-the-camera (SOOC).  In this post, I would like to discuss my current strategy for recovering shadows.  Here I use Lightroom but the same techniques can be used in other post-processing software.


COMPARISON OF THREE APPROACHES

Here is the SOOC version of the image above.


I used the approach I discussed in my last post, relying on ADL to expose for the highlights.  As expected, the SOOC is underexposed.  However, the relevant highlights are preserved:

even the candle highlights are preserved


The highlights in the window on camera right are not preserved but that's ok.  They don't add to the image (it was an overcast day with gray skies) and exposing for them would have led to more noise without much offsetting benefit.

Easy approach

The  easiest approach is of course to use the shadow slider (increase it as needed) and the highlight recovery slider (decrease as needed).  In my opinion it is also the least satisfying way to recover underexposure.  The result looks HDR-ish (but if you like that effect, then this is perfect for you -- boost the clarity slider next to make it look more like HDR).  Moreover, in some sensors like that of the D7100, using the shadow slider is more likely to reveal noise or worse, banding.
Using the shadow slider: HDR much?

Global approach
The next approach is one that I've posted about before.  In brief, instead of relying on the shadow slider, I use the exposure slider.  I do use the shadow slider as well, but only up to about +20 or sometimes +30.  More than that and it looks too artificial for me.  I use as little of the shadow slider as possible.

A +20 or +30 shadow adjustment for a scene that's exposed for highlights will nowhere be enough.  Therefore the heavy lifting ( sorry :) ) is done with the exposure slider which I use as much as necessary.  Using the exposure slider will be more likely to blow the highlights that are actually captured.  To offset that, I use aggressive highlight recovery.  As much as -200 (by using an adjustment brush on top of the highlight adjustment).  Unlike using the shadow recovery slider I don't find any issues with the highlight recovery.

For very contrasty scenes I get a little help by changing the camera calibration to a low contrast picture style and if necessary, by decreasing the contrast as well.

When the midtones look normal, I then work on restoring the oomph because the image will otherwise look very flat / low contrast.  To do that, I increase the white slider (making whites appear more white), and I decrease the shadow slider (deepening the blacks).  Does that effectively negate what I did with the highlight recovery and shadow recovery?  Not at all.  The net effect of those changes is to move the shadows and highlights a little closer to the middle, where it is easier to see them (partly because our eyes can differentiate more midtone shades).

Here is the result:


Here again is the first method for comparison:

This second method produces a more natural and more three-dimensional appearance.  Now let's talk about the third approach.

INTRODUCING THE HOBBY APPROACH

I call my current approach the Hobby approach for two reasons: first, it is styled after Strobist David Hobby's logic of using lights; second, because it is customized for each image, it is probably not usable for event pros who need to edit thousands of shots.  So, it's just for us hobbyists. :)  Well, ok, editorial and portrait shooters too.

Until about a year ago, I was a huge strobist fan.  My lighting collection attests to that (someday I'll review more of my lighting gear).  I'm still a fan, but after having gotten the D600 with its exceptional shadow recovery abilities, I found that I could get results with postprocessing that closely mimic real artificial lighting (lol).  Here's how it works (strobists among you will recognize the logic):

Shadow detail legibility
The first thing I do with the underexposed image is to raise the exposure for shadow legibility.  In strobist-speak that means increasing the exposure to the point where the details of relevant shadows can be seen.  What that exactly means varies depending on your shot and your taste.  If for example you want an intense-looking dramatic scene then the shadow details would be barely visible.  If you want a look that mimics Mr. Hobby's shooting style, you want shadow details that are pretty easy to see (enough that if you print the shot on newsprint with a lousy printer, you will still have enough detail).  I myself prefer something in between.

Here again is the SOOC shot:

And here is the shot with the exposure raised to my desired shadow legibility (in this case +0.36):

Highlights
To tame the highlights, I use the highlight recovery slider, that's all.  I don't mind being aggressive with it, although I watch to make sure the image doesn't become too flat.  For stubborn highlights, I use an adjustment brush or radial gradient to bring them down further.

Midtones
To raise the midtones, I use Lightroom 5's radial gradient.  To me it looks more convincing than using the adjustment brush.  If you're new to LR5, pls. note that the radial gradient can be changed to an oval/ellipse and can be tilted.

I use an inverse mask which means the effect will be within the circle that you apply instead of outside it.  I also increase the feathering from 50 to 75.  This simulates real world lights more closely (unless you want it to look like you used a snoot, in which case you decrease the feathering).  For each gradient I try not to increase more than +0.7 or else the result looks too obvious.

I apply this radial gradient everywhere I want to raise the midtones, starting from the darkest midtones.  For some areas, I apply overlapping radial gradients that are progressively smaller.  For example if I have a portrait shot from the waist up then I'll apply a radial gradient for the head and body, then to highlight the face, I'll add another radial gradient just to the head area.  Note that I don't just use one huge radial gradient to cover the arms as well -- I apply a separate radial gradient to each arm.

From the previous shadow legibility step:

Here are the areas where I applied a radial gradient (see the dots):

Result with midtone recovery:


Contrast
As with the second approach, I add punch to the image using the white slider, black slider, and sometimes the clarity slider.

That's pretty much all there is to this approach.  Note that this method cannot recreate rim lights or kickers or hard lights.  For those I use ambient light sources or flash.

Here are some more samples:


Read More
Posted in | No comments

The Dead Gecko

Posted on 12:51 by Unknown

Remember my recent Abstracts post? It was during the same day that me and my friend found a dead gecko on the bathroom floor. It was tiny, but it presented a good photographic opportunity and allowed us to occupy some of the long free boring time we had on hand, hit the jump for the full story.


Before I start, I want to show you how tiny this gecko is, the camera in the picture is a Canon 60D and that's my very own Canon 60mm Macro f/2.8. The tripod is my Manfrotto 190CX Pro3.

My friend is still learning about lighting, so I let him lead to see what he would do, and every now and then I gave some pointers and suggestions. So, he started with the obvious, a slightly high angle, shooting directly on the same table where we put the gecko, and shooting from the same direction where the light came from (a large door-sized window with sunset light, which you can see from the shadow).


Here is what came out:


Not the best background, lots of dust specks (we really didn't notice it with our eyes), and it turns out the gecko had some string attached to its front left leg. And more importantly, the light didn't look good. I did a few spot removal in lightroom, and this is what I was able to get, still not good enough.


For the next attempt, I suggested that we should get rid of the brown background, and use something black instead. The only thing we had that worked was my friend's leather tablet cover.

As for lighting, I suggested shooting through the gecko with the sun coming from behind and opposite to the lens (backlighting). We also improved the composition, and shot from a much lower angle, almost from the eye-level of the gecko. Here's the setup shot, but after the sunset light went away (notice the useful tilting LCD, and the extremely useful tripod's extending center column):


And here's how it looked like with just the sunset backlighting the gecko, you'll notice we cleaned the tablet cover thoroughly, yet I had to do a little bit of spot removal.


We were shooting at f/6.3, with the lowest ISO, and the sun was setting down quickly, consecutive shots looked slightly different because of moving light. For the next iteration, I decided we should use flash, and have complete control over our lighting.

The 60D had a commander pop-up flash that triggered a remote 580EX (also my very own) in TTL mode, we were able to adjust the flash compensation either from the camera or the flash itself (which I held in my hand).

For the lighting setup, I decided to mimic the backlight as in the shot above, but with some fill from the front. To diffuse the light, and in the same spirit of the place we were staying at, I used a large (1m x 1.5m) plastic bag to diffuse the flash light and soften it. It is transparent with some writing on it that didn't affect the color of the light. I held the bag behind the gecko, and held the flash almost one meter away from the bag. It acted as a huge (compared to the gecko's size) diffuser, and gave some very soft light. For fill, I used an idea that I used previously with great results. I used a yellow piece of paper in front of the gecko to reflect the diffused light on his eye, and open up the shadows. The benefit of the yellow paper is that it reflect the light with a golden tint. Here's how it came out:


You can see the effect of the yellow reflection on his eye. And to show you the difference, here is the same shot with a normal white paper, and without the vignetting. Much less appealing in my opinion.


At that stage, we were quite satisfied with what we got, but we decided to play with the position of the backlight and the diffuser a bit, sometimes raising the light and sometimes lowering it. It resulted in different pictures for the same subject, especially for the background, and the rim light.

Finally, here's the opening picture (my favorite) again:


RELATED POSTS

Sharing Some Macros
Macro Talk: Canon EF-S 60mm f/2.8 Macro USM
Macro Fun @ Home
Abstracts With The Olympus 40-150R
Flash Series - Part 1: Canon Speedlites Chat (580EX II vs 580EX vs 430EX)


Read More
Posted in 190cx pro3, 580EX, 60d, 60mm macro, flash, gecko, lighting, macro, manfrotto | No comments

Wednesday, 9 October 2013

Comments on the Nikon D610 and Pentax K-3

Posted on 10:32 by Unknown
New cameras have been announced by Nikon and Pentax.  Here are some thoughts.
 
Nikon D610: virtually the same as the Nikon D600, except that it has a new shutter mechanism that can do 6fps instead of 5.5fps.  The new shutter can also use continuous shutter in quiet mode.  The big question that everyone has is whether it will fix the dust problem.  If it does then it might be worth getting the D610 instead of the D600.  The cost of getting dust swabs, blowers, etc. can mount, and they are inconvenient to use.  If the D610 doesn't fix the dust problem then at least you can get a D600 at hopefully larger savings.
 
Pentax K-3: lots of great features.  The big question for me is which sensor they used?  Judging by the resolution of 6016 x 4000, I think they used the same sensor as the Nikon D3200 which is by Sony.  If so, that would be welcome news.  The Toshiba sensor in the D5200 and D7100 has great high ISO performance but lousy shadow recovery (it has banding when shadows are recovered).
Read More
Posted in | No comments

Sunday, 6 October 2013

Post Processing Series: Episode 3

Posted on 08:41 by Unknown

In the third episode of this series, I will show you how I post processed the picture you see above, this is dedicated to Muhammad Usman based on his comments on the original post where I posted this photo. Hit the jump for the full post.

This photo was part of a macro shoot that I did at home, this is a small lock that I use to lock my bag during travel. I originally shot that same lock with my Canon 60mm macro a while ago, and I liked it so much that I decided to do it again with my OM-D and 12-50 lens.

On with the post then, here's the original shot:


NOTE: You can click on any of the screenshots below to see the full 1920x1080 picture.

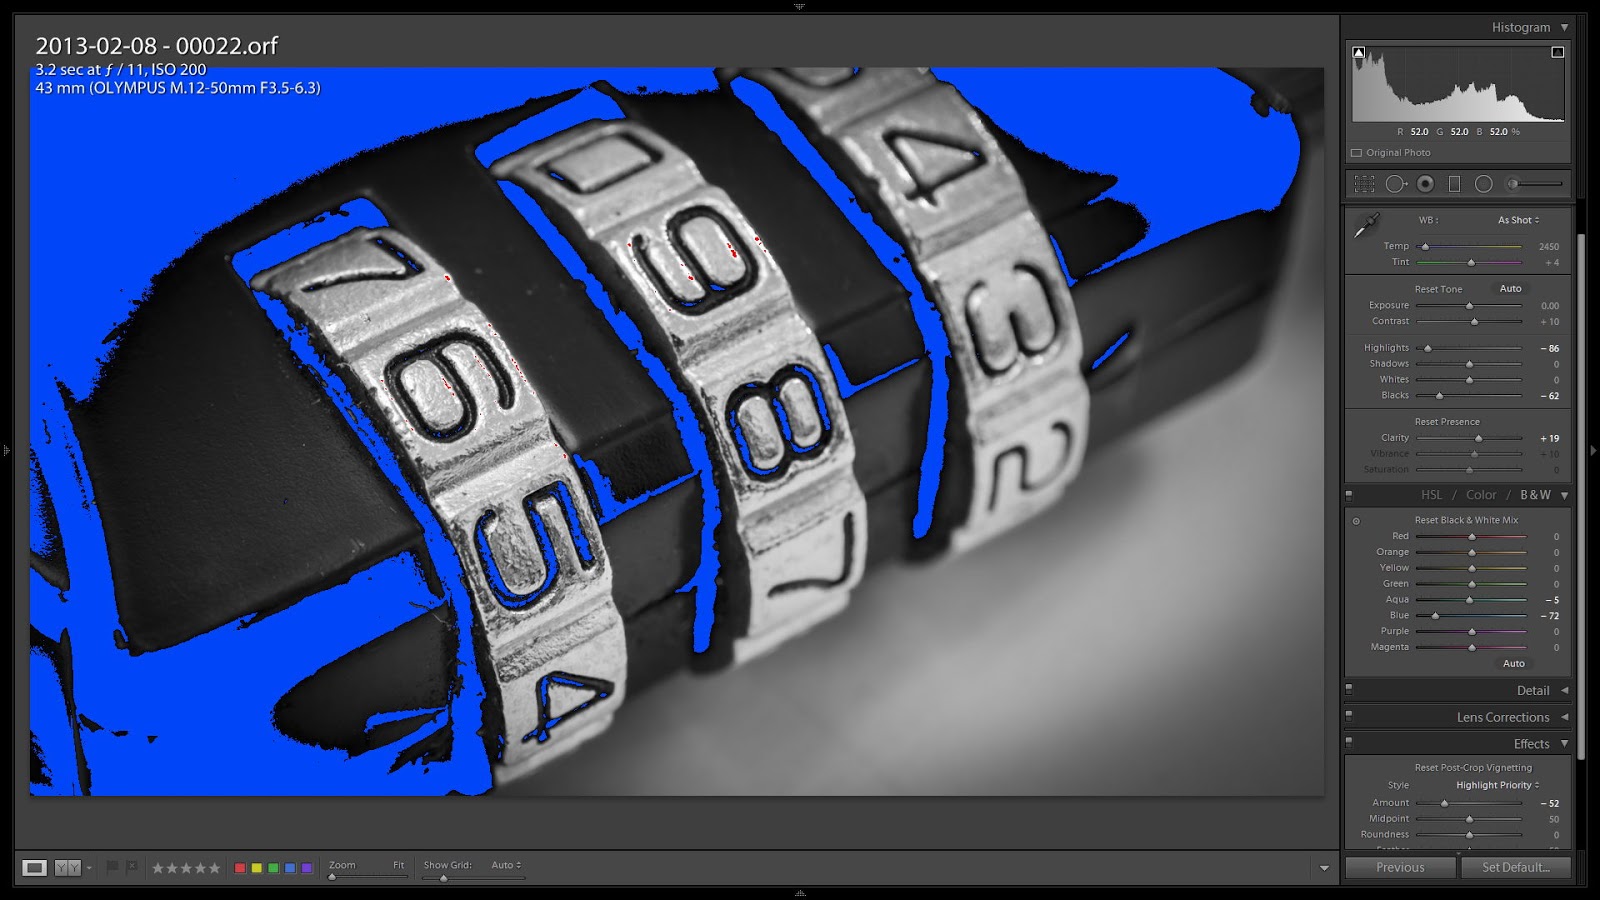
And here's how it looked like in lightroom, with the default adjustments, you'll notice a specular highlights around the numbers 9 and 6 (shown in red), this is a useful feature in lightroom, you can press "J" while in develop module, and it will show any blown highlights in red, and deep blacks in blue:


Next I increased the blacks using the black slider until there were a few black parts in the picture, which is what I like to have in most pictures, they are shown in blue below:


And since this is a photo of an object, and not a portrait, I increased the clarity until it the picture had enough bite and a little more micro-contrast.


Now that I am done with global adjustments, it is time to crop the picture to show just the lock dials, which is what I had in mind when I was shooting:


Time for black and white, there are a few ways to do that in lightroom, and my favorite is to click the B&W button in the "HSL / Color / B&W" module on the right hand, this provides me with some color control (yes, in B&W, similar to gelled filters used in front of B&W film cameras) which I find useful in portrait and landscape shots, I will be using it in a small bit.


Usually I like more contrast and more blacks in B&W photos, unless I am going for a soft high key look, and I don't mind having large areas with crushed blacks as long as they don't contribute to the details of the image. So my next modification will be adding more blacks, since you can see the lock  looks gray-ish instead of black.


Then I reduce the highlights more to bring some of the missing details around the numbers 9 and 6 which is the focus of the image.


And here's where I use the colors under the B&W section, I click the targeted adjustment tool (the small circle on the top left corner of the B&W module), and move my mouse to the part where I want to change the color, and use the scroll wheel, scrolling up lightens that color, and scrolling down makes it darker. After a few scrolls down, the lock looks better.


Still missing something, I don't like the logo at the top of the photo. Cropping to a 16 x 9 ratio will solve the issue.


And some post-crop vignetting, I don't mind going a bit strong in a B&W picture.


And for the final touches, some spot-removal to remove the spots and dust particles. There is a very useful feature in Lightroom 5 when using the spot-healing brush, you have at the bottom of the picture a square which when you tick, helps you visualize the spots in the picture.


A few clicks to remove the spots, and we're done.


I hope this has been a useful post. Finally here's the before and after.


RELATED POSTS

Post Processing Series: Episode 1 - Indoor Portrait
Post Processing Series: Episode 2 - Landscape
Macro Fun @ Home 

Read More
Posted in lightroom, lightroom 5, post processing, raw, raw editing, tips | No comments

Wednesday, 2 October 2013

Exposure for Digital Cameras

Posted on 00:47 by Unknown


In this post, I'd like to talk about my approach on setting the exposure for digital cameras.

COMPARISON BETWEEN THE EYE AND A DIGITAL SENSOR

When you raise the volume on your stereo, do you notice that as it gets louder, it takes larger adjustments to make it even louder?  Our eyes work in a similar way.  As an object gets brighter, it needs to become disproportionately brighter in order to appear brighter to our eyes.  This relationship between actual versus perceived brightness is sometimes described as being logarithmic or nonlinear.

The reason I mention this from the outset is because it is an important concept to consider when determining exposure.

With film cameras, in particular negative (print) film, exposure works in a similar way to our eyes.  It requires progressively more light in order to make it appear brighter.  As a result, negative film usually preserves highlights very well.  Check out the sample below:


I took the shot with a Nikon N90, using ordinary consumer grade color negative film (Kodak Gold 200 IIRC).  As you can see from the very sharp shadows, the sun was quite bright, with barely any clouds.  Nonetheless, you can see all the highlight details were preserved, even in the light colored areas of the shot that were directly illuminated by the sun, such as the white part of the sneakers, or more critically, the skin (particularly the underside of the forearm).  No blown highlights at all.

The sensor of a conventional digital camera, however, works differently from our eyes and from negative film.  Digital sensors are linear.  Double the light and the recorded light is also doubled, no matter how bright or dark the image already is.  To further compound the problem, once the maximum amount of light is recorded, all detail in that portion is lost forever.  That part of the image will just look totally white, with no detail that can be recovered (though I admit it is possible to *simulate* recovery through careful cloning). There are also exceptions such as the Fuji S5 Pro (reviewed here) which is much more similar to our eyes and to negative film.

"CORRECT" EXPOSURE

We use the term 'exposure' in a couple of ways.  On one hand it can mean whether you chose a wide aperture or narrow aperture, or a fast shutter or slow shutter, or a high ISO or a low ISO.  On the other hand, it can also mean just the net amount of recorded light, regardless of choice of aperture, shutter speed, or ISO.  To avoid confusion, by exposure I mean the latter (I'll refer to the former as creative exposure).

Suppose we ask, what is the correct exposure?

One response is that the correct exposure is the exposure that records the amount of light that is actually in the scene.  A middle gray object is recorded as middle gray.  I agree, when comparing straight-out-of-the-camera results, this is of course by definition the most accurate approach.  If this is your preferred approach then an incident lightmeter is your best friend.  Barring that, you can use the Zone System to get a reasonable estimate of the light in the scene.

The problem with this approach is that it doesn't necessarily take into account the sensor or medium's dynamic range (the range of shadows and highlights that can be captured by the medium).  Suppose you have a medium that has a range of 3 stops of shadow and 3 stops of highlights.  Suppose further that you have a scene that is quite dark, with tones that are primarily in Zone I, II and III.  If you use the 'most accurate' approach, then you won't be able to record the Zone I portions of the scene - they are beyond the dynamic range of the medium.

An alternative solution would be to fit the dynamic range of the scene within the dynamic range of the medium, as much as possible.  In the hypothetical scenario above, the scene could be intentionally overexposed by 1 or more stops so that the Zone I is rendered as Zone II or higher, within the dynamic range of the medium.  In post processing, the intentional overexposure can be corrected, and meanwhile the Zone I detail is preserved, a better end result than the previous approach that needlessly sacrifices Zone I.

We can apply this same logic to digital cameras.  Most digital sensors have a very good shadow range but less impressive highlight range.  Indeed, as post-processing software improves, the useful shadow range is effectively extended to ever-deeper blacks.  Therefore it makes sense to underexpose the shot as needed to fit the relevant highlight range within the sensor's highlight range.

This does not mean we should underexpose unnecessarily, "just to be safe."  Because notwithstanding advances in sensor technology, an underexposed image will have more noise.

Keeping both objectives (dynamic range and noise), the ideal strategy for digital sensors is therefore to expose for the brightest relevant highlight, i.e. expose to the right as much as possible without blowing any relevant highlight detail.

The key word here is 'relevant'.  When is a highlight relevant or not?  To me, a highlight is relevant if it helps in the "modeling" of the subject (i.e., helps describe the three-dimensional contour of the subject).  Therefore to me, a highlight illuminated by a kicker or the shoulder is relevant, while I don't sweat over the rim light or backlight (the thin bright outline to separate the subject from the background).  In general, I also don't attempt to preserve specular reflections - you know, the very bright reflections of light (there's no detail there anyway), just focusing instead on keeping diffuse highlights.

As for the background, highlights matter to me based on various factors like whether the highlight adds to the image or not.  If the sky is just featureless gray sky, then I don't care if I lose it or not (it's featureless after all!).  If the background is blurred with shallow depth of field, I look at factors like whether the background is colored or not.  If it's just white blobs, I don't mind losing some highlight detail there.  Again, this is just my opinion on which highlights I find relevant.

CASE STUDIES

Let's compare these two straight-out-of-the-camera shots:


Again, these are SOOC without any exposure adjustments.  The scenes are different, and in the first one I used a flash while in the second one I did not.  But note that the ambient lights are similar: sun coming from over the shoulder.  In the first shot, the exposure was set for 'accuracy,' it doesn't look overexposed or underexposed as is.  The second one appears significantly underexposed.

Notwithstanding the SOOC appearance, to me, the exposure in the second shot is the one I prefer based on my preferred strategy for exposure for digital cameras.  In the first one, look at my skin (and that of my son).  Bright patches of detail-less white, like someone spilled correction fluid on us.  You could kind of rationalize and say, oh it's just backlight.  But to me, because they do help shape the subjects' heads, they should have been preserved.


Here is a closeup from the second shot:

No lost highlights at all.

And now here are the end results after post-processing:

Note: it's not exactly the same shot, I know.  Anyway, as you can see there are many blown highlights even after post-processing.  Like I said, once they're gone they're gone.

And here is the second shot, after postprocessing:


Although I brought up the exposure to correct the underexposure, the highlights are all still there.

REAL WORLD APPLICATION

So, in the real world, how do we expose to the right just enough to preserve relevant highlights?  One way is to use the histogram.  It helps if your camera has a zoomable histogram (meaning the histogram reflects the zoomed-in portion).  Another way is to take a test shot and see if any of the relevant highlights are blinking, but this is somewhat unreliable for me.  I find the camera is usually too conservative, showing that an area is blinking whereas in reality that portion still has detail when I download the shot to my computer.

I use neither of these options.  Instead I rely on Active D-Lighting (Highlight Tone Protection for Canon).  For Nikon cameras, Active D-Lighting will seemingly increase the dynamic range of the shot.  Actually what it does is to underexpose the shot, then use its internal postprocessing to recover underexposed shadow areas.  The shadow recovery is recorded only in JPEG, and I always shoot in Raw so I don't see that in-camera shadow recovery when I download the shot, but I don't care too much about it.  I can apply shadow recovery myself.  The primary benefit of ADL for me is that it underexposes the shot sufficiently to preserve the highlights.  In current Nikon DSLRs, the "protectiveness" of the ADL can be adjusted from low to normal to high to extra-high to auto.  I usually leave it on Auto unless conditions are extremely contrasty, in which case I tend to choose extra-high.

FOLLOW-UP

We haven't discussed yet how I brought up the shadows.  In the past here is the approach I used.  These days, I use a different approach.  That will be the topic for my next post.

Read More
Posted in | No comments
Newer Posts Older Posts Home
Subscribe to: Posts (Atom)

Popular Posts

  • Samyang 24 f/3.5 Tilt Shift Lens Now Available
    A seller on ebay ( bestpriceoptics ) is now selling the Samyang 24 f/3.5 tilt shift lens, in Canon and Nikon mounts, for $999 shipped.  This...
  • Nikon 28 1.8G: Moody Artist?
    When Nikon had its recently-finished sale (now extended to end of March), the one lens that I considered buying was the Nikkor 28 1.8G.  To...
  • Olympus E-PL3 with 14-42 Lens $199; Moving from Nikon to MFT?
    I saw on 43rumors.com that the Olympus E-PL3 was being sold at Newegg for just $199 with the 14-42 kit lens included.  I checked it out and...
  • Double Camera Strap & BlackRapid RS-5 Review
    This is a review of two camera straps: - The first is a double camera strap that's -- let's be blunt -- a knockoff of the BlackRapid...
  • Price drops!!! Olympus XZ-2, Pentax MX-1. And about the Casio EX-10
    I just noticed a huge price drop on the Olympus XZ-2 (previously $500 now under $400) and Pentax MX-1 (previously $500 now under $300 ).  Pe...
  • Best Alternative to Nikon 24-70 2.8G: the Nikon 28-70 2.8D
    Every Nikon shooter knows that the Nikkor 24-70 2.8G is the best standard zoom for Nikon's full frame cameras.  However, at around $1900...
  • Abstract Fun
    In one of the rare times I put effort and setup a light stand and an umbrella to shoot my girls, I decided to make use of this burst of ener...
  • Coco Ring Flash - First Impressions
    A few weeks ago, after much deliberation, I finally decided to get a ring flash adapter.  My purpose was to use it as on-axis fill, much lik...
  • Nikon D7000 vs. Nikon D7100
    D7000 + Tokina 11-16 I've been using the Nikon D7000 for a couple of months now, and in this post I'd like to share my thoughts on t...
  • Sigma 18-35 1.8 Revisited; Where to Get It
    Back in April of this year, Sigma surprised everyone by announcing the Sigma 18-35 f/1.8 , the first zoom lens for a large sensor that had s...

Categories

  • "alien bee"
  • "april fool's"
  • "ring flash"
  • "yong nuo"
  • 1"
  • 1/1.7"
  • 10-17
  • 10-20
  • 11-16
  • 15-85mm
  • 15z
  • 17-50 vc
  • 190cx pro3
  • 2.8
  • 2.8G
  • 2/3"
  • 200 f2.8
  • 200 L
  • 200mm
  • 200mm f/2.8
  • 200mm f/2.8 L II
  • 200mm f2.8
  • 200mm f28
  • 200mm f28 L II
  • 2012
  • 2013
  • 23 Samsung led
  • 24-105 f4
  • 24-70
  • 25 1.4
  • 28-105
  • 28-70
  • 35mm
  • 35mm f/2
  • 35mm f2
  • 360
  • 3rd party
  • 4.1
  • 4/3
  • 40 pancake
  • 40 panckae
  • 40 stm
  • 40-150R
  • 40mm f/2.8
  • 430EX
  • 43rumors
  • 45 18
  • 45 AW
  • 4x4
  • 50 14
  • 50 f14
  • 50-150
  • 50mm
  • 50mm f/1.4
  • 55 AW
  • 55-250
  • 550D
  • 55aw
  • 560ex
  • 580 ex ii
  • 580EX
  • 580EX II
  • 5d
  • 5d mark 2
  • 5d mark 3
  • 5D Mark II
  • 5d mark iii
  • 5d2
  • 600d
  • 600ex-rt
  • 60d
  • 60fps
  • 60mm macro
  • 650d
  • 6d
  • 7.5mm
  • 720p
  • 75 f1.8
  • 85mm f1.8
  • 8x12
  • abbc
  • abstract
  • accuracy
  • active d-lighting
  • adjustment
  • adl
  • AF
  • af point
  • AF Point Expansion
  • aftermarket
  • airport
  • alexandria
  • alien bee
  • alien bees
  • alienbee
  • alienbees
  • alternative
  • ambient
  • ambient light
  • angle
  • aperture priority
  • APS-C
  • apsc
  • assignment
  • auto focus
  • auto white balance
  • autofocus
  • AWB
  • awl
  • back button focus
  • background
  • background blur
  • backlight
  • backlighting
  • backlit
  • bad behavior
  • bad photography
  • balance
  • bare flash
  • battery
  • BBF
  • beach
  • beams
  • beauty dish
  • bellagio
  • BFT
  • birthday
  • black
  • black foamie thing
  • black rapid
  • blackrapid
  • blogs
  • blower
  • blown
  • blur
  • bokeh
  • bounce
  • bounce card
  • bounce flash
  • bower
  • bracket
  • brightness
  • brilliance
  • brolly grip
  • brother
  • build
  • burst mode
  • butterflies
  • butterfly
  • C.Fn
  • cable
  • cake
  • camera
  • camera bag
  • camera releases
  • camera settings
  • candle
  • candlelight
  • canon
  • Canon 100mm Macro L IS
  • canon 200mm f28L
  • canon 24-105
  • canon 40 stm
  • canon 40mm f28 pancake
  • canon 50
  • canon 50 1.4
  • canon 55-250
  • canon 5d mark 2
  • canon 5d mark ii
  • canon 5d mark iii
  • canon 5d2
  • canon 5d3
  • Canon 60d
  • canon 6d
  • canon g11
  • canon speedlite
  • car
  • carbon fiber
  • catch lights
  • cheap
  • christmas
  • clean
  • cleaning
  • clipped
  • clipping
  • close up
  • clouds
  • cls
  • clustered
  • color
  • compact
  • comparison
  • composition
  • compositional aid
  • construction
  • contrast
  • cooler master
  • copyright
  • core i7
  • cowboy
  • cowboystudio
  • cpl
  • creepy
  • crop factor
  • crop sensor
  • cyber commander
  • cybersync
  • d-lux
  • d-lux5
  • d3
  • d300
  • D5100
  • D600
  • d70
  • d700
  • D7100
  • d90
  • dark background
  • david hobby
  • daylight
  • dell 24 inch
  • depth of field
  • desert
  • diamond
  • digital
  • directional
  • distance
  • diy
  • dlux
  • dlux5
  • dng
  • double
  • dslr
  • DSLR bag
  • dual
  • dust
  • dx
  • dynamic range
  • earthquake
  • ebay
  • ebay trigger
  • eclipse
  • editing
  • EF 40mm f/2.8
  • ef-s 60mm
  • einstein
  • Electro GN
  • engagement
  • environmental portrait
  • ep5
  • equipment
  • ETTL
  • ettr
  • europe
  • events
  • evf
  • ex600
  • existing light
  • expensive
  • exposing to the right
  • exposure
  • f/3.5
  • family
  • faq
  • fasten-r3
  • favorite
  • fayoum
  • Fayoum desert
  • fill
  • fill light
  • film
  • filter
  • finepix
  • fire
  • fireplace
  • first impressions
  • fish-eye
  • fisheye
  • fix
  • FL600R
  • flash
  • flash bounce
  • flash sync
  • flash trigger
  • flashmeter
  • flashright
  • focal length
  • focus
  • food
  • football
  • fotodiox
  • fountain
  • freexwire
  • fuji
  • fujifilm
  • Full Frame
  • fun
  • fx
  • galaxy s 3
  • galaxy s4
  • gecko
  • GeForce gtx570 OC
  • gel
  • geomag
  • ggs
  • ghost
  • gigabyte z77 ud3h
  • glass
  • gn
  • Goodbye
  • gorillapod
  • gregg
  • grid
  • grip
  • group shot
  • gskill ripjaws
  • guide
  • guide number
  • gx7
  • haf 912
  • handheld
  • hands on
  • hands-on
  • hdr
  • head shot
  • hiatus
  • high dynamic range
  • high iso
  • high speed sync
  • highlight
  • highlights
  • histogram
  • holder
  • holiday
  • home
  • home made
  • Honda civic
  • honeycomb
  • hotshoe
  • hoya
  • humor
  • i9500
  • id
  • image quality
  • impressions
  • indoor flash
  • infrared
  • infringement
  • insects
  • inverse square law
  • japan
  • jewel
  • jewelry
  • joby head
  • jpeg
  • Kingston hyperX SSD
  • kirk tuck
  • kl bird park
  • krakow
  • kuala lumpur
  • las vegas
  • lastolite
  • laurence kim
  • lax
  • lcd
  • leica
  • lens
  • lens cap
  • lens compression
  • lens review
  • lenses
  • lenspen
  • lensrentals
  • light
  • light painting
  • lighting
  • lightroom
  • lightroom 4
  • lightroom 5
  • location
  • long
  • long exposure
  • los angeles
  • low key
  • low light
  • Lowepro
  • Lowepro 45aw
  • Lowepro 55aw
  • lr4
  • lumiquest softbox III
  • lumix
  • lx-5
  • lx5
  • m4/3
  • m43
  • macro
  • macro adapter
  • makernotes
  • malaysia
  • manfrotto
  • manfrotto tripod
  • manual
  • mark ii
  • mark iii
  • MFT
  • mft. micro four thirds
  • micro four thirds
  • mielec
  • migration
  • mini review
  • mirror
  • mirror-less
  • mirrorless
  • mobile
  • modification
  • modifier
  • monobloc
  • monoblock
  • monolight
  • motion
  • motion blur
  • multi function printer
  • multiple
  • nano crystal
  • natural light
  • neil
  • Neil VN
  • niekerk
  • nikkor
  • nikon
  • nikon d600
  • noise
  • off camera
  • oil
  • olympus
  • olympus 12-50
  • Olympus 40-150
  • olympus 45
  • olympus 45 18
  • olympus om-d em-5
  • om-d
  • omd
  • omd em1
  • omd em5
  • omd em6
  • on-camera
  • one inch
  • overexposure
  • overpowering sun
  • panasonic
  • panasonic leica 25 14
  • pancake
  • party
  • passport
  • pastries
  • pastry
  • pc
  • pentax
  • peter
  • phone
  • phone photography
  • photo
  • photo tips
  • photography
  • photokina
  • photomerge
  • photoshop
  • photoshop elements
  • planning
  • pocketwizard
  • point and shoot
  • poland
  • polarizer
  • popup
  • popup flash
  • portrait
  • post processing
  • post-processing
  • postprocessing
  • product
  • product shots
  • profile
  • protection
  • protector
  • quad-flash
  • quantum
  • radiopopper
  • raid 0
  • Range finder
  • raw
  • raw editing
  • raw+jpeg
  • rays
  • real
  • recovery
  • reflection
  • reflector
  • resources
  • restaurant
  • review
  • rf-603
  • rf603
  • ricoh
  • ring
  • ringflash
  • robin wong
  • roger cicala
  • rogue
  • rokinon
  • roll off
  • roll-off
  • rolloff
  • rs-5
  • rs-7
  • rumors
  • s5
  • s5 pro
  • s5pro
  • samples
  • samsung
  • samyang
  • sb-26
  • sb-80
  • sb26
  • sb800
  • screen protector
  • sensor
  • sensor swab
  • sensorclear
  • sensorklean
  • sensorklear
  • separation
  • shadow
  • shadow pulling
  • shadows
  • shards
  • sharpening
  • sharpness
  • shoot through
  • shoot-through
  • shoot-thru
  • shooting technique
  • shootout
  • short
  • sigma
  • sigma 50-150
  • skin tones
  • skylight
  • Slik Mini Tripod
  • slingshot
  • slow
  • small
  • smooth
  • soft
  • softbox
  • sony
  • sony a99
  • sony rx100
  • sony t10
  • specular
  • speed
  • speedlight
  • speedlite
  • spinlight
  • spots
  • standard
  • stockholm
  • story
  • strap
  • strobe
  • strobist
  • studio
  • studio strobe
  • subject
  • substitute
  • sudden
  • summilux
  • sunrise
  • sunset
  • sweden
  • swivel
  • sync speed
  • t2i
  • t3i
  • Table top tripod
  • tamron
  • technique
  • techniques
  • tele
  • telephoto
  • thinktank retrospective 5
  • third party
  • tips
  • tokina
  • tonal
  • tonality
  • tone curve
  • toploader
  • toys
  • translucent
  • travel photography
  • tri-flash
  • Tribute
  • trifold
  • trigger
  • tripod
  • truth
  • ttl
  • TTL Cord
  • u43
  • ultra-wide
  • ultrawide
  • umbrella
  • underexposure
  • unlimited sync speed
  • up-rise
  • up-rise 15z
  • update
  • uprise
  • USM
  • uv
  • uwa
  • vanguard
  • versus
  • vertical
  • video
  • view nx2
  • visual science lab
  • vs
  • wadi rayan
  • wd caviar black
  • web
  • weekend
  • westin
  • white balance
  • white lightning
  • wide
  • wide angle
  • window
  • wireless
  • wireless flash
  • wireless release
  • wireless trigger
  • workflow
  • Yashica
  • yashica gtn
  • yashica st-7
  • yn-560
  • yn-560ex
  • yn-ex600
  • yn560
  • yong nuo
  • yongnuo
  • zack arias
  • zoom
  • zoom toploader
  • zuiko

Blog Archive

  • ▼  2013 (165)
    • ▼  December (5)
      • Olympus E-PL3 with 14-42 Lens $199; Moving from Ni...
      • Sigma 18-35 1.8 Revisited; Where to Get It
      • Speedlight Modifiers - 50% discount at Fotodiox
      • Olympus M.Zuiko 45mm f/1.8 Mini Review
      • Evening Portraits with Flash
    • ►  November (10)
    • ►  October (8)
    • ►  September (7)
    • ►  August (3)
    • ►  July (11)
    • ►  June (10)
    • ►  May (15)
    • ►  April (19)
    • ►  March (33)
    • ►  February (24)
    • ►  January (20)
  • ►  2012 (193)
    • ►  December (17)
    • ►  November (22)
    • ►  October (34)
    • ►  September (47)
    • ►  August (12)
    • ►  July (11)
    • ►  June (10)
    • ►  May (13)
    • ►  April (13)
    • ►  March (8)
    • ►  February (1)
    • ►  January (5)
  • ►  2011 (141)
    • ►  December (8)
    • ►  November (8)
    • ►  October (7)
    • ►  September (9)
    • ►  August (13)
    • ►  July (13)
    • ►  June (19)
    • ►  May (17)
    • ►  April (25)
    • ►  March (22)
Powered by Blogger.

About Me

Unknown
View my complete profile