Better Family Photos

  • Subscribe to our RSS feed.
  • Twitter
  • StumbleUpon
  • Reddit
  • Facebook
  • Digg

Saturday, 15 December 2012

A Couple Of Yashica Oldies

Posted on 03:50 by Unknown
Yashica Electro 35 GTN + Yashica ST-7
 
How many of you know the above camera? Have you seen such a tripod before? Hit the jump for a flash back in time.
 
The first camera I have ever used, and learned to take photos with, was my father's Yashica Electro 35 GSN, it is not the one shown above, but it is identical in almost everything, and the top part has a silver color instead of black as the one in the picture, which is a GTN by the way.
 
Aperture, Distance Scale, DOF scale, WB, Self Timer & Bulb Mode
 
It was (past tense used to indicate it was decommissioned ~ 10 years ago) a 35mm film range finder, it has a fixed 45mm f/1.7 lens, and to focus, you look through the viewfinder where you see two images of the same scene but slightly shifted horizontally, you move the focus ring until the two images of the object you want to focus on coincide on top of each other, only then can you trip the shutter.
 
Film Speed
 
We used it with color Kodak film, I think it was ASA 400 film, you had a dial to select the film speed (aka sensitivity, or ISO in digital). The camera was mostly automatic, you pick the required aperture and it will select a shutter speed between 1/500 sec up to 30 sec depending on the light conditions, there are two lights that tells you if the shot was going to be over or under exposed, which meant the camera couldn't select a shutter speed suitable enough, and you had to take action. I remember my father taught me to use f/16 aperture when shooting in sunlight, and down to f/1.7 indoors, middle apertures were used in between both extreme lighting conditions.
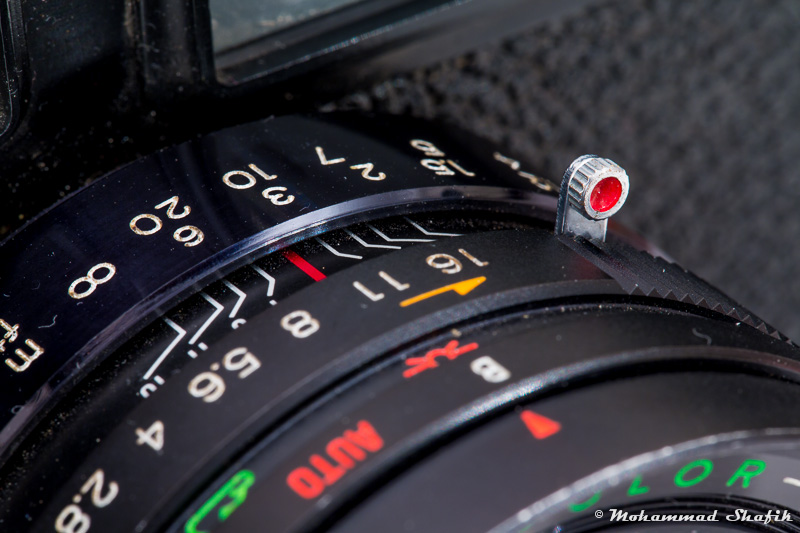
 
Self Timer
 
See that silver lever with the red dot? That's the self timer, you move it counter clockwise until it locks in place (it uses a spring mechanism), and when you trip the shutter, it returns to it's original position slowly, you have around 10 seconds before the camera takes a picture.
 
One of my step mother's friends gave the camera and the tripod shown here to my daughter to play with, it was the first time for me to see that tripod, it was quite interesting, a unique design which I never saw before, let's have a few looks first, I will compare it to my Slik Mini-Tripod with a ball head, which I adore, especially that it can carry up to 3kg of weight.
 
Yashica ST-7 is really tiny
 
Unscrew the bottom, spread the legs, and screw it back
 
Legs expanded
 
Made in Germany
 
Ball head, a nice surprise
 
Compared to my Slik tripod with only the legs opened
 
Slik's maximum height
 
Maximum height, with maximum legs length
 
How would you focus like that without a rear live view screen? We're quite spoiled.
 
The tripod was a very nice surprise, it is tiny when closed (a mini monopod), it has a ball head, a nice hand strap, and it is very sturdy, and all the mechanical bits are too smooth. The one who came up with this design is a genius. Of course I doubt it will carry a heavy DSLR with a heavy lens with such short legs, but it is more than adequate for small cameras and my soon-to-be-acquired Olympus OM-D EM-5.
 
All of the tripod pictures were taken with the 5D Mark III and the 100 Macro L, I was too lazy to use any lighting equipment, so I just used available overhead room lights, all exposures were completely hand held (not even resting my hands on a table), f/8, ISO 1600 and 1/6th of a second, now that's more than 4 stops of image stabilization, and in some of the shots I was at macro shooting distances, the 100L is really the perfect lens.
Posted with BlogsyPosted with Blogsy
Read More
Posted in 5d mark iii, Canon 100mm Macro L IS, Electro GN, Range finder, Slik Mini Tripod, Table top tripod, tripod, Yashica, yashica gtn, yashica st-7 | No comments

Friday, 14 December 2012

Nikon D600 Price Drop! Now Just $1999 WITH 24-85 VR Kit

Posted on 07:06 by Unknown
The Nikon D600 with 24-85 VR kit is now available for just $1999.  http://shop.nikonusa.com/store/nikonusa/en_US/pd/ThemeID.18145600/productID.256095900/pgm.81985000

The same deal is available at Amazon until December 15, 2012.

FYI I bought my Nikon D600 for $2099 + tax.  Compared to that, this deal is like getting the 24-85 VR lens for free!  Alternatively, you may be able to sell the 24-85 VR (retails for $600) for $400 or $500 and cut down the price of the D600 to $1500 or $1600. (Wow... Almost makes me want to buy another one....!)

Offer good until December 29, 2012 only at the Nikon store.  Plus, at the Nikon store for December 14-16, 2012 only, you can get a DSLR/laptop shoulder bag AND next day shipping for free!

This offer appears to be intended to take the wind out of the Canon 6D's sales (pun intended hehe) (comparison here).  Recently, Canon did a similar thing to the D600 by drastically lowering the price of the Canon 5D Mark II.  (The difference is that the D600 is a cutting edge camera whereas the 5DII is a capable but aging camera.)

RELATED POSTS:
Nikon D600 Review
Nikon D600 Posts in reverse chronological order.  Click on older posts to retrieve more articles.
Read More
Posted in | No comments

Tuesday, 11 December 2012

Some Valuable Resources for Teaching Your Child Reading and Math

Posted on 15:32 by Unknown
Yes this is a photography blog. If you found our site and are looking for photo-related stuff, don't worry you're in the right place. Just see any of the 500+ articles that we have already posted. In particular you may want to start with the index. I haven't updated it in a year but it will still help you navigate through many of our articles.
This post, however, is for our readers who have young kids. I have a 2-yr old daughter and a 5-yr old son. I found some very helpful resources for teaching reading and math, and I wanted to share them with you.


READING

I believe it's essential to foster reading skills and a love of reading in my kids, so I have been reading to them regularly. With my son now in kindergarten, I started trying to teach him sight words using Meet the Sight Words by Kathy Oxley. He had been learning to read the books, so I was pleased with his progress. But I noticed that he was misreading some words. For example he sometimes misread "that" as "the" and vice-versa. He was also intimidated by new words.
Meanwhile I learned another method of teaching kids how to read called DISTAR (Direct Instruction System for Teaching Arithmetic and Reading) or "Direct Instruction." I bought a book that was based on that method called, Teach Your Child to Read in 100 Easy Lessons. I learned that the sight words method could foster bad reading habits such as being overly reliant on pictures and guessing words instead of learning to read. That certainly explained some of the mistakes that I saw my son was making. I stopped with the sight words books and switched to DISTAR.
The 100 Easy Lessons book builds up reading skills in 20-minute lessons. Each lesson has several short components, such as recognizing the sounds of letters, reading them phonetically, writing them, and in later lessons, testing reading comprehension with short stories followed by questions. By the 100th lesson (or even before that) the child will be reading stories with several paragraphs, which I suppose is good enough to enable him to read pretty much any kind of reading material appropriate for his age group.
I have been using DISTAR with my son for the past several weeks with good results. At the beginning it felt kind of strange because it is very rigid (they use a script), but after several lessons I learned when it was not necessary to use the script. Regardless of my initial impressions, the results have been good. My son has definitely been learning to read phonetically (I tested this the other day by presenting him with nonsensical made-up words to see if he could read them). He has also been understanding what he is reading. I was so pleased with the DISTAR reading program that I wanted to look into using the DISTAR approach for math as well.
MATH
Math is one of my favorite subjects, and I have tried to teach my son math conceptually. He knows how to count but I want to be sure he understands what the numbers mean and is not just rattling them off. I found it somewhat frustrating to think of different ways to teach him concepts like places, carrying over, etc. using coins, counting beads, and an abacus. It felt so inefficient because I am sure someone has done this before. The resources I did find already assumed an understanding of the fundamental concepts (e.g. Kumon math books).
After I got good results with the DISTAR reading program I tried to look for DISTAR Arithmetic resources. I saw one on Amazon but it was priced at $158 (!!). I found out the publisher was McGraw Hill and I checked it out there. The workbook for kids was $50+. OK that's within reason. The manual for the teachers is $700. Just for level 1. WTF. Level 2 is of course another $700.
After some more searching, I eventually found out that there are actually FREE software for DISTAR arithmetic AND reading. It's on a site called www.funnix.com . I was suspicious at first, but found out it's by Siegfried "Zig" Engelmann, the inventor of the DISTAR method and co-author of the 100 Easy Lessons book. (FYI the free offer is just a temporary promotion. The math program is available free until December 15. The reading program will be available for free from December 16 to December 31. If the promo has ended by the time you read this, you can also buy the software at around $32 and $38 respectively.)
I was also curious about whether DISTAR Arithmetic would teach math conceptually. I got my answer in the video on this page by Zig Engelmann. In it, you'll see kindergarten and first-grade kids who have been taught using DISTAR demonstrating a very solid understanding of math concepts. Check it out. Call me a nerd, but I found it very touching and inspiring.
That video was made in 1966. It is heartwarming to know that Zig Engelmann still continues his work and his advocacy for underprivileged children.
FUNNIX BEGINNING MATH
Most free programs or books are usually just teasers. This is the real deal. It includes 100 lessons. The software is 800MB. There are PDF files that are included. The workbook is 208 pages. This is not some bullshit promo teaser. There are no ads. It's not time-limited. It's not disabled in any way. It's complete. There's no upsell. As far as I can tell it's identical to the software that they sell for $32.
- Lessons are 35 mins each., and are intended to be done once per day, 5 days / wk.
- Covers addition, subtraction, algebra addition (e.g. 1 + x = 5), algebra subtraction (e.g. 10 - x = 6), and basic fractions.
- A prerequisite to starting the class is to pass a "placement exam" with a minimum of 10 pts. Essentially if your child can count reliably up to 10 and can identify the numbers 1 to 10 then they will pass. If the child doesn't yet meet this score, the authors recommend a beginning language program instead.
I have yet to start the program but I've reviewed the materials and am very optimistic. There are several similarities with 100 Easy Lessons, such as the fact that the lessons are organized so that kids learn mini-skills in bite-sized pieces that ensure success, which are reinforced and later combined into bigger skills that are again repeated for reinforcement and combined into still more complex skills.
Will update after some lessons.
FUNNIX BEGINNING READING
Will update after downloading and trying out.
Read More
Posted in | No comments

Monday, 10 December 2012

Room With a View: Indoor Photos with Scenic Windows

Posted on 08:37 by Unknown


One of the lighting scenarios that I find most demanding to capture is an indoor room with a scenic window.


You know the issue -- you take a photo of your friends or family with the gorgeous window view as a background.  But all you get is your subjects and totally blown windows.

A shot from another party I took a few years ago.  Most of the details in the scene outside were gone.
The problem of course is that the dynamic range is extremely wide.  However, it is not impossible to capture it all, particularly with the newer DSLR sensors.

The first step is to expose for the windows.  The subjects will be severely underexposed.  However, newer DSLRs have incredible shadow dynamic range, so you will be able to recover the shadows.  If you know your DSLR's highlight dynamic range limit, then so much the better -- you can overexpose the window view to the limit of your camera's sensor to get additional light on your subjects.  In terms of selecting your exposure, it would be best to use the ISO with the widest dynamic range.  Usually this is the base ISO, although on some cameras it is a stop or two higher than that.

The second step is to add flash if possible.  It's not absolutely necessary, but it will make the shadow recovery much easier, and will decrease the noise on the recovered shadows.  If you do decide to add flash, then you should set the shutter speed to your camera's sync speed.  Doing so will decrease the ratio of the ambient to the flash.  Do not go above that and use high speed sync (aka HSS or Auto FP) because you will lose more than 2 stops of flash output, which will be a greater decrease than the decrease to the ambient, i.e. there is a net increase in the ratio of ambient to flash.

What about the ISO and aperture?  There's no combination of ISO and aperture that you can do to decrease the ratio of ambient to flash.  So I suggest sticking to low ISOs in order to get a wider dynamic range.

If the conditions outside are bright and you choose your sync speed as your shutter speed, your aperture will likely be around f/8 or even narrower.  With a low ISO and narrow aperture, your flash will be working extra hard.  In the shot above I was at ISO 200, f/7.1, 1/200.

If you use direct flash, you probably will have enough light:


However, it's very unusual to have a source of hard  frontal light indoors so the flash use is very obvious.  I prefer to get soft light, to mimic the actual light indoors.  To get soft light I used bounce flash.  At ISO 200, f/7.1, my SB-800 didn't have enough power to light up the subjects, even when zoomed to 105mm.  But that's ok.  I know that I'm adding at least some light to the subjects and making it easier to recover them.  This was what the SOOC image looked like with the addition of flash at full power:


Scary, yes?  Seeing this, there is a strong temptation to adjust the settings to bring up the exposure but I knew from experience that the Nikon D600 could recover those silhouetted subjects.

The third step is of course post-processing.  I used Lightroom 4 for post-processing, and I adjusted the following:
- Increased the exposure to brighten the subjects.
- Increase the shadow recovery to around 20 (not more than that, or else the image will look like HDR).
- Decrease the contrast.  This will lift the shadows, just don't overdo it.
- Decreased the highlights -100 to recover as much of the highlights as possible.
- Used the adjustment brush to paint another -100 highlight adjustment (yes, it's cumulative)
- Increase the clarity of the scene outside the window.
- Adjust black clipping and white clipping if necessary.

Here is the end result:


(Note: it was cloudy outside, so the scene outside was really kind of grayish.  There were zero blown details.)

RELATED POSTS
Nikon D600 Hands-On Review
Choosing Exposure for Dynamic Range
Nikon D600 Dynamic Range in the Real World
How to fix underexposure
Read More
Posted in | No comments

Thursday, 6 December 2012

Comment on New York Post subway photo

Posted on 10:33 by Unknown
When I saw and read about the photo of the man who was about to be crushed by a subway train, I was appalled. I don't think there is any other kind of reaction that is possible for that picture. And no, I don't believe the photographer's claim that he was trying to warn the train with his flash.
Just as quickly as I condemned the photographer however, I realized that I have been guilty of the exact same thing, just on a different scale. It's an issue that I've mentioned briefly before -- prioritizing the photograph and in the process failing to be a husband and father. The truth is, no photograph is worth missing out on being with my family. I am a dad and husband first.
It is true that I want nice photos of our family. But I don't have to document everything like an event photographer. I'd like to focus on being a dad first, and THEN take a few good photos.
I'm on my way to attend a holiday luncheon at work. In past years, I've pretty much acted like an event photographer -- taking photos instead of joining and being a part of the party. This year, I will be with my coworkers first, then take a few shots to preserve the fun we had.
Read More
Posted in | No comments

Tuesday, 4 December 2012

Preview of Carbon Fiber Tripod and Tamron 70-300 VC

Posted on 07:59 by Unknown

Remember the $79 carbon fiber tripod that I bought from Costco?  I received it last week and last night I tried it out on a long exposure shot of our Christmas tree.  The shot above was for 6 seconds (f/8, 100 ISO), all ambient.  (Click for higher resolution)

Here is another one, at 5 seconds (also f/8, 100 ISO).


(FYI some of the blocks look like they're glowing because I put an LED light under it.)

I will be reviewing this tripod soon and will also be posting my first impressions of the lens I used, a Tamron 70-300 VC.
Read More
Posted in | No comments

Monday, 3 December 2012

Sensor Cleaning with Sensor Swab, LensPen, and Blower

Posted on 08:22 by Unknown

Hi everyone.  Sorry for the infrequent posting (our daughter has fever).

Anyway, I cleaned my camera's sensor for the first time with more than just a blower.  I resorted to a Sensor Swab with Eclipse fluid, a LensPen Sensor Klear and a blower.

I got the Sensor Swab and Eclipse fluid because it was recommended by the store where I bought my Nikon D600 (Bel-Air Camera).  Their service department uses blowers and this combination.  As for the Sensor Klear kit, I got it because I wanted a lighted loupe, and it came with a blower.  As for the LensPen SensorKlear itself, I thought it would be good to try because I find the LensPen effective for cleaning my lenses.

Here are the results.

Since this was my first time, I didn't dare try to clean my D600 and instead I practiced cleaning my Nikon D70.

This is what the sensor looked like at f/45 (I used a Tamron 70-300 VC).

Quite dirty, even though I couldn't see anything with the naked eye, or even with the lighted sensor loupe that was included in the SensorKlear Kit.

ATTEMPT #1: BLOWER
The first thing I tried was a blower.  I selected the menu option for raising the mirror, tilted the camera facing down at around 45 degrees, then used the blower at various angles to the sensor, being very careful not to touch the sensor/AA filter.  Here's the result.

A significant improvement, although not pristine.

ATTEMPT #2: LENSPEN SENSORKLEAR
When I first used the lighted sensor loupe from the SensorKlear kit, the light would not turn on despite having fresh batteries (the small ones similar to those used in watches -- be very careful to keep these away from babies).  I determined that it was because the battery contacts were loose.  I used a tweezer to pull them and make the contact with the battery tighter, and after that the light worked.

The lighted sensor loupe went over the camera mount.  The loupe has a cut away to allow you to put the lenspen in the mirror box and clean the sensor as you see it.  At first I liked this feature but after a few cleaning attempts, I found it easier to just clean the sensor without the loupe then use the loupe to inspect the sensor.  The other thing is that the magnification of the loupe is not super high.  I estimate perhaps 10x or so, and it seemed that whatever I could see in the loupe, I could almost always see with my naked eye with careful scrutiny.

Using the lenspen was easy.  The lenspen is similar to the one used for lenses except that it can be angled.  The tip is also triangular which I suppose helps clean edges of the sensor's rectangular surface better.

Here is the result.


Both of those shots were taken after the first attempt with the lenspen.  Terrible.  There were those huge specks that I believe came from the lenspen itself.  I thought maybe that's because it's the first time to use it.  So I gave it another shot.

I cleaned again with the lenspen, this time looking to see if the lenspen was itself introducing new spots.  Here is the result.


Ugh.  Better than the first attempt but no better than using the blower.  In addition you can see that there are strand-like specks.  I don't know if those came from the lenspen or were in the mirror box and released by the lenspen.

In general I found that the lenspen could clean the dust but somehow there would be new dust, or perhaps the old dust just got moved.  The dust wasn't getting absorbed by the lenspen.

ATTEMPT #3: SENSOR SWAB
This time I decided to try the Sensor Swab.  Each swab is individually wrapped in a clear plastic bag.  The swab is wrapped with some sort of lint-free artificial fabric which is secured to the swab with a small elastic rubber band.  The fabric and rubber band can be mistaken for a mere wrap -- do not remove them.

Sensor Swabs come in two sizes -- one for full frame and another for APS-C.  The one for APS-C can be used for full frame as well but it will take more than one swipe and is therefore not recommended.

I placed a drop of the Eclipse fluid on each side of the sensor swab.  Starting from one side of the sensor, I swept to the other side, then swept back using the other side of the swab.  I found it hard to make sure that the swab was making sufficient contact with the sensor without pressing too hard, especially near the corners.  In addition, the sides of the swab tended to get snagged by the frame around the sensor.


Here is the result after a couple of swabs (each swab is supposed to be used only once).

Better than the lenspen but still quite a few specks around the corners.

After a couple of attempts with the sensor swab, my D70 suddenly locked up.  All I could see was "CHA" or "CHR" where I normally see the shots remaining.  The camera could focus but would not take shots.  I recharged the battery and reformatted the CF card, and on the theory that perhaps the sensor got too wet, I left it to dry a bit.  I tried again and the D70 was working again.

Anyway, I tried to clean it a couple more times with the sensor swab (5 times total) but could not get rid of all the dust.  I thought maybe the lenspen would do a better job at the corner so I tried that again.

ATTEMPT #4: LENSPEN AGAIN

As with one of the previous shots, it seems the lenspen itself seems to lose some bits of fabric that end up as specks.  It could be that the lenspen is getting snagged by the sharp-edged frame around the sensor, causing it to lose those bits.

ATTEMPT #5: BLOWER AGAIN
I tried the blower again


Not perfect but much improved.

PRELIMINARY CONCLUSION
I'm a newbie at cleaning sensors but for now my preference is to simply use the blower.  If there are stubborn specks, I'll use the lenspen.  The lenspen may lose some bits but those are easy to blow away with the blower.  I'm wary of using the sensor swab.  It seems that it takes skill to use it very well and practicing with it is expensive.

Because of the blower's effectiveness I might also consider the Firefly ionizing blower, suggested to me by a reader (thanks!).  Update: Firefly review posted here: Firefly DSC-2000 Review

RELATED POSTS:
Firefly DSC-2000 Review
Read More
Posted in blower, clean, dust, eclipse, lenspen, oil, sensor, sensor swab, sensorclear, sensorklean, sensorklear, spots | No comments
Newer Posts Older Posts Home
Subscribe to: Posts (Atom)

Popular Posts

  • Samyang 24 f/3.5 Tilt Shift Lens Now Available
    A seller on ebay ( bestpriceoptics ) is now selling the Samyang 24 f/3.5 tilt shift lens, in Canon and Nikon mounts, for $999 shipped.  This...
  • Nikon 28 1.8G: Moody Artist?
    When Nikon had its recently-finished sale (now extended to end of March), the one lens that I considered buying was the Nikkor 28 1.8G.  To...
  • Olympus E-PL3 with 14-42 Lens $199; Moving from Nikon to MFT?
    I saw on 43rumors.com that the Olympus E-PL3 was being sold at Newegg for just $199 with the 14-42 kit lens included.  I checked it out and...
  • Double Camera Strap & BlackRapid RS-5 Review
    This is a review of two camera straps: - The first is a double camera strap that's -- let's be blunt -- a knockoff of the BlackRapid...
  • Price drops!!! Olympus XZ-2, Pentax MX-1. And about the Casio EX-10
    I just noticed a huge price drop on the Olympus XZ-2 (previously $500 now under $400) and Pentax MX-1 (previously $500 now under $300 ).  Pe...
  • Best Alternative to Nikon 24-70 2.8G: the Nikon 28-70 2.8D
    Every Nikon shooter knows that the Nikkor 24-70 2.8G is the best standard zoom for Nikon's full frame cameras.  However, at around $1900...
  • Abstract Fun
    In one of the rare times I put effort and setup a light stand and an umbrella to shoot my girls, I decided to make use of this burst of ener...
  • Coco Ring Flash - First Impressions
    A few weeks ago, after much deliberation, I finally decided to get a ring flash adapter.  My purpose was to use it as on-axis fill, much lik...
  • Nikon D7000 vs. Nikon D7100
    D7000 + Tokina 11-16 I've been using the Nikon D7000 for a couple of months now, and in this post I'd like to share my thoughts on t...
  • Sigma 18-35 1.8 Revisited; Where to Get It
    Back in April of this year, Sigma surprised everyone by announcing the Sigma 18-35 f/1.8 , the first zoom lens for a large sensor that had s...

Categories

  • "alien bee"
  • "april fool's"
  • "ring flash"
  • "yong nuo"
  • 1"
  • 1/1.7"
  • 10-17
  • 10-20
  • 11-16
  • 15-85mm
  • 15z
  • 17-50 vc
  • 190cx pro3
  • 2.8
  • 2.8G
  • 2/3"
  • 200 f2.8
  • 200 L
  • 200mm
  • 200mm f/2.8
  • 200mm f/2.8 L II
  • 200mm f2.8
  • 200mm f28
  • 200mm f28 L II
  • 2012
  • 2013
  • 23 Samsung led
  • 24-105 f4
  • 24-70
  • 25 1.4
  • 28-105
  • 28-70
  • 35mm
  • 35mm f/2
  • 35mm f2
  • 360
  • 3rd party
  • 4.1
  • 4/3
  • 40 pancake
  • 40 panckae
  • 40 stm
  • 40-150R
  • 40mm f/2.8
  • 430EX
  • 43rumors
  • 45 18
  • 45 AW
  • 4x4
  • 50 14
  • 50 f14
  • 50-150
  • 50mm
  • 50mm f/1.4
  • 55 AW
  • 55-250
  • 550D
  • 55aw
  • 560ex
  • 580 ex ii
  • 580EX
  • 580EX II
  • 5d
  • 5d mark 2
  • 5d mark 3
  • 5D Mark II
  • 5d mark iii
  • 5d2
  • 600d
  • 600ex-rt
  • 60d
  • 60fps
  • 60mm macro
  • 650d
  • 6d
  • 7.5mm
  • 720p
  • 75 f1.8
  • 85mm f1.8
  • 8x12
  • abbc
  • abstract
  • accuracy
  • active d-lighting
  • adjustment
  • adl
  • AF
  • af point
  • AF Point Expansion
  • aftermarket
  • airport
  • alexandria
  • alien bee
  • alien bees
  • alienbee
  • alienbees
  • alternative
  • ambient
  • ambient light
  • angle
  • aperture priority
  • APS-C
  • apsc
  • assignment
  • auto focus
  • auto white balance
  • autofocus
  • AWB
  • awl
  • back button focus
  • background
  • background blur
  • backlight
  • backlighting
  • backlit
  • bad behavior
  • bad photography
  • balance
  • bare flash
  • battery
  • BBF
  • beach
  • beams
  • beauty dish
  • bellagio
  • BFT
  • birthday
  • black
  • black foamie thing
  • black rapid
  • blackrapid
  • blogs
  • blower
  • blown
  • blur
  • bokeh
  • bounce
  • bounce card
  • bounce flash
  • bower
  • bracket
  • brightness
  • brilliance
  • brolly grip
  • brother
  • build
  • burst mode
  • butterflies
  • butterfly
  • C.Fn
  • cable
  • cake
  • camera
  • camera bag
  • camera releases
  • camera settings
  • candle
  • candlelight
  • canon
  • Canon 100mm Macro L IS
  • canon 200mm f28L
  • canon 24-105
  • canon 40 stm
  • canon 40mm f28 pancake
  • canon 50
  • canon 50 1.4
  • canon 55-250
  • canon 5d mark 2
  • canon 5d mark ii
  • canon 5d mark iii
  • canon 5d2
  • canon 5d3
  • Canon 60d
  • canon 6d
  • canon g11
  • canon speedlite
  • car
  • carbon fiber
  • catch lights
  • cheap
  • christmas
  • clean
  • cleaning
  • clipped
  • clipping
  • close up
  • clouds
  • cls
  • clustered
  • color
  • compact
  • comparison
  • composition
  • compositional aid
  • construction
  • contrast
  • cooler master
  • copyright
  • core i7
  • cowboy
  • cowboystudio
  • cpl
  • creepy
  • crop factor
  • crop sensor
  • cyber commander
  • cybersync
  • d-lux
  • d-lux5
  • d3
  • d300
  • D5100
  • D600
  • d70
  • d700
  • D7100
  • d90
  • dark background
  • david hobby
  • daylight
  • dell 24 inch
  • depth of field
  • desert
  • diamond
  • digital
  • directional
  • distance
  • diy
  • dlux
  • dlux5
  • dng
  • double
  • dslr
  • DSLR bag
  • dual
  • dust
  • dx
  • dynamic range
  • earthquake
  • ebay
  • ebay trigger
  • eclipse
  • editing
  • EF 40mm f/2.8
  • ef-s 60mm
  • einstein
  • Electro GN
  • engagement
  • environmental portrait
  • ep5
  • equipment
  • ETTL
  • ettr
  • europe
  • events
  • evf
  • ex600
  • existing light
  • expensive
  • exposing to the right
  • exposure
  • f/3.5
  • family
  • faq
  • fasten-r3
  • favorite
  • fayoum
  • Fayoum desert
  • fill
  • fill light
  • film
  • filter
  • finepix
  • fire
  • fireplace
  • first impressions
  • fish-eye
  • fisheye
  • fix
  • FL600R
  • flash
  • flash bounce
  • flash sync
  • flash trigger
  • flashmeter
  • flashright
  • focal length
  • focus
  • food
  • football
  • fotodiox
  • fountain
  • freexwire
  • fuji
  • fujifilm
  • Full Frame
  • fun
  • fx
  • galaxy s 3
  • galaxy s4
  • gecko
  • GeForce gtx570 OC
  • gel
  • geomag
  • ggs
  • ghost
  • gigabyte z77 ud3h
  • glass
  • gn
  • Goodbye
  • gorillapod
  • gregg
  • grid
  • grip
  • group shot
  • gskill ripjaws
  • guide
  • guide number
  • gx7
  • haf 912
  • handheld
  • hands on
  • hands-on
  • hdr
  • head shot
  • hiatus
  • high dynamic range
  • high iso
  • high speed sync
  • highlight
  • highlights
  • histogram
  • holder
  • holiday
  • home
  • home made
  • Honda civic
  • honeycomb
  • hotshoe
  • hoya
  • humor
  • i9500
  • id
  • image quality
  • impressions
  • indoor flash
  • infrared
  • infringement
  • insects
  • inverse square law
  • japan
  • jewel
  • jewelry
  • joby head
  • jpeg
  • Kingston hyperX SSD
  • kirk tuck
  • kl bird park
  • krakow
  • kuala lumpur
  • las vegas
  • lastolite
  • laurence kim
  • lax
  • lcd
  • leica
  • lens
  • lens cap
  • lens compression
  • lens review
  • lenses
  • lenspen
  • lensrentals
  • light
  • light painting
  • lighting
  • lightroom
  • lightroom 4
  • lightroom 5
  • location
  • long
  • long exposure
  • los angeles
  • low key
  • low light
  • Lowepro
  • Lowepro 45aw
  • Lowepro 55aw
  • lr4
  • lumiquest softbox III
  • lumix
  • lx-5
  • lx5
  • m4/3
  • m43
  • macro
  • macro adapter
  • makernotes
  • malaysia
  • manfrotto
  • manfrotto tripod
  • manual
  • mark ii
  • mark iii
  • MFT
  • mft. micro four thirds
  • micro four thirds
  • mielec
  • migration
  • mini review
  • mirror
  • mirror-less
  • mirrorless
  • mobile
  • modification
  • modifier
  • monobloc
  • monoblock
  • monolight
  • motion
  • motion blur
  • multi function printer
  • multiple
  • nano crystal
  • natural light
  • neil
  • Neil VN
  • niekerk
  • nikkor
  • nikon
  • nikon d600
  • noise
  • off camera
  • oil
  • olympus
  • olympus 12-50
  • Olympus 40-150
  • olympus 45
  • olympus 45 18
  • olympus om-d em-5
  • om-d
  • omd
  • omd em1
  • omd em5
  • omd em6
  • on-camera
  • one inch
  • overexposure
  • overpowering sun
  • panasonic
  • panasonic leica 25 14
  • pancake
  • party
  • passport
  • pastries
  • pastry
  • pc
  • pentax
  • peter
  • phone
  • phone photography
  • photo
  • photo tips
  • photography
  • photokina
  • photomerge
  • photoshop
  • photoshop elements
  • planning
  • pocketwizard
  • point and shoot
  • poland
  • polarizer
  • popup
  • popup flash
  • portrait
  • post processing
  • post-processing
  • postprocessing
  • product
  • product shots
  • profile
  • protection
  • protector
  • quad-flash
  • quantum
  • radiopopper
  • raid 0
  • Range finder
  • raw
  • raw editing
  • raw+jpeg
  • rays
  • real
  • recovery
  • reflection
  • reflector
  • resources
  • restaurant
  • review
  • rf-603
  • rf603
  • ricoh
  • ring
  • ringflash
  • robin wong
  • roger cicala
  • rogue
  • rokinon
  • roll off
  • roll-off
  • rolloff
  • rs-5
  • rs-7
  • rumors
  • s5
  • s5 pro
  • s5pro
  • samples
  • samsung
  • samyang
  • sb-26
  • sb-80
  • sb26
  • sb800
  • screen protector
  • sensor
  • sensor swab
  • sensorclear
  • sensorklean
  • sensorklear
  • separation
  • shadow
  • shadow pulling
  • shadows
  • shards
  • sharpening
  • sharpness
  • shoot through
  • shoot-through
  • shoot-thru
  • shooting technique
  • shootout
  • short
  • sigma
  • sigma 50-150
  • skin tones
  • skylight
  • Slik Mini Tripod
  • slingshot
  • slow
  • small
  • smooth
  • soft
  • softbox
  • sony
  • sony a99
  • sony rx100
  • sony t10
  • specular
  • speed
  • speedlight
  • speedlite
  • spinlight
  • spots
  • standard
  • stockholm
  • story
  • strap
  • strobe
  • strobist
  • studio
  • studio strobe
  • subject
  • substitute
  • sudden
  • summilux
  • sunrise
  • sunset
  • sweden
  • swivel
  • sync speed
  • t2i
  • t3i
  • Table top tripod
  • tamron
  • technique
  • techniques
  • tele
  • telephoto
  • thinktank retrospective 5
  • third party
  • tips
  • tokina
  • tonal
  • tonality
  • tone curve
  • toploader
  • toys
  • translucent
  • travel photography
  • tri-flash
  • Tribute
  • trifold
  • trigger
  • tripod
  • truth
  • ttl
  • TTL Cord
  • u43
  • ultra-wide
  • ultrawide
  • umbrella
  • underexposure
  • unlimited sync speed
  • up-rise
  • up-rise 15z
  • update
  • uprise
  • USM
  • uv
  • uwa
  • vanguard
  • versus
  • vertical
  • video
  • view nx2
  • visual science lab
  • vs
  • wadi rayan
  • wd caviar black
  • web
  • weekend
  • westin
  • white balance
  • white lightning
  • wide
  • wide angle
  • window
  • wireless
  • wireless flash
  • wireless release
  • wireless trigger
  • workflow
  • Yashica
  • yashica gtn
  • yashica st-7
  • yn-560
  • yn-560ex
  • yn-ex600
  • yn560
  • yong nuo
  • yongnuo
  • zack arias
  • zoom
  • zoom toploader
  • zuiko

Blog Archive

  • ▼  2013 (165)
    • ▼  December (5)
      • Olympus E-PL3 with 14-42 Lens $199; Moving from Ni...
      • Sigma 18-35 1.8 Revisited; Where to Get It
      • Speedlight Modifiers - 50% discount at Fotodiox
      • Olympus M.Zuiko 45mm f/1.8 Mini Review
      • Evening Portraits with Flash
    • ►  November (10)
    • ►  October (8)
    • ►  September (7)
    • ►  August (3)
    • ►  July (11)
    • ►  June (10)
    • ►  May (15)
    • ►  April (19)
    • ►  March (33)
    • ►  February (24)
    • ►  January (20)
  • ►  2012 (193)
    • ►  December (17)
    • ►  November (22)
    • ►  October (34)
    • ►  September (47)
    • ►  August (12)
    • ►  July (11)
    • ►  June (10)
    • ►  May (13)
    • ►  April (13)
    • ►  March (8)
    • ►  February (1)
    • ►  January (5)
  • ►  2011 (141)
    • ►  December (8)
    • ►  November (8)
    • ►  October (7)
    • ►  September (9)
    • ►  August (13)
    • ►  July (13)
    • ►  June (19)
    • ►  May (17)
    • ►  April (25)
    • ►  March (22)
Powered by Blogger.

About Me

Unknown
View my complete profile