Better Family Photos

  • Subscribe to our RSS feed.
  • Twitter
  • StumbleUpon
  • Reddit
  • Facebook
  • Digg

Monday, 10 September 2012

Yongnuo YN-560EX (EX600) Review

Posted on 01:55 by Unknown

This is a follow up to my preliminary review of the Yongnuo YN-560EX.  For convenience, I'm going to incorporate the information on the previous review in this one, so this will be the main resource page for the 560EX.

ABOUT THE YONGNUO YN-560EX
The YN-560EX (formerly EX600) is a manual flash but can act as a wireless TTL slave via Canon or Nikon's wireless flash commanders (yes it is cross-compatible with Canon and Nikon).  I was excited about this model because it's only $109.99, less than the YN-565EX (which has wireless TTL as well as on-camera TTL and costs around $160 for the Nikon version).  It is one of the cheapest wireless TTL flashes available.  (At the end of this article I will post other wireless TTL alternatives.)

The YN-560EX should not be mistaken with its similarly-named predecessors, the YN-560 (a purely manual flash) and the YN-560II (an updated version of the YN-560, also purely manual).  The 560EX was previously known as the EX600 but its name was finalized as the 560EX.


YONGNUO'S FLASH LINEUP
Here's a brief comparison with the other current flashes in Yongnuo's lineup:

  • YN-560 - Manual only flash.  Simple interface.   Compatible with external power pack.
  • YN-560II - Manual only flash.  LCD interface.   Compatible with external power pack.
  • YN-465 - TTL flash (Canon or Nikon version available).  No optical slave, no zoom.
  • YN-467 - TTL flash  (Canon or Nikon version available) with built-in optical slave and zoom.
  • YN-467II - update of YN-467.  Adds metal foot, PC port and improved buttons and battery compartment.
  • YN-468 - Similar to YN-467 but adds stroboscopic mode and LCD display.
  • YN-468II - update of YN-468.   Adds metal foot, PC port and improved buttons and battery compartment.
  • YN-460RX and TX - manual flash with Yongnuo's built-in radio-based wireless TTL system.
  • YN-560EX (formerly EX600) - When mounted on-camera, it is a manual only flash.  However, as a wireless flash it is capable of TTL with either a Canon or Nikon commander.
  • YN-565EX - When mounted on-camera, it is a TTL flash (Nikon or Canon but not both).  Like the 560EX, it is capable of TTL as a wireless flash with either a Canon or Nikon commander.  Compatible with external power pack.


WHAT'S IN THE BOX
I ordered my 560EX on eBay from seller thephotogadget.  Three days after I ordered it, it was shipped out from Shanghai, then I received it just 10 days later.  It arrived in a package with bubble wrap around the 560EX's box.

The box contained the flash itself, a ballistic nylon case, a flash stand, an instruction manual in Chinese and English, and a brochure describing Yongnuo's flashes.  The case is handsome and includes a pocket for the included flash stand.  However, the material is thinner than similar cases for the Nikon SB-800 or SB-600.  The velcro is also kind of weak.  If held upside down and shaken, the case could open and your flash could drop.


The flash stand accommodates the standard ISO foot and has a receptacle for a locking pin.  There is a 1/4-20 socket at the bottom for mounting on a tripod or light stand.  However the socket is plastic.

THE 560EX BODY
The 560EX seems to take its design cues from Canon's 580EX, although it's not likely one will be confused with the other. 
Optical sensor on top; ready light indicator on the bottom
The front of the flash has a large red window.  In Canon and Nikon flashes, this red window is used for AF assist.  In the 560EX, the red window covers a "ready lamp" that pulses to indicate the flash is ready when it is being used as a slave.  Above the red window is an opaque cover that houses the 560EX's optical sensor for the wireless slave function.


At the back of the flash, there is a large LCD panel, unlike the YN-560 which had a simple panel with LED lights.
560EX and 560 comparison of interfaces and head rotation
In terms of size, the 560EX is about the same size as the YN-560.
Nikon SB-800, YN-560EX, YN-560

The 560EX build quality seems about the same as the YN-560, but the LCD screen makes it look more polished.  The buttons are also different from the YN-560 and are hard plastic instead of squishy rubber, another improvement.  The hotshoe is mostly metal but the middle is plastic.  It is probably plastic to avoid activating the TTL contacts of a hotshoe.  There is a collar around the foot, and when the collar is rotated, it brings down the locking pin.  The 560EX doesn't look cheap at all.


On one side of the flash is the battery compartment with a spring-loaded battery cover with a hinge, so it will never get lost.  The battery chamber has a clear label to show the polarity of the batteries.  The other side of the flash has a rubber-covered port that covers a 2.5mm (not 3.5mm) miniplug sync port.  There is no port for an external battery.
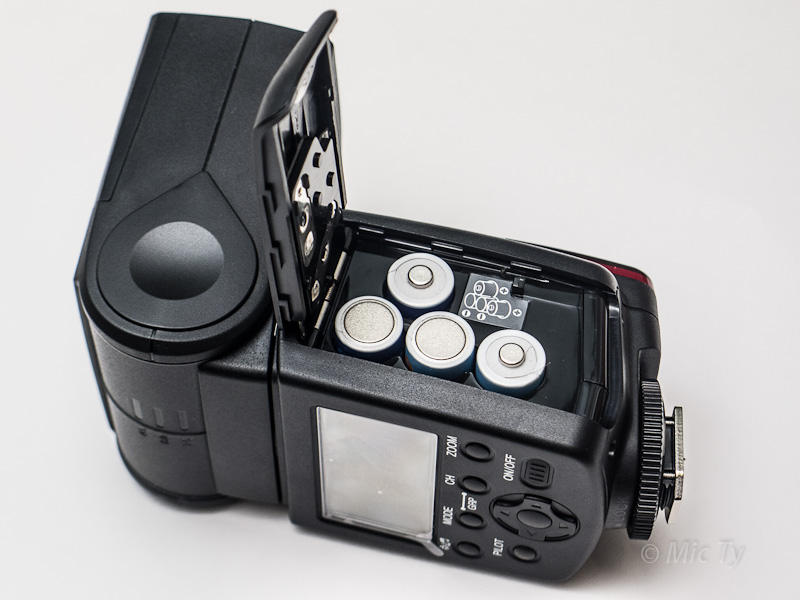
Spring-loaded battery cover
The 560EX's head rotates 180 degrees in both directions, and has a vertical bounce angle of -7 degrees to 90 degrees.  The head has a built-in diffuser and catchlight reflector.  When the diffuser is pulled out, the zoom does not change.

OPERATING THE FLASH
By default, turning the flash on or off requires the power button to be held down for about 4 or 5 seconds while the LCD shows some simple animation.  If the power button is released before that time, it won't work.  Fortunately there is an option for 'quick startup/shutdown'.  If that option is activated, then pressing the power button immediately turns the flash on or off.
The 560EX has a simple and intuitive interface:
From L to R: Optical slave mode (S2 looks similar), Manual on-camera mode, Stroboscopic mode, Wireless Nikon mode (Wireless Canon mode looks similar)
The first button is for the backlight and sound.  Pressing the button activates the backlight.  If it is held down, then the sound will toggle on or off.

The second button is the mode, which cycles from Slave 1 (simple manual optical slave) --> Slave 2 (optical slave with delay) --> on-camera manual flash --> stroboscopic mode --> Canon wireless --> Nikon wireless --> Slave 1.

In Slave 1, Slave 2, manual flash, and stroboscopic modes, you can select the power level and the zoom.  To select the power level, you press the directional pad.  Pressing left or right adjusts the power down or up by a full stop.  Pressing up or down adjusts the power up or down in increments.  By default the increments are 0.3, 0.5 and 0.7.  There is an option to change the increments as discussed below.  In stroboscopic mode, you can only adjust power in full stops (incremental power changes are not available).

To change the zoom, you just press the zoom button which cycles from 24mm --> 28mm --> 35mm --> 50mm --> 70mm --> 80mm --> 105mm --> 24mm.

In stroboscopic mode, you specify the number of times the 560EX will flash and the frequency of the flashes.  The number of flashes is anywhere from 0 to 70 (however from 20 to 50 times, the number changes by 5, and from 50 to 70 times the number changes by 10).  The maximum number depends on the power level selected.  At 1/4 power, the maximum number of flashes is 3.  At 1/128 power, the maximum is 70.  Adjusting the power level upward automatically decreases the number of flashes to the maximum.  The frequency is anywhere from 1 to 100 hertz (cycles per second).  The frequency is not affected by power level.  As with the number of flashes, the number changes by 5 above 20hz, and changes by 10 above 50hz).

In the Canon and Nikon wireless modes, you can change the channel (1 to 4) by pressing the channel button, and/or group (A, B or C) by pressing both mode and channel at the same time, as clearly labeled by the buttons.  This simple interface is a huge improvement over the YN-565EX which was much less intuitive.  As with the other modes, you can also change the zoom.  Changing the power level or flash exposure mode (TTL or manual) is of course done through the commander.

There is a pilot light / test button left of the directional pad.  It glows green when the flash is recycling and then red when the flash is ready.  You can press the button to fire a test.


As mentioned, the flash has some options available.  Holding down the zoom button activates the options menu.  Pressing up and down cycles through the 5 available options, while pressing left or right cycles between the parameters for each option, and pressing the middle button on the directional pad exits the option menu:
-
Options mode.  Maximum vertical (bounce) angle also shown.
1. Power saving in non-slave mode ("SE Sd").  It will show 2 numbers.  The first number is the number of minutes before the flash enters a standby mode.  At "--" the flash doesn't standby.  The second number is the number of minutes before the flash automatically shuts down.  Available choices are: (3 30, 15 60, 30 120, -- 120).

2. Power saving in slave mode ("Sd").  30 mins or 60 mins.

3. Power level increments ("Inc"). 0.3 stops, 0.5 stops, or 0.3/0.5/0.7.

4. Backlight time ("lcd").  7, 15, or 30 seconds.

5. Quick startup or shutdown ("qu"). On or off.


Power (Guide Number)

To test the 'real' guide number of the 560EX, I attached it to a lightstand, outdoors, away from a bounce surface.  I positioned the flashmeter (a Paul Buff CyberCommander) on an identical lightstand, and used a tape measure to position the flash 10 feet away from the flashmeter.  I triggered the 560EX by mounting it to an RF-603 trigger which was in turn connected to a Paul Buff CSRB+ receiver.  I used the flashmeter function of the CyberCommander at ISO 100, 1/250 sync. I took 3 measurements each at 35mm and 105mm zoom, waiting 30 seconds between firing.  I converted the f-stop to guide number using the information here.  For comparison, I did the same to an SB-800.


YN-560EX Results

35mm: 
test1: f/8 1/10 = GN of 82.8 feet
test2: f/8 0/10 = GN of 80 feet
test3: f/8 0/10 = GN of 80 feet
average GN = 80.93 feet = 24.67 meters.
105mm: 
test1: f/8 9/10  = GN of 109 feet
test2: f/11 0/10 = GN of 110 feet
test3: f/11 0/10 = GN of 110 feet
average GN = 109.67 feet = 33.43 meters.

Nikon SB-800 Results

35mm: 
test1: f/8 3/10 = GN of 88.8 feet
test2: f/8 2/10 = GN of 85.7 feet
test3: f/8 3/10 = GN of 88.8 feet
average GN = 87.77 feet = 26.75 meters.  At 35mm, the SB-800 is 2/10ths of a stop more powerful than the 560EX.
105mm: 
test1: f/11 2/10 = GN of 121 feet
test2: f/11 2/10 = GN of 121 feet
test3: f/11 2/10 = GN of 121 feet
average GN = 121 feet = 36.88 meters.  At 105mm, the SB-800 is about 3/10ths of a stop more powerful than the 560EX.


Note: speedlights.net publishes an extensive power comparison here.  To compare the data above with the speedlights.net power index: add 1 stop (I asked speedlights.net why they add 1 stop but I didn't get a reply).

Flash duration
Used an LX5 (which has a digital shutter therefore unlimited sync).  Killed ambient by setting exposure at ISO 80, f/8.  Started with a shutter speed of 1/125, then fired full power at progressively higher shutter speeds (allowing 30 secs recycle time) until there is noticeable drop in output.
Result: no reduction in flash exposure observed at speeds up to 1/640.  At 1/800 there was a slight reduction in flash exposure.  The flash duration at full power is therefore between 1/640 to 1/800.

Max Wireless sync speed
- S1: 1/8000 tested ok on Nikon D70 (manual external flash attached).
- S2: 1/2000 tested ok on Lumix LX5 (popup flash was on TTL mode).  Could not test higher speeds.
- Nikon wireless mode:
1/500 tested ok on D70.
1/250 tested ok on Fuji S5
1/200 tested ok on D90.
The 560EX wireless mode works at all Non-HSS shutter speeds tested, up to 1/500.

TTL comparison with SB-800.
-3, -2, -1, 0, +1, +2, +3 FEC
TBA

Recycling speed
Test: connected flash to camera, fired full power
Counted amount of time it took to fire 10 shots.  Got the average time.
Result: 25.6 seconds to fire 10 shots.  Average recycling speed: 2.6 seconds.  Please note that this needs to factor in my reaction time, which at 1:30am is not really very good.

Wireless compatibility:
The list below shows the commanders I tested.  For each commander, it shows the groups tested, channels tested, whether TTL worked (+1, 0 and -1 FEC), and whether wireless manual worked (tested 1/64, 1/16 and 1/4).

  • D90 popup.  A ok. B not ok. / Channel 1-4 ok. / TTL ok / Manual ok.
  • SB-800 on D90.  A,B,C ok. / 1-4 ok / TTL ok / Manual ok.
  • Fuji S5 popup.  A,B ok. / 1-4 ok / TTL ok / Manual ok.
  • D70 popup. A ok / 3 ok / TTL ok / Manual ok.

Wireless Accessories:
SG-3IR: tested ok with Nikon D70, Nikon D90, Fuji S5.
Aokatec AK-TTL wireless radio trigger: see Aokatec review.


OTHER THIRD PARTY WIRELESS TTL ALTERNATIVES
Other flashes you may want to check out:

  • Yongnuo YN-565.  Same wireless capabilities as 560EX but in addition has TTL when mounted on-camera.
  • Oloong SP-660.  Same wireless capabilities as 560EX.
  • Oloong SP-690 II.  Claims to have both master and slave wireless modes.

Nissin and Metz also produce flashes with wireless capabilities, but for me the price difference between their flash and Nikon's flashes is not that significant.
Read More
Posted in 560ex, ex600, flash, gn, guide number, lighting, real, review, strobist, yn-560, yn-560ex, yn-ex600, yong nuo, yongnuo | No comments

Friday, 7 September 2012

Comments on Samyang T-S lens

Posted on 10:17 by Unknown
Photokina 2012 is just around the corner. Besides the anticipated announcement of the Nikon D600 (likely on September 13), I'm also eager to learn about the Samyang tilt-shift lens. Why would I care about that?
A tilt-shift lens is a kind of lens that can be tilted at an angle away from the camera, and/or shifting of the lens parallel to the lens axis. In the case of the Samyang, it can tilt +/- 8.5 degrees, shift +/- 12mm, and be rotated +/- 90 degrees.
I am very interested in a tilt-shift lens because it can be used for several effects:
1. Avoiding reflections. Besides shooting a mirror without your reflection being seen, I am interested in it for product photography. Managing reflections is an important aspect of lighting especially for product photography. A tilt-shift lens can make avoiding reflections much easier.
2. Perspective correction. A tilt shift lens, like a perspective-control lens, can correct the perspective when shooting a tall subject, as in this example by motorrad-67:
File:Bashford views - perspective control.jpg
Photo by motorrad-67
3. Depth of field control. A tilt shift lens can be used to increase or decrease depth of field. For example, Ryan Brenizer uses a tilt-shift lens for some of his portraits to create a shallow depth of field. Conversely, some landscape shooters use a tilt shift lens to increase depth of field.
Those are some of the reasons I am interested in a tilt-shift lens. The problem with TS lenses is the cost. Nikon has a couple of them: the 24mm f/3.5D PC-E (~$2000), the 45mm f/2.8D PC-E Micro-Nikkor (~$1900), and 85mm f/2.8D PC-E Micro-Nikkor ($2050).
The Samyang is of course being presented as a less expensive alternative to the Nikon 24mm. Usually you get what you pay for, but in the case of Samyang, they have made a pretty good fisheye lens, so I'm hoping their version of Nikon's 24mm PC-E lens is decent as well as affordable. I probably would have preferred that Samyang made a 45mm macro TS lens but I am still very much interested in the 24mm.
Read More
Posted in | No comments

Thursday, 6 September 2012

Cheap Wireless TTL? Aokatec AK-TTL Review

Posted on 12:18 by Unknown

The Aokatec AK-TTL radio trigger is a wireless radio trigger that is supposed to be cross-compatible with Canon, Nikon, Pentax and Sony (no word on Olympus). The price for a transmitter and receiver kit: $109.99.

I've never heard of Aokatec before (until a comment posted by a reader, Ricardo Rodrigues, about Aokatec's version of the Nikon SG-3IR infrared panel). I've also been disappointed many times when buying products from unknown companies, especially when they make incredible claims, and even more so when the price is a fraction of equivalent products from more established manufacturers.
How well did it perform? Hit the jump.

OVERVIEW
Currently, there are several available systems that promise wireless TTL. First, most camera brands offer their own native wireless TTL system. Until recently, all of those systems worked through infrared light. Commander units could communicate with slave flashes through coded pulses of visible light (or infrared light). The problem with this system is that sometimes, the slave flashes could not detect the light pulses sent out by the commanders -- either because the ambient was too bright, or the flash was too far away. It's only slightly better than line-of-sight (it's better than LOS because the pulses can bounce off from nearby surfaces).

Third parties came up with radio-based wireless flash systems. At first there were just simple manual triggers which offered much greater reliability than optical systems (e.g. PocketWizard, eBay povertywizards, etc.) but could not be adjusted and were manual only (no TTL). Next came triggers that allowed manual power adjustment (e.g. Radiopopper JrX Studio). Then we had remote-adjustable radio triggers with both TTL and manual capability (Radiopopper PX, Pocketwizard FlexTT5 and MiniTT1). However, these systems were very expensive. Some companies produced less expensive TTL triggers but many of them had significant limitations (some functioned essentially like a TTL cord, except wireless). Then, a few months ago, Canon introduced flashes with a built-in radio-based wireless TTL system.
So, the market had several systems that were either cheap and didn't do exactly what I wanted, or did what I wanted but were very expensive. Then came the Aokatec AK-TTL. It was announced earlier this year but became available less than 2 weeks ago.

AOKATEC AK-TTL
The Aokatec AK-TTL works with your camera's native infrared wireless flash system. In principle, it appears to work similarly with the Radiopopper PX system. The transmitter is positioned close to the commander flash and detects the electromagnetic noise emitted by your commander flash when it flashes, then the transmitter sends out a radio signal that mimics the flash pulse pattern. The radio signal is received by the receiver unit which re-broadcasts the pulse pattern as an infrared signal, directly to the infrared receiver of the slave flash.

With the promised specs (cross-compatibility with Canon, Nikon, Pentax and Sony) and seemingly no weaknesses, the Aokatec AK-TTL seemed really fishy. There had to be a catch. So as much as I wanted to, I didn't order it. Fortunately, photographer Aaron Burns bought one to test. He was using a Nikon D5100, and tested the following commanders: Nikon SU-800 dedicated infrared commander, Nikon SB-700, and Nissin Di866 II. For the slaves, he tested the aforementioned SB-700, Di866 II and Oolong SP-660 II. To my surprise, he reported that it worked for him. The only downside he noted was that the range was lower than advertised (75m instead of 100m).

After I read Aaron's review, I ordered a set on eBay. Fortunately, one of the sellers (ebay user gpslot) is based in California, which increased my confidence because it would be easier to return the product if it didn't work (sometimes foreign-based sellers rely on the high cost of returning a product as a way of discouraging returns).

I'd like to build on Aaron's excellent review by adding some more info. Aaron's tests were very thorough but there were a few questions unanswered, such as: would popup commanders work? What about wireless HSS work?

I found out that the seller is based in Los Angeles like me, so I got the package within just a couple of days of ordering it. The kit came as a separately boxed transmitter (TX) and receiver (RX).

THE TX PACKAGE
The TX package includes the transmitter, a lanyard, 2 pairs of velcro stickers and an infrared panel with an attachment for mounting the TX unit on the IR panel.

THE RX PACKAGE
The RX package includes the RX unit, the infrared repeater, a 3.5mm to 3.5mm sync cable, a 3.5mm to PC sync cable, a lanyard and two Livestrong wristbands bright yellow rubber bands. On my package, I did not see a rubber cutout, which was included in Aaron's package. The cutout would have been a small rubber sticker to be attached to the flash to help position the IR repeater and increase the friction between the repeater and the flash.

THE TX UNIT AND RX UNIT
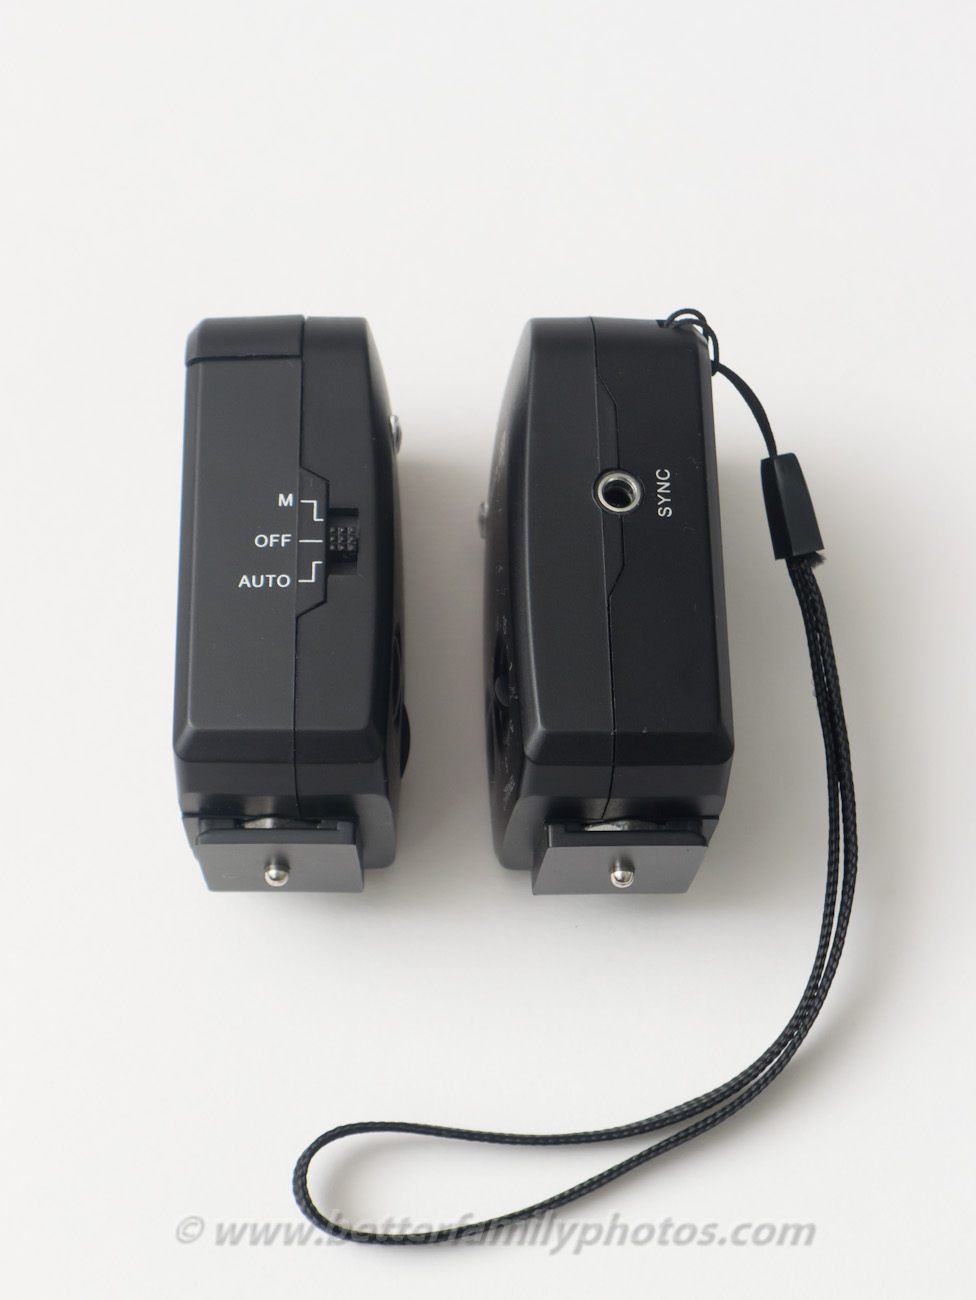
Externally, the transmitter and receiver appear identical. The only difference externally appears to be the label. I attached the lanyard to the receiver to make it easier for me to distinguish between the two in the field when it's dark or I'm in a hurry. Physically, the triggers are reasonably small (about the size of a pack of TicTac candies) and very light.
On the face of the unit is an LED light, a test button and a 16-channel switch.
- When the unit is turned on, the LED pulses with a green light every 4 seconds or so. When the TX transmits or the RX receives a signal, then light becomes red. The red light seems brighter than the green light, although both are visible to me in daylight.
- Besides being used to confirm that the units are communicating, the test button can be used to wake up your slave flash if it goes into standby or sleep mode.
- The channel selector has clear detents. It is not likely to be nudged accidentally into a different channel. One issue is that the arrow for the channel selector is tiny, so it may be hard to see whether a channel is set to a particular number or the number on the opposite side.
At the top of the unit is a cover for the battery. It feels secure, though as noted in Aaron's review, the clips for the cover are very thin and could easily snap off. Both TX and RX are powered by two AAA batteries each. On my package, batteries were not included. The labels for the required polarity for the batteries are a little hard to see. I just have to remember that the battery closer to the middle has the + end pointing inside the unit.
The bottom is a plastic foot for a regular ISO hotshoe with a flash triggering pin. (I don't have a Sony version but to my understanding it has a foot for the Sony/Minolta hotshoe.) The foot has no collar or other mechanism to lock it in position on a hotshoe other than by friction. However, when attached to a hotshoe, it felt snug, not like it was going to fall off.

On one side of the unit is a switch between manual mode, off, and auto (i.e. wireless adjustment mode). On the other side of the unit is a 3.5mm jack. The switch is ok although there is a bit of 'play' so the switch feels slightly flimsier than the rest of the unit.

INFRARED PANEL
The TX package includes an IR panel, which at first glance looks like a clone of Nikon's SG-3IR infrared panel. If you're new to wireless flash, the function of the IR panel is to block the visible light from the commander's pulses while allowing the infrared spectrum of the signal to pass through. For conventional wireless flash systems, this makes sure that the popup commander is not contributing to the exposure. Another benefit is that it blocks the flash pulses that often cause subjects to blink. (With the IR panel blocking the visible flash pulses, all the subjects will see is that the panel will flash a bit red, which in my experience doesn't cause them to blink.)
With the Aokatec AK-TTL system, the panel arguably should block all of the light (even the IR portion) so that the receivers won't get confused with competing signals from the repeater and the popup commander. However, the Aokatec panel does allow the IR portion to pass through. I am considering sticking something at the back of the Aokatec panel to block even the IR portion. However, by allowing the IR portion to pass through I can mix the radio-based AK-TTL triggering and the regular optical triggering.
The Aokatec panel (left, with attachment shown) and the Nikon SG-3IR
Notwithstanding the many similarities between the Aokatec and Nikon panels, there are a few significant details that distinguish the Aokatec panel from the SG-3IR:

1. One of the first things I noticed is that the Aokatec panel has a more flimsy movement compared to SG-3IR. It is possible that if the Aokatec panel is flipped many times repeatedly, the hinge might get worn to the point that the panel might not stay up by itself. However, I'm just speculating - it hasn't happened yet and I suspect it would take a while for that to happen.

2. The Aokatec's panel seems to be made of a different kind of plastic, although it appears just as opaque as that of the SG-3IR. I haven't seen any difference in ability to block visible light.
3. A distinct feature of the Aokatec panel is that it includes a removable attachment that allows an AK-TTL TX unit to be mounted on the panel.
4. A plus for Canon shooters is that the Aokatec foot has a thinner portion designed to avoid pushing down the TTL pins on Canon hotshoes. (Otherwise when those pins are pushed down, Canon cameras think there is a Canon TTL flash attached.) By contrast, Canon shooters wanting to use the SG-3IR have had to shave off a portion of the SG-3IR's foot to avoid pushing down the Canon TTL pins.
5. Another difference is that the Aokatec's locking pin is rounded, whereas that of the SG-3IR is sharp. Some SG-3IR users have commented that the SG-3IR is hard to remove from a hotshoe (in fact some users have removed the locking pin). With the Aokatec's rounded pin, it is easier to remove from a hotshoe, while still being secure.
USING THE AK-TTL SYSTEM
To use the AK-TTL system, you first attach the TX unit close to the commander. If you're using a popup commander, then this is done by mounting the TX unit on the included IR panel.
If your commander is instead an external flash or dedicated IR commander, you can attach the TX unit to your commander flash using the included velcro pads.
As previously mentioned, the RX unit includes an IR repeater. The repeater is quite small though somewhat thick. The side with the emitter has rubber padding to increase friction with the flash surface.
You plug one end of the repeater to the sync port of the RX unit. You then locate the IR sensor of the slave unit. The sensor is not always facing the front. On the SB-800, it is a small round and dark window on the side of the flash, near the battery door.
You attach the repeater over the IR sensor using the included rubber band.
Personally I don't like the rubber band because it looks way too conspicuous. I am also concerned that the rubber may dry out and snap. Instead of the rubber band, I used two velcro cable ties linked to each other. The cable tie is attached to the cable, making it less likely that I'll lose it. I think it also looks better than the rubber band.
From there all you have to do is put the slaves on wireless mode. Some reminders
- The slaves should be in the same channel (1, 2, 3 or 4) as the commander, and note the group (A, B or C).
- The TX and RX units have to use the same radio channel (1 through 16).
- Make sure the slaves aren't asleep or in standby.
- Some 3rd party slave flashes don't have HSS. If you exceed the sync speed, the commander will use the HSS protocol which the slave won't understand so it won't fire.
The AK-TTL can also be used as a simple manual radio trigger. To do that, you just switch both units to M mode and connect the receiver to the slave using the 3.5mm to PC cable or the 3.5mm to 3.5mm cable. I tested the PC cable and was able to trigger the SB-800.
COMPATIBILITY TESTS
I tested the AK-TTL system with the following commanders:
- Nikon D70 popup (note: the D70 wireless flash is limited to channel 3, group A only. You cannot change the channel or control any other group).
- Nikon D90 popup
- Fuji S5 popup
- SB-800 as commander
I tested them with the following slaves:
- Nikon SB-800
- YongNuo YN-560EX
Based on my tests, the AK-TTL does work just as well as Nikon's CLS (Creative Lighting System) AWL (Advanced Wireless Lighting). With two caveats (discussed below), the slaves functioned to the same extent as if they had been controlled by the optical signal from the commander. I could use TTL mode, adjust FEC up and down, change to manual mode, and adjust manual power levels.
Among the tests I did, which worked (feel free to check out the exif on the samples):
Yongnuo YN-560EX. The fact that this worked was a relief, because I want to use the YN-560EX as an inexpensive wireless adjustable slave.
Wireless HSS: I tried Wireless HSS at 1/8000 shutter speed and it worked. I tested it with the Fuji S5 popup as commander and a Nikon SB-800 as slave.
Non-HSS sync speed: I tested up to 1/500 shutter speed (using Nikon D70).
Mixed optical with AK-TTL radio:
I tested the SB-800 as commander, with another SB-800 as AK-TTL radio slave in Group A and YN-560EX as Nikon CLS AWL optical slave in Group B.
Inline image 1

Panasonic Lumix LX-5: :Just for fun, I experimented with the LX-5's popup flash as well.  I used an SB-800 as a slave in SU-4 mode.  I covered the SB-800 with a thick comforter to make sure it was not receiving an optical signal from the popup flash.  When I mounted the TX unit on the hotshoe using the Aokatec panel, the system did not trigger (the TX unit probably could not detect the electromagnetic noise from the small popup flash).  However, when I held the TX beside the popup flash, it was able to trigger the SB-800 all the way to the maximum 1/2000 sync speed.

In short, as far as I can tell, the AK-TTL performs just as promised. About those caveats I mentioned earlier:
1. Interference. If the slave receives a signal from the repeater as well as the optical signal of the commander, it might not fire. One solution is to face the sensor away from the commander.
2. Repeater placement. On my first couple of tries with the YN-560EX, it did not fire. I don't know for sure if it was partly caused by interference but one thing I did is to adjust the IR repeater position slightly to the left of center, and from there the 560EX worked fine. The 560EX's sensor is a large opaque panel, so it's hard for me to tell the optimal position for the repeater.
If I had to nitpick the AK-TTL, I think the weakest part of the system is how the IR repeater attaches to the slave flash.
- First, it might not completely block the flash from still receiving the optical wireless signals, resulting in failure due to interference.
- You also need to know where the sensor is on the slave flash. On the SB-800 it's easy. On the YN-560EX, I am hoping I have it figured out. I would hate to be on an assignment and have the triggering fail because the repeater is slightly out of position.
- Placing the repeater can take a few seconds. I think the velcro cable tie makes this a bit easier.
- The IR repeater might be moved out of position if the flash is jostled hard enough. Besides losing the signal, the RX unit could fall if it is just dangling from the IR repeater.
- It's possible you might forget, lose or break the rubber band that you're using to secure the repeater, which could make the system temporarily unusable (then again, gaffer tape could come to the rescue).
Also, pls. note that I have not yet tested:
- long term durability
- battery life in the field
- multiple RX units (I have another RX unit on order and will be posting about this soon)
- whether it works on Canon, Sony, Pentax or Olympus.
You can tell that those are really minor gripes, and those are the worst things I can say about the AK-TTL. In other words, I FRIGGIN LOVE IT. It works as well as I hoped and the price is just right. This is now my preferred radio flash trigger and would recommend it. I previously envied Canon shooters for having a radio-based wireless flash system. Now? Not as much. :) Coupled with the availability of inexpensive wireless-capable flashes such as the Yongnuo YN-560EX, adjustable radio-based wireless flash systems are now accessible to virtually everyone [even Pentax shooters :) ]!


Read More
Posted in | No comments

Tuesday, 4 September 2012

Dell Inspiron 14z Laptop for Photography

Posted on 13:03 by Unknown
Saw this deal posted at TigerDirect good only for today (9/4/12):
Dell Inspiron 17R
  • Intel i7-2670QM processor
  • 6GB RAM
  • 500GB HDD
  • 17.3-inch display
  • Windows 7 64-bit
  • 2 x USB 3.0, 1 x USB 2.0 / eSATA, 1 x USB 2.0
  • Gigabit ethernet LAN
  • $599
I don't have that particular laptop but I recently got a Dell Inspiron 14z (n411z) that I'm pleased with:
  • Intel i5-2450M processor
  • 8GB RAM / 750GB HDD
  • 14" screen
  • Windows 7 64-bit
  • 2 x USB 3.0, 1 x USB 2.0
  • Doesn't have gigabit ethernet. Just 10/100.
I got the 14z a few months ago for $529 refurbed at eCost.com (which seems to be a partner of TigerDirect). Like I said I don't have the 17R, but the 17R has much better specs than the 14z for not much more cost, so the 17R looks ilke a pretty good deal to me.


WHY I UPGRADED
Before I got the 14z I had been using an HP laptop with these specs: 2.10 GHz AMD Sempron SI-42 Processor, 3GB RAM, 160GB HDD, DVDRW, 15.6" screen, windows vista basic 32-bit, 10/100 lan. Without having tried newer computers, my HP laptop performed adequately. I didn't feel like I was missing anything when using it with Lightroom 4. The only hint I had about its lack of performance was that when I convert my DVDs into mp4 for my phone, it took forever (several hours). In the back of my mind I thought about getting a new computer if I found one with the right features and the right price.

FEATURES
I was looking for a laptop that would be good for editing photos and would also be capable of editing HD videos. I got a Canon HG10 many years ago but gave up editing the videos from it because editing them on my computers was very slow and tedious. I also take videos on my phone and the LX5, but again, I didn't even think about editing the videos. If I were to buy a new laptop I wanted it to be good enough to edit videos in addition to editing photos.

My PC-savvy brother advised me that the most important component for photo and video editing is a fast processor. For laptops, he suggested to avoid AMD because they are power-hungry and run too hot (for desktops he doesn't mind using them). Among Intel processors, I should pay attention to the generation. I should avoid the older generation (Nehalem) because they are about 20% slower for processors with the same clock speeds. The newer generations are Sandy Bridge and Ivy Bridge. Ivy Bridge is of course cutting edge but costs more and is just starting to become available.

To identify the Intel processor generation, look at the model number of the processor. Nehalems use 3 digits, e.g.. i7-xxx and i5-xxx (there are no i3 nehalems). All sandy bridge have a 2xxx model number such as i5-2xxx or i3-2xxx. Ivy bridge processors have a 3xxx model number such as i5-3xxx or i3-3xxx.

I saw the Dell Inspiron 14z being advertised and I found out it had a sandy bridge processor. The other specs seemed pretty good as well, particularly the ample 8GB RAM and the two USB 3.0 ports (USB 3.0 is much faster than USB 2.0, and I was considering getting a USB 3.0 external hard drive). So I went ahead and ordered one.

BENEFITS
I tried the Inspiron 14z with Lightroom 4 and it performed better than I expected. I could truly see changes in real time. It was fast enough at processing that I didn't really need to render 1:1 previews for all photos beforehand. It could render 1:1 previews from Nikon D90 and Fuji S5 raw files within just a couple of seconds (from minimal previews). Even if I chose to render 1:1 previews, importing photos into Lightroom took just a couple of minutes.

I started being 'brave' enough to edit my photos in Photoshop Elements. Previously, I did almost all of my editing in Lightroom only because I didn't want to spend the time to edit in Photoshop Elements. Even exporting from LR4 to PSE9 took several minutes on my old laptop. By contrast, the Inspiron 14z was fast enough that editing in Photoshop Elements 9 was a painless process. Exporting to PSE only takes a few seconds (including the time to launch PSE). Editing the photos was also fast.

Recently, I finally got Photoshop CS6. Again, exporting to PS and editing the photos was quick and painless. So much so that I now process almost all keepers in Photoshop as part of my regular workflow. I never imagined doing that before. In fact, with the large 8GB RAM I don't feel any deterioration in performance by keeping both LR4 and PS running.

Finally, last week I started trying to edit videos. I took videos with the Lumix LX5 (720p MOV format) and the Nikon D90 (720p AVI format) and tried to edit them using Lightroom 4, Picasa and Windows Live Movie Editor. It was quick and easy. The 14z never complained. The processing was fast enough that I didn't hesitate to go back and frequently change settings. Editing videos was as painless as I wanted it to be.

(As for converting DVDs, it's not bad at all. It takes me about 15 minutes to convert a 1-hour DVD.)

BTW I should also mention that the 14z has a stronger WiFi signal than my old laptop.  I get 4 or sometimes 5 bars from my desk whereas with my old laptop I only got 2 or 3 bars.

GRIPES
The Inspiron 14z isn't perfect. First of all, the 14-inch screen is small. I personally don't mind that size but my co-author Mshafik and my brother have both been encouraging me to get a larger LCD. The screen colors are also very inaccurate. When I used Spyder Express 3 to calibrate my old laptop display there was only a very slight change in brightness with the calibration. On the 14z, the calibrated color is very different, which showed me that the default screen setting is too bluish/purplish. Even with calibration, the colors look weird -- kind of greenish. I would have liked a more accurate screen but I can live with it. And I just might heed the advice given to me and buy a larger and better screen.
Second, although the Inspiron 14z is fast enough for me, I've seen reviews saying it's actually below average compared to other laptops in the same class. On the other hand, I don't know if those other laptops are in the $500 price range.
Finally, I don't like the USB ports in the 14z. They have covers that are hard to remove, and somehow it's hard for me to plug devices by feel. I usually have to turn on the lights to find where exactly to insert the USB cable.
One more nitpick. When I attach my external drive to the 14z and reboot, sometimes it will attempt to boot from the external drive and will get stuck. I have to disconnect the external hard drive before it will boot normally.
SUMMARY
I'm pleased with the 14z and I'm very happy with the upgrade. I absolutely think the upgrade was worth the cost. If I had to do it over again now I might buy the 17R instead because of the even faster processor and the small price difference, but of course that's always true when buying computers. As for the 14z, it is quite capable of editing photos, even with Photoshop. The 14z also seems to be good enough at least for simple video editing, though I haven't tried editing AVCHD yet. I'll post about that when I have more experience with it.
Read More
Posted in | No comments

Saturday, 1 September 2012

A Lighting Opportunity You Shouldn't Miss

Posted on 22:59 by Unknown
The spot above shows one of my favorite kinds of photo opportunities.  It allows me to get dramatic lighting effortlessly.  Hit the jump for a few samples.


BACKLIGHTING
I love backlighting because it emphasizes the subjects and allows them to stand out from the background.  The kind of backlighting I like best for this purpose is one where the light is not directly behind the subject, but is instead above and behind the subject (sometimes called separation light or shoulder light).

To get that kind of light with flash normally requires using at least a tall light stand, if not a boom stand (so that the light stand won't be visible in the shot), so it's not often that I have the chance to shoot with it.
One of the few occasions when I was able to add separation light to a casual portrait.
(Funny how fat I was back then.  Thank goodness for Brazilian Jiu-Jitsu!)
Fortunately, sometimes nature does the work for us.  When the sun is at a sufficiently low angle (not directly overhead), I often position the subject to use the sun as backlight.

The effect is most noticeable when there is a dark background, which makes the separation light prominent.  That's why I like areas like the spot at the beginning of the story.  It is a backlit area next to a shaded area.  As a further bonus, the dark background tends to reduce the dynamic range of the scene (compared to a backlit shot without a shade).  Finally, if the backlit area is a light-toned surface such as concrete, it can reflect light into the subject, adding a bit of fill.  In short, instant studio-style lighting, without any effort at all.

On this particular morning, it was a "costume day" at our kids' school, and my wife asked me to take a shot of the kids.  I looked out at the backyard, saw the shaded and backlit area and did an internal fist pump. :)  I chose to use the Fuji S5 and Sigma 50-150.

To position the subject, I have the subject in the shaded area, facing away from the light, close to the sunlit portion so that they're casting a shadow.  The part of the subject that is casting a shadow will be the part that has a separation light.  It could be the whole subject, or just the head, or anywhere in between.  (BTW the light doesn't have to be behind the subject.  It can be at an angle for effect.)  And here's what that light did for my shot:


When the subject has hair with volume (e.g. frizzy or curly hair), or is wearing something translucent, then the effect is even better.


EXPOSURE
One challenge with backlit shots like this is that a camera may be fooled into underexposure.  The correct exposure will depend on your camera and your intent.  Some cameras will seriously underexpose backlit shots, while others will do fine.  In this case, I was using the Fuji S5, which has a tendency to underexpose.  With that tendency in mind, I set the exposure compensation at +1.3EV but when I processed the shot, I found that I had to add another +0.85EV.


FLARE
Something else to watch out for with a strong backlight is flare.  Flare can reduce the contrast of the image, making it look washed-out.  Depending on your lens, you may also see ghosting.  To minimize these issues, use a lens hood (or use your hand to shade your lens) and if you have a choice, consider using a longer focal length.  Alternatively, instead of avoiding flare, you can allow flare into the shot for effect.


RELATED POSTS
Using Midday Sunlight
Turnabout is Fair Play
Fill Flash: Summer Pool Party

--
Happy Labor Day and have a great weekend!
(BTW, did you notice anything different about the post-processing of these shots?  That will be something I will discuss soon.)
Read More
Posted in 50-150, backlight, backlit, fuji, lighting, s5, s5 pro, s5pro, separation, sigma | No comments

Thursday, 30 August 2012

YN-560EX update: wireless compatibility

Posted on 07:53 by Unknown
I tested the 560EX in wireless mode with my Fuji S5 and found that it works both in Group A and Group B.  I repeated the test with the D90 and it still doesn't work in group B.  It therefore appears that wireless compatibility varies by camera model.  I will check other cameras.
Read More
Posted in | No comments

Monday, 27 August 2012

Update

Posted on 10:29 by Unknown
Hi everyone. Here are some of the upcoming posts I'm working on.
1. Aputure Gigtube Wireless II. Last week I showed a photo that I took about 10 feet high from where I was standing. I was able to do that by using the Aputure Gigtube Wireless II, a wireless monitor that you can connect to some DSLRs to get remote live view and shutter capabilities. What's cool about it is it allows me to take photos from unusual angles. Almost like having the power to levitate or shrink yourself when you take photos. That's the promise it holds. But I've been doing a few tests and it's more challenging to use than I had anticipated. Some have to do with the unit, some with the camera's inherent limitations, and some are just plain photography issues. I believe the issues can be resolved but I'm still working on it. So the jury's still out on this one. I wouldn't rush out to get one just yet.
2. Yongnuo YN-560EX (EX600). I posted my initial tests last week. I'm still waiting for the flashmeter to be returned from repair but I'm suspecting it is much weaker than advertised. I also don't know if my inability to control group B with my popup is a manufacturing defect or an inherent issue with the 560EX. Will post a more comprehensive review asap.
3. Aokatec wireless TTL. Aokatec recently released a radio-based wireless TTL system that supplements your existing IR-based wireless system by detecting the electromagnetic noise from the commander flash's pulses, sending out the signal as radio, then translating it into IR for receivers. It sounds similar in principle to the Radiopopper PX. At $110 for a transmitter/receiver kit and $55 for each additional receiver, it appears to be the cheapest radio-based wireless TTL system out there. I'm very tempted to get one but am somewhat concerned about whether they can truly deliver. I've never heard of Aokatec before. Lightingrumours.com is about to review it, so I'd like to see that review before deciding whether to get one.
4. Nikkor 24-70. I have more shots now with this lens but most of my recent shots have been with APS-C cameras, which is not really the intended market for this lens. I was thinking of postponing the review until I get a full frame camera again (either a D600, D800 or D700) but I may split it into two posts - a review for APS-C and another for full frame.
5. Nikkor 28-105 3.5-4.5. I've had this lens for a while but haven't done a review of it. This may be a good alternative for someone looking for macro capabilities on a budget.
6. Nikkor 70-200 VR vs. Sigma 50-150.
7. Spyder Express monitor calibration.
8. Choosing a budget laptop for photography.
9. Review of Dodging and Burning e-book.
10. Review of Ming Thein's Photoshop Workflow tutorial.
I often change my mind as to which post to work on next and sometimes I get too busy to work on posts, so consider subscribing to our feed (such as through Google Reader) or twitter account (@betterfamilypix) to get notified of new posts.
Read More
Posted in | No comments
Newer Posts Older Posts Home
Subscribe to: Posts (Atom)

Popular Posts

  • Samyang 24 f/3.5 Tilt Shift Lens Now Available
    A seller on ebay ( bestpriceoptics ) is now selling the Samyang 24 f/3.5 tilt shift lens, in Canon and Nikon mounts, for $999 shipped.  This...
  • Nikon 28 1.8G: Moody Artist?
    When Nikon had its recently-finished sale (now extended to end of March), the one lens that I considered buying was the Nikkor 28 1.8G.  To...
  • Olympus E-PL3 with 14-42 Lens $199; Moving from Nikon to MFT?
    I saw on 43rumors.com that the Olympus E-PL3 was being sold at Newegg for just $199 with the 14-42 kit lens included.  I checked it out and...
  • Double Camera Strap & BlackRapid RS-5 Review
    This is a review of two camera straps: - The first is a double camera strap that's -- let's be blunt -- a knockoff of the BlackRapid...
  • Price drops!!! Olympus XZ-2, Pentax MX-1. And about the Casio EX-10
    I just noticed a huge price drop on the Olympus XZ-2 (previously $500 now under $400) and Pentax MX-1 (previously $500 now under $300 ).  Pe...
  • Best Alternative to Nikon 24-70 2.8G: the Nikon 28-70 2.8D
    Every Nikon shooter knows that the Nikkor 24-70 2.8G is the best standard zoom for Nikon's full frame cameras.  However, at around $1900...
  • Abstract Fun
    In one of the rare times I put effort and setup a light stand and an umbrella to shoot my girls, I decided to make use of this burst of ener...
  • Coco Ring Flash - First Impressions
    A few weeks ago, after much deliberation, I finally decided to get a ring flash adapter.  My purpose was to use it as on-axis fill, much lik...
  • Nikon D7000 vs. Nikon D7100
    D7000 + Tokina 11-16 I've been using the Nikon D7000 for a couple of months now, and in this post I'd like to share my thoughts on t...
  • Sigma 18-35 1.8 Revisited; Where to Get It
    Back in April of this year, Sigma surprised everyone by announcing the Sigma 18-35 f/1.8 , the first zoom lens for a large sensor that had s...

Categories

  • "alien bee"
  • "april fool's"
  • "ring flash"
  • "yong nuo"
  • 1"
  • 1/1.7"
  • 10-17
  • 10-20
  • 11-16
  • 15-85mm
  • 15z
  • 17-50 vc
  • 190cx pro3
  • 2.8
  • 2.8G
  • 2/3"
  • 200 f2.8
  • 200 L
  • 200mm
  • 200mm f/2.8
  • 200mm f/2.8 L II
  • 200mm f2.8
  • 200mm f28
  • 200mm f28 L II
  • 2012
  • 2013
  • 23 Samsung led
  • 24-105 f4
  • 24-70
  • 25 1.4
  • 28-105
  • 28-70
  • 35mm
  • 35mm f/2
  • 35mm f2
  • 360
  • 3rd party
  • 4.1
  • 4/3
  • 40 pancake
  • 40 panckae
  • 40 stm
  • 40-150R
  • 40mm f/2.8
  • 430EX
  • 43rumors
  • 45 18
  • 45 AW
  • 4x4
  • 50 14
  • 50 f14
  • 50-150
  • 50mm
  • 50mm f/1.4
  • 55 AW
  • 55-250
  • 550D
  • 55aw
  • 560ex
  • 580 ex ii
  • 580EX
  • 580EX II
  • 5d
  • 5d mark 2
  • 5d mark 3
  • 5D Mark II
  • 5d mark iii
  • 5d2
  • 600d
  • 600ex-rt
  • 60d
  • 60fps
  • 60mm macro
  • 650d
  • 6d
  • 7.5mm
  • 720p
  • 75 f1.8
  • 85mm f1.8
  • 8x12
  • abbc
  • abstract
  • accuracy
  • active d-lighting
  • adjustment
  • adl
  • AF
  • af point
  • AF Point Expansion
  • aftermarket
  • airport
  • alexandria
  • alien bee
  • alien bees
  • alienbee
  • alienbees
  • alternative
  • ambient
  • ambient light
  • angle
  • aperture priority
  • APS-C
  • apsc
  • assignment
  • auto focus
  • auto white balance
  • autofocus
  • AWB
  • awl
  • back button focus
  • background
  • background blur
  • backlight
  • backlighting
  • backlit
  • bad behavior
  • bad photography
  • balance
  • bare flash
  • battery
  • BBF
  • beach
  • beams
  • beauty dish
  • bellagio
  • BFT
  • birthday
  • black
  • black foamie thing
  • black rapid
  • blackrapid
  • blogs
  • blower
  • blown
  • blur
  • bokeh
  • bounce
  • bounce card
  • bounce flash
  • bower
  • bracket
  • brightness
  • brilliance
  • brolly grip
  • brother
  • build
  • burst mode
  • butterflies
  • butterfly
  • C.Fn
  • cable
  • cake
  • camera
  • camera bag
  • camera releases
  • camera settings
  • candle
  • candlelight
  • canon
  • Canon 100mm Macro L IS
  • canon 200mm f28L
  • canon 24-105
  • canon 40 stm
  • canon 40mm f28 pancake
  • canon 50
  • canon 50 1.4
  • canon 55-250
  • canon 5d mark 2
  • canon 5d mark ii
  • canon 5d mark iii
  • canon 5d2
  • canon 5d3
  • Canon 60d
  • canon 6d
  • canon g11
  • canon speedlite
  • car
  • carbon fiber
  • catch lights
  • cheap
  • christmas
  • clean
  • cleaning
  • clipped
  • clipping
  • close up
  • clouds
  • cls
  • clustered
  • color
  • compact
  • comparison
  • composition
  • compositional aid
  • construction
  • contrast
  • cooler master
  • copyright
  • core i7
  • cowboy
  • cowboystudio
  • cpl
  • creepy
  • crop factor
  • crop sensor
  • cyber commander
  • cybersync
  • d-lux
  • d-lux5
  • d3
  • d300
  • D5100
  • D600
  • d70
  • d700
  • D7100
  • d90
  • dark background
  • david hobby
  • daylight
  • dell 24 inch
  • depth of field
  • desert
  • diamond
  • digital
  • directional
  • distance
  • diy
  • dlux
  • dlux5
  • dng
  • double
  • dslr
  • DSLR bag
  • dual
  • dust
  • dx
  • dynamic range
  • earthquake
  • ebay
  • ebay trigger
  • eclipse
  • editing
  • EF 40mm f/2.8
  • ef-s 60mm
  • einstein
  • Electro GN
  • engagement
  • environmental portrait
  • ep5
  • equipment
  • ETTL
  • ettr
  • europe
  • events
  • evf
  • ex600
  • existing light
  • expensive
  • exposing to the right
  • exposure
  • f/3.5
  • family
  • faq
  • fasten-r3
  • favorite
  • fayoum
  • Fayoum desert
  • fill
  • fill light
  • film
  • filter
  • finepix
  • fire
  • fireplace
  • first impressions
  • fish-eye
  • fisheye
  • fix
  • FL600R
  • flash
  • flash bounce
  • flash sync
  • flash trigger
  • flashmeter
  • flashright
  • focal length
  • focus
  • food
  • football
  • fotodiox
  • fountain
  • freexwire
  • fuji
  • fujifilm
  • Full Frame
  • fun
  • fx
  • galaxy s 3
  • galaxy s4
  • gecko
  • GeForce gtx570 OC
  • gel
  • geomag
  • ggs
  • ghost
  • gigabyte z77 ud3h
  • glass
  • gn
  • Goodbye
  • gorillapod
  • gregg
  • grid
  • grip
  • group shot
  • gskill ripjaws
  • guide
  • guide number
  • gx7
  • haf 912
  • handheld
  • hands on
  • hands-on
  • hdr
  • head shot
  • hiatus
  • high dynamic range
  • high iso
  • high speed sync
  • highlight
  • highlights
  • histogram
  • holder
  • holiday
  • home
  • home made
  • Honda civic
  • honeycomb
  • hotshoe
  • hoya
  • humor
  • i9500
  • id
  • image quality
  • impressions
  • indoor flash
  • infrared
  • infringement
  • insects
  • inverse square law
  • japan
  • jewel
  • jewelry
  • joby head
  • jpeg
  • Kingston hyperX SSD
  • kirk tuck
  • kl bird park
  • krakow
  • kuala lumpur
  • las vegas
  • lastolite
  • laurence kim
  • lax
  • lcd
  • leica
  • lens
  • lens cap
  • lens compression
  • lens review
  • lenses
  • lenspen
  • lensrentals
  • light
  • light painting
  • lighting
  • lightroom
  • lightroom 4
  • lightroom 5
  • location
  • long
  • long exposure
  • los angeles
  • low key
  • low light
  • Lowepro
  • Lowepro 45aw
  • Lowepro 55aw
  • lr4
  • lumiquest softbox III
  • lumix
  • lx-5
  • lx5
  • m4/3
  • m43
  • macro
  • macro adapter
  • makernotes
  • malaysia
  • manfrotto
  • manfrotto tripod
  • manual
  • mark ii
  • mark iii
  • MFT
  • mft. micro four thirds
  • micro four thirds
  • mielec
  • migration
  • mini review
  • mirror
  • mirror-less
  • mirrorless
  • mobile
  • modification
  • modifier
  • monobloc
  • monoblock
  • monolight
  • motion
  • motion blur
  • multi function printer
  • multiple
  • nano crystal
  • natural light
  • neil
  • Neil VN
  • niekerk
  • nikkor
  • nikon
  • nikon d600
  • noise
  • off camera
  • oil
  • olympus
  • olympus 12-50
  • Olympus 40-150
  • olympus 45
  • olympus 45 18
  • olympus om-d em-5
  • om-d
  • omd
  • omd em1
  • omd em5
  • omd em6
  • on-camera
  • one inch
  • overexposure
  • overpowering sun
  • panasonic
  • panasonic leica 25 14
  • pancake
  • party
  • passport
  • pastries
  • pastry
  • pc
  • pentax
  • peter
  • phone
  • phone photography
  • photo
  • photo tips
  • photography
  • photokina
  • photomerge
  • photoshop
  • photoshop elements
  • planning
  • pocketwizard
  • point and shoot
  • poland
  • polarizer
  • popup
  • popup flash
  • portrait
  • post processing
  • post-processing
  • postprocessing
  • product
  • product shots
  • profile
  • protection
  • protector
  • quad-flash
  • quantum
  • radiopopper
  • raid 0
  • Range finder
  • raw
  • raw editing
  • raw+jpeg
  • rays
  • real
  • recovery
  • reflection
  • reflector
  • resources
  • restaurant
  • review
  • rf-603
  • rf603
  • ricoh
  • ring
  • ringflash
  • robin wong
  • roger cicala
  • rogue
  • rokinon
  • roll off
  • roll-off
  • rolloff
  • rs-5
  • rs-7
  • rumors
  • s5
  • s5 pro
  • s5pro
  • samples
  • samsung
  • samyang
  • sb-26
  • sb-80
  • sb26
  • sb800
  • screen protector
  • sensor
  • sensor swab
  • sensorclear
  • sensorklean
  • sensorklear
  • separation
  • shadow
  • shadow pulling
  • shadows
  • shards
  • sharpening
  • sharpness
  • shoot through
  • shoot-through
  • shoot-thru
  • shooting technique
  • shootout
  • short
  • sigma
  • sigma 50-150
  • skin tones
  • skylight
  • Slik Mini Tripod
  • slingshot
  • slow
  • small
  • smooth
  • soft
  • softbox
  • sony
  • sony a99
  • sony rx100
  • sony t10
  • specular
  • speed
  • speedlight
  • speedlite
  • spinlight
  • spots
  • standard
  • stockholm
  • story
  • strap
  • strobe
  • strobist
  • studio
  • studio strobe
  • subject
  • substitute
  • sudden
  • summilux
  • sunrise
  • sunset
  • sweden
  • swivel
  • sync speed
  • t2i
  • t3i
  • Table top tripod
  • tamron
  • technique
  • techniques
  • tele
  • telephoto
  • thinktank retrospective 5
  • third party
  • tips
  • tokina
  • tonal
  • tonality
  • tone curve
  • toploader
  • toys
  • translucent
  • travel photography
  • tri-flash
  • Tribute
  • trifold
  • trigger
  • tripod
  • truth
  • ttl
  • TTL Cord
  • u43
  • ultra-wide
  • ultrawide
  • umbrella
  • underexposure
  • unlimited sync speed
  • up-rise
  • up-rise 15z
  • update
  • uprise
  • USM
  • uv
  • uwa
  • vanguard
  • versus
  • vertical
  • video
  • view nx2
  • visual science lab
  • vs
  • wadi rayan
  • wd caviar black
  • web
  • weekend
  • westin
  • white balance
  • white lightning
  • wide
  • wide angle
  • window
  • wireless
  • wireless flash
  • wireless release
  • wireless trigger
  • workflow
  • Yashica
  • yashica gtn
  • yashica st-7
  • yn-560
  • yn-560ex
  • yn-ex600
  • yn560
  • yong nuo
  • yongnuo
  • zack arias
  • zoom
  • zoom toploader
  • zuiko

Blog Archive

  • ▼  2013 (165)
    • ▼  December (5)
      • Olympus E-PL3 with 14-42 Lens $199; Moving from Ni...
      • Sigma 18-35 1.8 Revisited; Where to Get It
      • Speedlight Modifiers - 50% discount at Fotodiox
      • Olympus M.Zuiko 45mm f/1.8 Mini Review
      • Evening Portraits with Flash
    • ►  November (10)
    • ►  October (8)
    • ►  September (7)
    • ►  August (3)
    • ►  July (11)
    • ►  June (10)
    • ►  May (15)
    • ►  April (19)
    • ►  March (33)
    • ►  February (24)
    • ►  January (20)
  • ►  2012 (193)
    • ►  December (17)
    • ►  November (22)
    • ►  October (34)
    • ►  September (47)
    • ►  August (12)
    • ►  July (11)
    • ►  June (10)
    • ►  May (13)
    • ►  April (13)
    • ►  March (8)
    • ►  February (1)
    • ►  January (5)
  • ►  2011 (141)
    • ►  December (8)
    • ►  November (8)
    • ►  October (7)
    • ►  September (9)
    • ►  August (13)
    • ►  July (13)
    • ►  June (19)
    • ►  May (17)
    • ►  April (25)
    • ►  March (22)
Powered by Blogger.

About Me

Unknown
View my complete profile