Better Family Photos

  • Subscribe to our RSS feed.
  • Twitter
  • StumbleUpon
  • Reddit
  • Facebook
  • Digg

Tuesday, 14 August 2012

Choosing the Exposure for Dynamic Range

Posted on 04:43 by Unknown

Over the weekend, we visited Knott's Berry Farm, one of the first theme parks in the U.S.  What I like about Knott's is that the lines are much shorter than those of Disneyland therefore we get to experience more rides within the same amount of time.  I also think Knott's has a more interesting variety of rides for young children like our 5-year old, and has more thrill rides (though not as many as Magic Mountain).  Although the production value is not as high as that of Disneyland, it is still quite high.

During our visit the heat was intense, reaching 95°F (35°C), just one degree below the all-time record of 96 for that area, and 10 degrees hotter than the average for this time of the year.  With the sun blazing overhead, the dynamic range was very wide.  I used two different exposure strategies to deal with the dynamic range.

PROTECTING HIGHLIGHTS
When the ambient is very bright, it is very easy to exceed the highlight range of a digital camera and blow the highlights.  I used to not care so much about it myself.  In the shot below, you can see that the highlights from the sunlight-as-kicker have no detail at all.


However, when I started learning about shooting film, I became more attentive to highlights. With print film (negative film) I have tremendous latitude for exposing highlights, and it's almost impossible to blow highlights.  With digital, once a certain threshold of light is reached, the sensor can't record any more details, and all I suddenly get is white (i.e. blown highlights).  Blown highlights are therefore one indicator that the image was shot digitally.

(BTW there's nothing wrong per se with looking digital.  It's just a personal preference.  I grew up during a time when digital video was used mostly for lower-budget movies and shows.)

On this occasion I was using two cameras, the Fuji S5 Pro and the Nikon D90.  They have different amounts of shadow range and highlight range therefore I used different exposure strategies.  In the shots below, I took some test shots to show the effect of the exposure strategies.  For the S5, I took a baseline shot using its 'standard' dynamic range mode, and another shot at the same exposure but this time activating its full 400% dynamic range (you can ignore the absence of a highlight on the neck of the baseline shot -- the sun was going down and a shadow fell on the cheek and neck of the mannequin head).  I also took a pair of shots with the Nikon D90: first a baseline shot with a normal exposure, and a second shot that was deliberately underexposed by two stops.  BTW these were at ISO 400, the widest dynamic range for the D90.


In postprocessing I adjusted the shots to recover the highlights and in the case of the underexposed D90 shot, to normalize the exposure as well.  Here is the result:

With the S5's standard mode, there was almost no highlight recovered.  Conversely, with the 400% dynamic range mode, all highlights were fully recovered.  There was not a single pixel that was blown.

With the D90's normal exposure, I was able to recover a few of the highlights but you can see large patches that were blown (the temple, cheekbone and the entire side of the neck).  However, with the deliberately underexposed shot, most of the highlights could be recovered.  There is only a patch of lost highlight near the base of the neck.  

Full resolution S5 400% DR with adjustment (click to download)

Full resolution D90 -2EV with adjustment (click to download)

The downside of this deliberate underexposure is the greater amount of noise in the midtone and shadow areas (after all, I needed to increase exposure 2 stops in postprocessing to compensate for the underexposure).  For me, I usually prefer having extra noise (and using noise reduction) than losing relevant highlights.
---

Back to Knott's Berry Farm.  The sky was cloudless for most of the afternoon, so with the S5, I used manual exposure and set the exposure for the shadow.  Here's a sample shot, straight-out-of-the-cam:

Looking only at the LCD screen, the bright patch of pavement might seem worrying (IIRC it was blinking), but I was confident that most, if not all, of the highlights would be recoverable with the S5, so I concerned myself with getting an adequate exposure of shadow areas to minimize noise.

And here's the adjusted shot (not a single pixel was lost).

As for the Nikon D90, I set the exposure to avoid losing highlights as much as possible.  First, when judging the exposure I paid attention to the blinkies and histogram, dialing down exposure as needed.  Second, I used the 'Extra High' setting of Active D-Lighting, which meant that the camera would underexpose slightly to avoid losing highlight detail.  For JPEGs, it would also boost the shadow and midtone areas to compensate for the underexposure.   However, I was shooting raw, so the boosting would be done in postprocessing.  Here's a sample shot, SOOC:

If I looked only at the LCD screen, it would look very underexposed.  However, I knew that for my purposes, this was the 'correct' exposure.  Here's how the shot looked after adjustment in post-processing.

Most of the highlights were preserved.  There is only a small patch lost, near my wife's elbow.

Here are a few more shots from our visit.  I used two lenses, the Tokina 10-17 fisheye (paired with the S5) and the Nikkor 28-105 3.5-4.5 AF-D (with the D90).


For when my kids are a little older
Knott's has a Peanuts-themed area for younger children, Camp Snoopy
A junior version of the elevator drop


We didn't spend as much time as we wanted because of the scorching heat, but we still had fun.
Read More
Posted in 10-17, 28-105, d90, digital, dynamic range, exposure, film, fuji, highlight, nikkor, nikon, postprocessing, s5, s5pro, tokina | No comments

Thursday, 9 August 2012

Chasing Butterflies with the LX5

Posted on 07:42 by Unknown

A couple of weeks ago, I had the opportunity to take a tour of a preserve in order to watch the El Segundo Blue Butterfly, an endangered species found only in a small area of the dunes of El Segundo, California.


The El Segundo Blue Butterfly (Euphilotes battoides) is a sub-species of the Square-Spotted Blue Butterfly.  It is a small butterfly, about the size of an adult fingernail.  Its life cycle is completed within a year, during which time it lives as a butterfly for only one week (sometimes two weeks).  During that one week, the butterfly has to mate and lay its eggs.

Unlike other blue butterflies, the El Segundo eats only one kind of plant (both as a caterpillar and as a butterfly) -- the coastal buckwheat.  In 1976, less than 500 butterflies remained and it became the first insect listed as a federal endangered species.  Through conservation efforts, the El Segundo population has recovered, with approximately 120,000 butterflies counted this year.

For this project, I chose the Lumix LX-5.  I thought that the deep depth of field would help in capturing shots of the butterfly.


We had the help of an entomologist with us and he pointed out the coastal buckwheat plants, where the butterflies would most likely be found.  He also told us that butterflies try to conserve their energy by avoiding the wind.  So if you have a friend stand in a way that blocks the wind from a certain spot, there's a good chance the butterfly will rest at that spot.  Also if it is a windy day the butterflies will tend to stay close to the ground or bushes.  Even with those tips it was very challenging and required a lot of patience because the butterflies don't stay in place and fly away when we get near.

The closest I got to a butterfly was about a foot and a half.  So, contrary to what I expected, I did not get to use the macro capabilities of the LX-5.  Instead, what would have been more useful was having a long lens.  The LX-5 is the equivalent of 90mm at its longest, which is not very long.  However, the LX-5's built-in stabilization was handy for stabilizing the shot not just for taking the shot itself but also while framing the shot.  To help the image be as sharp as possible, I used a high shutter speed and a narrower aperture (keeping in mind that the diffraction limit of a point-and-shoot is wider than for a DSLR).  Given the relatively constant light (due to the cloudless sky), I used manual exposure mode, selecting the highest shutter speed (1/2000), the highest ISO that I consider acceptable for the LX-5 (ISO 400) and varying my aperture between f/4 and f/5.6.

Focusing was also a challenge because of the very busy background.  Even though I manually selected the autofocus area, it was hard for the camera to tell which one was the subject.  I usually had to refocus several times.

With some patience I was able to capture several shots of the butterflies, which I cropped in post to enlarge the view.


I plan to participate in next year's watch for the blue butterflies.  I plan to use both a point and shoot as well as a DSLR (so that I could use a longer focal length; I would just have to use a much smaller aperture for depth of field).
Read More
Posted in butterflies, butterfly, insects, lx-5, lx5 | No comments

Tuesday, 7 August 2012

The Big Picture

Posted on 13:46 by Unknown
We recently had a birthday party for our son. It was at a playhouse with large bounce houses and a play structure, with tall black ceilings (maybe about 30 feet high or so) and multicolored walls.
Inline image 1

What lighting technique would you use in these circumstances? Hit the jump to see what approach I used.
Inline image 3
Inline image 2

When I'm indoors I prefer to use bounce flash because with proper technique, the light is soft and directional. In this situation however, I thought bouncing would be impractical because of the very high and dark ceiling. I didn't think bouncing off walls would be a good idea either because the multi-colored walls would create wildly inconsistent color casts on the subjects.

Without being able to bounce, I thought about other alternatives such as a handheld umbrella, the Fotodiox 8x12 softbox, or the Coco Ringflash. I first took a test shot using ambient only. At f/2.8 and ISO 1600 (what I consider to be a reasonable amount of noise for the D90 and to a certain extent, the D70), I was getting a shutter speed of around 1/80. I was surprised because I was expecting that the ambient would be too dim, with just some fluorescent lights overhead. At 1/80 however, I thought the shutter speed was usable, so that's what I used - ambient only (cue the thunder and lightning).

Sure, I often use flash because I believe it often improves the result, but I don't go out of my way to use it when I don't have to. I could have used the tools I mentioned (handheld umbrella, on-camera softbox or ringflash) but if I did, it would have been much harder to handle two cameras at the same time. And with only one camera, I would be compromising either my ability to capture moments (if I had to keep switching lenses) or my ability to compose (if I stuck to one lens). When the results of ambient only are fine, I didn't think it would be a good tradeoff.

Inline image 1
Inline image 2
Inline image 3

A shot of me by my non-photographer wife:
Who knew that my wife would know to pan a shot and do it successfully? :-O
Inline image 5

Part of what made it possible to get the shots above is that I was using fast f/2.8 lenses. The lenses I used here are the Tokina 11-16 (reviewed here) and the Nikon 24-70. See if you can guess which lens was mounted on the D90 and which was mounted on the 8-year old D70. :)

Speaking of lenses, I wanted to briefly mention my choice of focal length. I normally use a standard zoom (17-50 on APS-C or 24-70 on full frame) and a telephoto (50-150 on APS-C or 70-200 on full frame). However, I sold my Tamron 17-50 VC a couple of months ago after I got the D3 because I was using the 24-70 to cover the standard zoom, and then I recently sold my Nikon D3 in anticipation of the Nikon D600. I initially thought about using the Tokina 11-16 and Sigma 50-150 but I would be left with a large gap between 16-50 (24-75 in 35mm terms). Instead I paired the 11-16 with the 24-70, using the latter as a normal and short telephoto lens. I have a Nikkor 28-105 3.5-4.5 which I also considered because of its longer range but felt that I could use the wider aperture of the 24-70 in the somewhat dim light.

Inline image 6

After the kids played, it was time to eat. The dining area was a medium-sized room, with light yellow ceilings about 10 feet high, and plain yellow walls. Unlike the play area, bouncing was definitely a good alternative here.
Inline image 7

Inline image 8

Inline image 10

Some of you may know that I recently reviewed two bounce flash accessories - a modified Flashright and the "DIY Spinlight." Which one did I use here? Neither. The modified Flashright, DIY Spinlight, and even the black foamie thing are all useful for blocking the flash from directly reaching the subject when the flash is aimed forward to bounce it from a short-light direction. The short lighting looks cinematic and I love the effect.

However, in this case, I preferred a more even lighting, so I bounced the flash behind me or to the side, making it unnecessary to use the BFT or the other bounce accessories. Again, I choose the look I want then the tool to achieve it, not the other way around.
Inline image 13

Inline image 11

BTW note that for these shots in the dining area, I used a narrower aperture. First of all, a shallow depth of field would not be useful because the background was often plain yellow. The bokeh would not have been interesting. Second, by using a narrower aperture, I could more easily keep subjects in focus because of the deep depth of field.

As for color temperature, I took the shots in raw, which allowed me to neutralize the color, but I preferred the straight-off-the-camera white balance with a yellowish color cast because that's how the room looked to me. The neutralized white balance technically made the colors look "correct" but felt "weird" in the sense that I don't expect an absolutely neutral color under these circumstances (yellow walls, fluorescent lights).

The time came for blowing the candle on the cake. The playhouse staff dimmed the lights, which was perfect. To maintain the ambience, I set the ambient exposure so that the candles would appear to be the primary source of light. The fill was supplied by the dimmed ambient and bounced flash (dialed down so it wouldn't overpower the candlelight).

Inline image 14

After that the kids had cupcakes and goody bags.

Inline image 15

Inline image 16

And then it was time to say good night.

Inline image 17
Read More
Posted in 11-16, 24-70, birthday, bounce, cake, candle, candlelight, flash, lighting, party, technique | No comments

Saturday, 4 August 2012

CowboyStudio Umbrella Stand Adapter D

Posted on 17:38 by Unknown

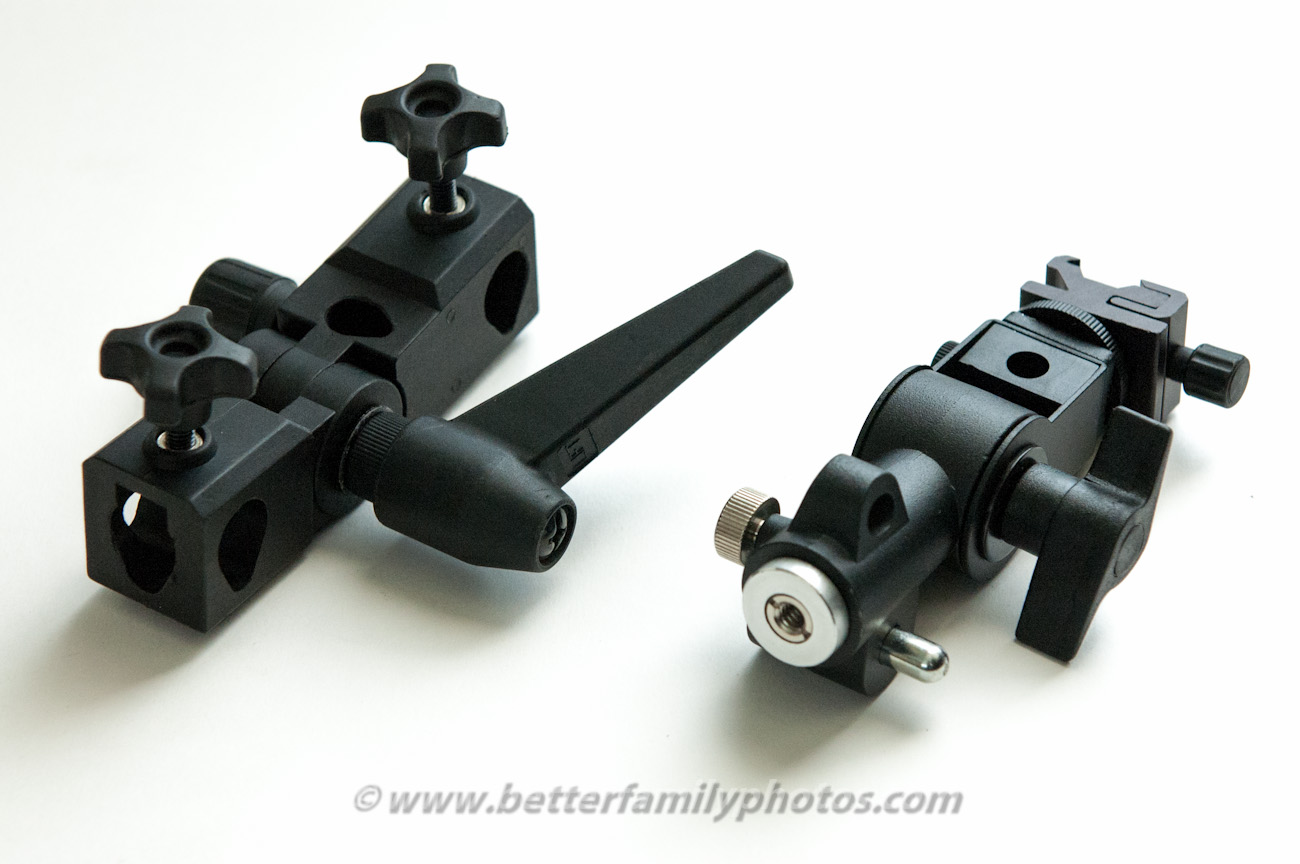
I was looking for a couple more umbrella holder brackets.  There are plenty of designs out there, and I chose a kind of bracket I had not seen before but had good reviews, the CowboyStudio Umbrella Bracket "D."  Here's a quick review.


COMPONENTS

The adapter is made mostly of metal (some sort of lightweight alloy).  Build quality appears decent.

The set includes a metal cold shoe, a spacer for the cold shoe, and a spigot.  The spigot has a removable bushing that can convert it from 1/4 to 3/8 inch.  That means the adapter can accept a light stand with either 1/4 (as in a tripod), 3/8, or 5/8 inch stud (by simply removing the spigot).

The business end of the adapter has a 1/4-inch stud, to which the cold shoe can be mounted (with the spacer to secure it).  You can also use many other third party cold shoes such as a Frio.  Alternatively, the spigot can be mounted on the 1/4 inch stud so that the adapter will have a 5/8 mounting stud.


NOTES:
- The receptacle for the umbrella can only take 7mm shafts.  Unlike some umbrella adapters, the receptacle is not angled (the umbrella shaft will be exactly perpendicular to the flash).

- When the adapter's knob is tightened, the adapter holds its position well.  It is possible to force it to move if you push it down really hard but in the real world the adapter is unlikely to encounter that much force.
- The receptacle for the light stand or spigot is secured both by a thumbscrew as well as a button.  Even if the thumbscrew is not locked down, you can't remove it from a light stand unless you press the button.
- There is a loop from which you can hang accessories such as radio triggers.
- It takes up less space in my bag than my old umbrella adapter.


So far I'm pleased with this umbrella adapter.  If I need another umbrella adapter, I would probably buy it again instead of the previous one I owned.  Alternatively, if you want to mount a speedlight on a light stand for use with an umbrella, the CowboyStudio Speedlight Bracket T places the flash closer to on-axis with the umbrella and can potentially be used with Bowens or Calumet modifiers, but the Bracket T will cost more and take up more space than the Adapter D.
Read More
Posted in | No comments

Wednesday, 1 August 2012

Choosing a Second Camera

Posted on 10:48 by Unknown
If you have more than one lens and you shoot events or candid shots, I highly recommend getting a second camera. I used to have only one camera and two lenses (Tamron 17-50 VC and Sigma 50-150). I liked the Sigma 50-150, but it was too specialized, so whenever I had the choice between the 17-50 VC or the 50-150, I almost always chose the 17-50, so I got very little use out of the 50-150, even though I liked it. I finally decided to get a second camera, and it made a big difference in my photography. I used my Sigma 50-150 far more often and I got a greater variety of shots.
Buying a second camera isn't just for gearheads. I honestly believe it would be useful for the majority of family photographers. If you shoot events and candids, you probably don't have time to switch lenses (or if you do, you're probably missing some moments). Plus, if you don't have to switch lenses, you will get less dust in your sensor, and it's less likely you'll drop your lens by accident. Moreover, if anything happens to your primary camera, you will still have a backup.
A second camera doesn't have to be expensive either. You can buy a very capable Nikon D70 for $200 or less these days.
If you're looking for a second body, I recommend getting one that has different capabilities from your current camera. Here are some examples for Nikon (Canon has equivalents as well):
  • Shallow depth of field and great low-light performance: any full frame DSLR.
  • Good low-light performance: Nikon D5100 or Nikon D7000.
  • A weaker anti-aliasing filter for greater sharpness: Nikon D800E, Nikon D300, or Nikon D300S
  • Unlimited sync speed: Nikon D40, Nikon D50, Nikon D70, Nikon D70s
  • Pop-up commander flash (so you can use an external flash wirelessly): Nikon D70, Nikon D70s, Nikon D80, Nikon D90, Nikon D7000, Nikon D300, Nikon D300s, Nikon D700
  • Built-in focus motor (so you can use lenses that don't have focus motors): Nikon D70, Nikon D70s, Nikon D80, Nikon D90, Nikon D7000, Nikon D300, Nikon D300s, any full frame DSLR
  • Tilt and swivel LCD (so you can get shots from unusual angles): Nikon D5000, Nikon D5100, Nikon D3200 (with wireless adapter)
  • High dynamic range: Fuji S5 Pro, Fuji S3.
  • Very high resolution: Nikon D3200, Nikon D3x, Nikon D800, D800E
  • Compact body: Nikon D40, D40x, D50, D3000, D3100, D3200.
  • Video (if your current camera doesn't have video): any recent DSLR.
RELATED POSTS:
Second body vs Second flash
Full frame DSLR FAQ

Canon 60D vs. 550D and 600D

Read More
Posted in | No comments
Newer Posts Older Posts Home
Subscribe to: Posts (Atom)

Popular Posts

  • Samyang 24 f/3.5 Tilt Shift Lens Now Available
    A seller on ebay ( bestpriceoptics ) is now selling the Samyang 24 f/3.5 tilt shift lens, in Canon and Nikon mounts, for $999 shipped.  This...
  • Nikon 28 1.8G: Moody Artist?
    When Nikon had its recently-finished sale (now extended to end of March), the one lens that I considered buying was the Nikkor 28 1.8G.  To...
  • Olympus E-PL3 with 14-42 Lens $199; Moving from Nikon to MFT?
    I saw on 43rumors.com that the Olympus E-PL3 was being sold at Newegg for just $199 with the 14-42 kit lens included.  I checked it out and...
  • Double Camera Strap & BlackRapid RS-5 Review
    This is a review of two camera straps: - The first is a double camera strap that's -- let's be blunt -- a knockoff of the BlackRapid...
  • Price drops!!! Olympus XZ-2, Pentax MX-1. And about the Casio EX-10
    I just noticed a huge price drop on the Olympus XZ-2 (previously $500 now under $400) and Pentax MX-1 (previously $500 now under $300 ).  Pe...
  • Best Alternative to Nikon 24-70 2.8G: the Nikon 28-70 2.8D
    Every Nikon shooter knows that the Nikkor 24-70 2.8G is the best standard zoom for Nikon's full frame cameras.  However, at around $1900...
  • Abstract Fun
    In one of the rare times I put effort and setup a light stand and an umbrella to shoot my girls, I decided to make use of this burst of ener...
  • Coco Ring Flash - First Impressions
    A few weeks ago, after much deliberation, I finally decided to get a ring flash adapter.  My purpose was to use it as on-axis fill, much lik...
  • Nikon D7000 vs. Nikon D7100
    D7000 + Tokina 11-16 I've been using the Nikon D7000 for a couple of months now, and in this post I'd like to share my thoughts on t...
  • Sigma 18-35 1.8 Revisited; Where to Get It
    Back in April of this year, Sigma surprised everyone by announcing the Sigma 18-35 f/1.8 , the first zoom lens for a large sensor that had s...

Categories

  • "alien bee"
  • "april fool's"
  • "ring flash"
  • "yong nuo"
  • 1"
  • 1/1.7"
  • 10-17
  • 10-20
  • 11-16
  • 15-85mm
  • 15z
  • 17-50 vc
  • 190cx pro3
  • 2.8
  • 2.8G
  • 2/3"
  • 200 f2.8
  • 200 L
  • 200mm
  • 200mm f/2.8
  • 200mm f/2.8 L II
  • 200mm f2.8
  • 200mm f28
  • 200mm f28 L II
  • 2012
  • 2013
  • 23 Samsung led
  • 24-105 f4
  • 24-70
  • 25 1.4
  • 28-105
  • 28-70
  • 35mm
  • 35mm f/2
  • 35mm f2
  • 360
  • 3rd party
  • 4.1
  • 4/3
  • 40 pancake
  • 40 panckae
  • 40 stm
  • 40-150R
  • 40mm f/2.8
  • 430EX
  • 43rumors
  • 45 18
  • 45 AW
  • 4x4
  • 50 14
  • 50 f14
  • 50-150
  • 50mm
  • 50mm f/1.4
  • 55 AW
  • 55-250
  • 550D
  • 55aw
  • 560ex
  • 580 ex ii
  • 580EX
  • 580EX II
  • 5d
  • 5d mark 2
  • 5d mark 3
  • 5D Mark II
  • 5d mark iii
  • 5d2
  • 600d
  • 600ex-rt
  • 60d
  • 60fps
  • 60mm macro
  • 650d
  • 6d
  • 7.5mm
  • 720p
  • 75 f1.8
  • 85mm f1.8
  • 8x12
  • abbc
  • abstract
  • accuracy
  • active d-lighting
  • adjustment
  • adl
  • AF
  • af point
  • AF Point Expansion
  • aftermarket
  • airport
  • alexandria
  • alien bee
  • alien bees
  • alienbee
  • alienbees
  • alternative
  • ambient
  • ambient light
  • angle
  • aperture priority
  • APS-C
  • apsc
  • assignment
  • auto focus
  • auto white balance
  • autofocus
  • AWB
  • awl
  • back button focus
  • background
  • background blur
  • backlight
  • backlighting
  • backlit
  • bad behavior
  • bad photography
  • balance
  • bare flash
  • battery
  • BBF
  • beach
  • beams
  • beauty dish
  • bellagio
  • BFT
  • birthday
  • black
  • black foamie thing
  • black rapid
  • blackrapid
  • blogs
  • blower
  • blown
  • blur
  • bokeh
  • bounce
  • bounce card
  • bounce flash
  • bower
  • bracket
  • brightness
  • brilliance
  • brolly grip
  • brother
  • build
  • burst mode
  • butterflies
  • butterfly
  • C.Fn
  • cable
  • cake
  • camera
  • camera bag
  • camera releases
  • camera settings
  • candle
  • candlelight
  • canon
  • Canon 100mm Macro L IS
  • canon 200mm f28L
  • canon 24-105
  • canon 40 stm
  • canon 40mm f28 pancake
  • canon 50
  • canon 50 1.4
  • canon 55-250
  • canon 5d mark 2
  • canon 5d mark ii
  • canon 5d mark iii
  • canon 5d2
  • canon 5d3
  • Canon 60d
  • canon 6d
  • canon g11
  • canon speedlite
  • car
  • carbon fiber
  • catch lights
  • cheap
  • christmas
  • clean
  • cleaning
  • clipped
  • clipping
  • close up
  • clouds
  • cls
  • clustered
  • color
  • compact
  • comparison
  • composition
  • compositional aid
  • construction
  • contrast
  • cooler master
  • copyright
  • core i7
  • cowboy
  • cowboystudio
  • cpl
  • creepy
  • crop factor
  • crop sensor
  • cyber commander
  • cybersync
  • d-lux
  • d-lux5
  • d3
  • d300
  • D5100
  • D600
  • d70
  • d700
  • D7100
  • d90
  • dark background
  • david hobby
  • daylight
  • dell 24 inch
  • depth of field
  • desert
  • diamond
  • digital
  • directional
  • distance
  • diy
  • dlux
  • dlux5
  • dng
  • double
  • dslr
  • DSLR bag
  • dual
  • dust
  • dx
  • dynamic range
  • earthquake
  • ebay
  • ebay trigger
  • eclipse
  • editing
  • EF 40mm f/2.8
  • ef-s 60mm
  • einstein
  • Electro GN
  • engagement
  • environmental portrait
  • ep5
  • equipment
  • ETTL
  • ettr
  • europe
  • events
  • evf
  • ex600
  • existing light
  • expensive
  • exposing to the right
  • exposure
  • f/3.5
  • family
  • faq
  • fasten-r3
  • favorite
  • fayoum
  • Fayoum desert
  • fill
  • fill light
  • film
  • filter
  • finepix
  • fire
  • fireplace
  • first impressions
  • fish-eye
  • fisheye
  • fix
  • FL600R
  • flash
  • flash bounce
  • flash sync
  • flash trigger
  • flashmeter
  • flashright
  • focal length
  • focus
  • food
  • football
  • fotodiox
  • fountain
  • freexwire
  • fuji
  • fujifilm
  • Full Frame
  • fun
  • fx
  • galaxy s 3
  • galaxy s4
  • gecko
  • GeForce gtx570 OC
  • gel
  • geomag
  • ggs
  • ghost
  • gigabyte z77 ud3h
  • glass
  • gn
  • Goodbye
  • gorillapod
  • gregg
  • grid
  • grip
  • group shot
  • gskill ripjaws
  • guide
  • guide number
  • gx7
  • haf 912
  • handheld
  • hands on
  • hands-on
  • hdr
  • head shot
  • hiatus
  • high dynamic range
  • high iso
  • high speed sync
  • highlight
  • highlights
  • histogram
  • holder
  • holiday
  • home
  • home made
  • Honda civic
  • honeycomb
  • hotshoe
  • hoya
  • humor
  • i9500
  • id
  • image quality
  • impressions
  • indoor flash
  • infrared
  • infringement
  • insects
  • inverse square law
  • japan
  • jewel
  • jewelry
  • joby head
  • jpeg
  • Kingston hyperX SSD
  • kirk tuck
  • kl bird park
  • krakow
  • kuala lumpur
  • las vegas
  • lastolite
  • laurence kim
  • lax
  • lcd
  • leica
  • lens
  • lens cap
  • lens compression
  • lens review
  • lenses
  • lenspen
  • lensrentals
  • light
  • light painting
  • lighting
  • lightroom
  • lightroom 4
  • lightroom 5
  • location
  • long
  • long exposure
  • los angeles
  • low key
  • low light
  • Lowepro
  • Lowepro 45aw
  • Lowepro 55aw
  • lr4
  • lumiquest softbox III
  • lumix
  • lx-5
  • lx5
  • m4/3
  • m43
  • macro
  • macro adapter
  • makernotes
  • malaysia
  • manfrotto
  • manfrotto tripod
  • manual
  • mark ii
  • mark iii
  • MFT
  • mft. micro four thirds
  • micro four thirds
  • mielec
  • migration
  • mini review
  • mirror
  • mirror-less
  • mirrorless
  • mobile
  • modification
  • modifier
  • monobloc
  • monoblock
  • monolight
  • motion
  • motion blur
  • multi function printer
  • multiple
  • nano crystal
  • natural light
  • neil
  • Neil VN
  • niekerk
  • nikkor
  • nikon
  • nikon d600
  • noise
  • off camera
  • oil
  • olympus
  • olympus 12-50
  • Olympus 40-150
  • olympus 45
  • olympus 45 18
  • olympus om-d em-5
  • om-d
  • omd
  • omd em1
  • omd em5
  • omd em6
  • on-camera
  • one inch
  • overexposure
  • overpowering sun
  • panasonic
  • panasonic leica 25 14
  • pancake
  • party
  • passport
  • pastries
  • pastry
  • pc
  • pentax
  • peter
  • phone
  • phone photography
  • photo
  • photo tips
  • photography
  • photokina
  • photomerge
  • photoshop
  • photoshop elements
  • planning
  • pocketwizard
  • point and shoot
  • poland
  • polarizer
  • popup
  • popup flash
  • portrait
  • post processing
  • post-processing
  • postprocessing
  • product
  • product shots
  • profile
  • protection
  • protector
  • quad-flash
  • quantum
  • radiopopper
  • raid 0
  • Range finder
  • raw
  • raw editing
  • raw+jpeg
  • rays
  • real
  • recovery
  • reflection
  • reflector
  • resources
  • restaurant
  • review
  • rf-603
  • rf603
  • ricoh
  • ring
  • ringflash
  • robin wong
  • roger cicala
  • rogue
  • rokinon
  • roll off
  • roll-off
  • rolloff
  • rs-5
  • rs-7
  • rumors
  • s5
  • s5 pro
  • s5pro
  • samples
  • samsung
  • samyang
  • sb-26
  • sb-80
  • sb26
  • sb800
  • screen protector
  • sensor
  • sensor swab
  • sensorclear
  • sensorklean
  • sensorklear
  • separation
  • shadow
  • shadow pulling
  • shadows
  • shards
  • sharpening
  • sharpness
  • shoot through
  • shoot-through
  • shoot-thru
  • shooting technique
  • shootout
  • short
  • sigma
  • sigma 50-150
  • skin tones
  • skylight
  • Slik Mini Tripod
  • slingshot
  • slow
  • small
  • smooth
  • soft
  • softbox
  • sony
  • sony a99
  • sony rx100
  • sony t10
  • specular
  • speed
  • speedlight
  • speedlite
  • spinlight
  • spots
  • standard
  • stockholm
  • story
  • strap
  • strobe
  • strobist
  • studio
  • studio strobe
  • subject
  • substitute
  • sudden
  • summilux
  • sunrise
  • sunset
  • sweden
  • swivel
  • sync speed
  • t2i
  • t3i
  • Table top tripod
  • tamron
  • technique
  • techniques
  • tele
  • telephoto
  • thinktank retrospective 5
  • third party
  • tips
  • tokina
  • tonal
  • tonality
  • tone curve
  • toploader
  • toys
  • translucent
  • travel photography
  • tri-flash
  • Tribute
  • trifold
  • trigger
  • tripod
  • truth
  • ttl
  • TTL Cord
  • u43
  • ultra-wide
  • ultrawide
  • umbrella
  • underexposure
  • unlimited sync speed
  • up-rise
  • up-rise 15z
  • update
  • uprise
  • USM
  • uv
  • uwa
  • vanguard
  • versus
  • vertical
  • video
  • view nx2
  • visual science lab
  • vs
  • wadi rayan
  • wd caviar black
  • web
  • weekend
  • westin
  • white balance
  • white lightning
  • wide
  • wide angle
  • window
  • wireless
  • wireless flash
  • wireless release
  • wireless trigger
  • workflow
  • Yashica
  • yashica gtn
  • yashica st-7
  • yn-560
  • yn-560ex
  • yn-ex600
  • yn560
  • yong nuo
  • yongnuo
  • zack arias
  • zoom
  • zoom toploader
  • zuiko

Blog Archive

  • ▼  2013 (165)
    • ▼  December (5)
      • Olympus E-PL3 with 14-42 Lens $199; Moving from Ni...
      • Sigma 18-35 1.8 Revisited; Where to Get It
      • Speedlight Modifiers - 50% discount at Fotodiox
      • Olympus M.Zuiko 45mm f/1.8 Mini Review
      • Evening Portraits with Flash
    • ►  November (10)
    • ►  October (8)
    • ►  September (7)
    • ►  August (3)
    • ►  July (11)
    • ►  June (10)
    • ►  May (15)
    • ►  April (19)
    • ►  March (33)
    • ►  February (24)
    • ►  January (20)
  • ►  2012 (193)
    • ►  December (17)
    • ►  November (22)
    • ►  October (34)
    • ►  September (47)
    • ►  August (12)
    • ►  July (11)
    • ►  June (10)
    • ►  May (13)
    • ►  April (13)
    • ►  March (8)
    • ►  February (1)
    • ►  January (5)
  • ►  2011 (141)
    • ►  December (8)
    • ►  November (8)
    • ►  October (7)
    • ►  September (9)
    • ►  August (13)
    • ►  July (13)
    • ►  June (19)
    • ►  May (17)
    • ►  April (25)
    • ►  March (22)
Powered by Blogger.

About Me

Unknown
View my complete profile