


A 30-day trial version of Photoshop Elements 10 is now available:
Friday, 30 September 2011
Thursday, 29 September 2011
 |
| Excuse the quality of the picture, this is the best I could get out of my wife's P&S |
So you've heard about BBF or Back Button Focusing and was wondering what BBF is. Maybe you also heard that once you get used to it you will never go back. In this post I will tell you what is BBF and why it is one of the best things that makes using a DSLR more practical and enjoyable.
WHAT IS BBF?
BBF is short for Back Button Focusing, which means that you will move the focusing function from the shutter button to one of the buttons at the back of the camera (usually the "*" button on a Canon), check the picture of my Canon 60D at the top, you will find three buttons on the top right part at the back of the camera (Rebels or xxxD series only have two).
Usually half pressing the shutter button initiates auto-focusing and auto-metering, and completing the press snaps the picture, the whole idea of BBF is to remove this focusing function from the shutter button and move it to a button on the back, but why would anyone want to do that?
WHY USE BBF?
For one very simple reason, in order not to let the camera focus everytime you press the shutter button to take a picture. You are going to tell me "but I can easily switch the lens to manual focus and achieve the same result", true, you can, but can you do the the same as in the scenarios that I will mention below?
SETTING UP BBF
But before that, I must tell you how I have assigned the buttons on my camera first, so that you can imagine what I am talking about when I am describing the scenarios.
- A half press of the shutter starts metering (exposure calculation).
- A full press on the shutter will snap the picture whether it is in focus or not.
- A press on the "*" button at the back will engage auto-focusing (will focus and lock the focus once if "Single Shot" is chosen, will keep focusing and tracking if "AI Servo" is chosen).
- AEL button remains as it is, locks exposure when pressed.
One advantage of the xxD and xD series Canons over the xxxD (Rebel) series is the extra "AEL" button, if you have an xxxD camera, you'll have to sacrifice the exposure lock function in order to use the "*" button at the back for focusing instead.
You can change the button assignment on your Canon via the custom functions "C.Fn." menu under the settings, they are listed on this Canon's Learning Center page for different cameras.
There's an easier way to do it on the 60D through the quick menu, press the "Q" button, go to button assignments and you will find something that looks like this.
 |
| Custom controls quick menu on a Canon 60D |
For Nikon users I found this link that describes how to set it up, if you can't do it on your Nikon, please tell us in the comments and Mic will be glad to help.
[Mic: For Nikon, the process is similar, although it varies by camera model. In some higher-end cameras such as the Nikon D300 there is an independent AF-ON button. The camera will focus when that button is pressed. However, by default the camera will also focus when the shutter is half-pressed. To use BBF, you disable the focus of the half-pressed shutter. This is an option listed under the Autofocus options. In the D300, it's option a5 AF Activation.
On older cameras such as the Nikon D70, you can use BBF but you have to use the AE-L button as the BBF button, thus giving up AE-L. To enable BBF, find the option for selecting the function of the AE-L button and change it to AF-ON. Enabling that option automatically disables the focus on half-pressing the shutter.
On still other cameras, such as the Nikon D80, there is no dedicated AF-ON button but there is a user-selectable Fn button that can be used for BBF. Alternatively, you can assign the AE-L function to the Fn button and use the AE-L button as the BBF button. The process is similar to that of the Nikon D70.]
THE SCENARIOS
I have read almost all of the posts and the forum topics that talk about BBF, and some of them list some possible usage scenarios that are straight out of science fiction books. I will tell you about the real life situatioins where BBF has helped me.
- Focus & Recompose: Imagine you're shooting someone using the focus and recompose method, you've already focused the picture, moved the camera a little to a composure of your liking and took the picture. Now imagine that the person in front of you made an interesting face or you said some instruction to them and want to take another picture, if you press the shutter again the camera will try to focus again compromising the focus you've already set, and you'll have to focus and recompose from the start again, while if you're using BBF you can happily shoot away while the focus remains set from the first time.
- Tripod Shooting: Imagine you have the camera on a tripod shooting some product, you have the focus set and you're taking several pictures, unless you change the focus button to manual, everytime you press the shutter button (and it is way more annoying when you're using a remote release) the camera will try to auto-focus and ruin your set focus.
- Difficult Focusing Situations: This happened to me a lot with the Canon G11, I was shooting some dark women dresses for an ad, the dress' position was fixed and I was standing in the same position, when I tried to focus the camera, it kept hunting and giving me the red rectangle which means it can't focus (dress is dark and has no contrast to help the camera focus), so I increased the room lights, the camera focused correctly, I turned the lights down and took my first picture, you can imagine what happened next, when I tried to take another picture the camera started hunting for focus (again!) and threw my correct focus away, ARGH!
If I had BBF then, I would set the focus once and shoot as many pictures as I like.
I assume you got the idea by now, the MAIN advantage is that you can set your focus, and shoot as many pictures as you like without the camera trying to focus again. However there are other useful scenarios for BBF:
- Canon's USM technology enables you to use the focusing ring at anytime even if the focusing button is set to "auto", that way using BBF you can focus manually at will and start shooting pictures without the camera trying to auto-focus, that way you can forget about the lens focus setting (manual or auto). A counter argument in this case would say "but I can set the lens to manual focusing and do the same thing", but there's a difference, sometimes (especially when shooting macro, and the camera's AF struggles) I quickly press the "*" button at the back to get the focus in the vicinity of correct focus, then resume focusing manually myself, after I''m satisfied with the focus, I know that when I press the shutter button the camera won't try to auto-focus and ruin my efforts.
- Finally, one great benefit for us Canon users (not sure about Nikon, Mic?*) is that we can use one focusing setting to either capture still or moving subjects. Let me explain, on Canon cameras we have three focusing settings (not entirely sure about the 7D and the 1D), Single Shot, AI Focus and AI Servo.
Single shot focuses once and stops when focus is achieved, AI Servo keeps focusing and tracking whatever it is that you're focusing on, and AI Focus is supposed to be an intelligent mode that detects whether it should use single shot mode or track subjects if they're moving, but I never had reliable success with it.
With BBF, I leave my camera on AI Servo all the time, that way I can use it as a single shot or track something without changing any settings, pressing the "*" button would focus until I release the button (when the subject is still), or I can keep the button pressed to track a moving subject.
[*Mic: For Nikon, we have similar options, although it varies by camera. At a minimum, there is a manual focus mode (M), a single focus mode (S), a continuous focus mode (C). The function of the continuous focus mode can be changed from always attempting focus (similar to Canon's AI Servo), a mode called AF-A where it's similar to single but will switch to continuous when the subject moves (similar to Canon's AI Focus). On some cameras there is a separate button for AF-A, whereas on other cameras AF-A is selected in the menus. Some older cameras such as the D70 don't have AF-A at all.]
IS BBF FOR ME?
I will tell you a little story, when I saw all the rage about BBF, and all the "I tried it and I never went back" stories I was excited to try it myself, and I first tried it on my 550D I used for one or two times and decided that I hated it and it slowed me down and went back to the half-press shutter focusing.
After a few weeks I decided to try it again and force myself to get used to it, and I never went back. For Real! Now I feel very frustrated whenever I use some camera where every time I want to take a picture it has to focus first, ARGH!
The only problem with BBF is when I give my camera to someone not used to it. The solution is simple, I have a custom mode (amateur proof mode, if you will) where the camera is setup to aperture priority, auto ISO, all focusing points active, single shot focusing, single shot drive, and auto-focusing set to the shutter button. All I have to do is to set the aperture to f/8 and give my camera to the poor guy to take pictures of me.
UPDATE: I usually post technical posts that to the dpreview.com forums for one of two reasons, either to benefit other readers or to get expert opinions on the post material, this one of those posts, and it has created some valuable comments and insights, I'd suggest you check them here.
Monday, 26 September 2011
If you were to take an environmental portrait, should you use a short focal length or long focal length?
Actually it's a trick question because neither answer is correct for every type of environmental portrait. As a general rule, to allow a subject to occupy the same portion of the frame, you should either be close to the subject and use a short focal length, at a "moderate" distance with a normal focal length, or far from the subject with a long focal length. What constitutes a moderate distance depends on the size of the particular subject: the larger the subject the longer the moderate distance will be.
For environmental portraits, there's a twist to the general rule because there are now two elements: the subject and the background element.
My first step is to choose the relative sizes of the relevant elements. By relevant elements, I mean the part of the subject(s) and the part of the background that I want to include in the frame. For example, if the subject is just one person, I choose whether to do just a head shot or full-length or something in between.
Similarly, for backgrounds, I don't necessarily want to capture everything that I can see. If there's a mountain range I don't need to have the entire mountain range in the shot. Just capturing a portion of the range may be enough to imply the presence of a mountain range.
Let's talk about controlling the relative size. To make the background element smaller relative to the subject (or to include more of the background), I either move the camera closer to the subject or I move the subject farther from the background, or both. Vice-versa if I want the background element to look larger (or capture less of the background).
Once I have the relative sizes of the subject and background the way I want them, I use the general rule to determine the focal length to use.
EXAMPLE 1:
A few weeks ago, we spent the weekend in Palm Desert. I first took a shot of my parents with a short focal length (28.5 mm in 35mm terms), from about 10 feet away.
In the next shot, I wanted to emphasize the mountain range in the background and make the mountains appear larger and closer. To do that I moved myself (and the camera) further away to about 20 feet and used a longer focal length (75mm in 35mm terms).
If I had a longer lens with me, I could have moved further back and used an even longer focal length to make the mountain range appear larger. On the other hand, less of the background would be included in the shot.
EXAMPLE 2:
A few months ago, we were visiting the charming town of Solvang near Santa Barbara. In this first shot, my wife was about 150 feet away from the windmill and my focal length was 50mm (75mm in 35mm terms).
In this second shot, I was now taking a photo of the group. If I had taken a photo of the group from the same distance and the same focal length, the group would not have fit in the shot. One solution might be to move further back (far enough for the group to fit in the frame). Note that as I go farther from both the subject and the background, the windmill would look "larger" relative to the subjects.
Another solution was to use a shorter focal length to capture a wider view that encompasses the group. However, if I did that from the same distance, the windmill would look much smaller. To make the shot work with a short focal length (25.5mm in 35mm terms), I asked the group to move much closer to the windmill (now about 75 feet away), keeping the windmill a prominent compositional element.
CHOOSING BETWEEN SIMILAR RELATIVE SIZES
Sometimes I have both options available: a short focal length close to the subject and background or a long focal length far from the subject and background, with about the same relative sizes. In that case, I consider other factors such as the depth of field or kind of perspective distortion I want.
RELATED POSTS:
If you found this post useful you may want to check out these related posts:
Actually it's a trick question because neither answer is correct for every type of environmental portrait. As a general rule, to allow a subject to occupy the same portion of the frame, you should either be close to the subject and use a short focal length, at a "moderate" distance with a normal focal length, or far from the subject with a long focal length. What constitutes a moderate distance depends on the size of the particular subject: the larger the subject the longer the moderate distance will be.
For environmental portraits, there's a twist to the general rule because there are now two elements: the subject and the background element.
My first step is to choose the relative sizes of the relevant elements. By relevant elements, I mean the part of the subject(s) and the part of the background that I want to include in the frame. For example, if the subject is just one person, I choose whether to do just a head shot or full-length or something in between.
Similarly, for backgrounds, I don't necessarily want to capture everything that I can see. If there's a mountain range I don't need to have the entire mountain range in the shot. Just capturing a portion of the range may be enough to imply the presence of a mountain range.
Let's talk about controlling the relative size. To make the background element smaller relative to the subject (or to include more of the background), I either move the camera closer to the subject or I move the subject farther from the background, or both. Vice-versa if I want the background element to look larger (or capture less of the background).
Once I have the relative sizes of the subject and background the way I want them, I use the general rule to determine the focal length to use.
EXAMPLE 1:
A few weeks ago, we spent the weekend in Palm Desert. I first took a shot of my parents with a short focal length (28.5 mm in 35mm terms), from about 10 feet away.
 |
| 19mm (equivalent to 28mm), about 10 feet from subjects |
 |
| 50mm (equivalent to 75mm), about 20 feet from subjects |
EXAMPLE 2:
A few months ago, we were visiting the charming town of Solvang near Santa Barbara. In this first shot, my wife was about 150 feet away from the windmill and my focal length was 50mm (75mm in 35mm terms).
 |
| 50mm (equivalent to 75mm) |
Another solution was to use a shorter focal length to capture a wider view that encompasses the group. However, if I did that from the same distance, the windmill would look much smaller. To make the shot work with a short focal length (25.5mm in 35mm terms), I asked the group to move much closer to the windmill (now about 75 feet away), keeping the windmill a prominent compositional element.
 |
| 17mm (equivalent to 25mm) |
Sometimes I have both options available: a short focal length close to the subject and background or a long focal length far from the subject and background, with about the same relative sizes. In that case, I consider other factors such as the depth of field or kind of perspective distortion I want.
RELATED POSTS:
If you found this post useful you may want to check out these related posts:
- What's the point of having different lenses? Controlling composition with different focal lengths
- Tip: Using a Zoom Lens as a Compositional Aid
- Getting a larger moon in the background
Sunday, 25 September 2011
Earlier this week, Adobe released Photoshop Elements 10. There is no trial version as of yet, so my information is only based on news articles published about it and Adobe's own PSE 10 website. Here are the primary new features of this version, along with some comments.
Painting any of 100 effects onto the photo. The classic way to apply an effect on just a part of the photo is through layers (specifically layer masking). This feature instead makes it easy to choose an effect then apply it to the image by painting the effect on the area you want to affect - in just one easy, intuitive step.
This feature has already been present as far back as Photoshop Elements 7 (Smart Brush). The difference is that PSE 10 paints the effect with more "intelligence" (similar to Lightroom 3's Auto Mask feature).
Let's say you want paint over a particular area (e.g. a hand) but the brush goes over parts that you don't want to be affected (e.g. the background). As far as I can tell from the demo, this feature will understand that you want to apply the effect on just the hand and will not apply the effect on the background even when part of the brush goes over the background.
I haven't tried this feature myself but if it works at least as well as LR3's Auto Mask, then it should be useful.
Comment: Picnik has many effects that are applied with a brush. Some of those effects require a subscription but many are available for free. As for the Auto Mask, I already have Lightroom 3 (a product I very strongly recommend despite its exorbitant price), and 95% of the time, the selective change I want to make is pretty simple like selective dodging and burning, and LR3 does that pretty well (yes, I use Auto Mask fairly often).
New effect: Depth of Field. Want to simulate a shallow depth of field? PSE 10 makes it easy. You can select the subject easily using the auto mask, then the rest of the image will be blurred.
Comment: If you have any experience with layer masking, this effect is pretty easy to do with previous versions of PSE. You might save time with PSE 10's faster/smarter selection brush but I don't know until I try it.
New effect: Orton Effect. The Orton effect makes your image appear to glow. PSE 10 now has this effect built-in.
Comment: I have Picnik Premium which has had this effect for a long time now. If you don't have Picnik premium, the Orton effect is not that difficult to simulate, and there are Photoshop actions out there that do exactly that, such as this one.
New effect: Picture Stack Collage. You know those photos that are made up of several other smaller photos that have been carefully arranged to form the larger photo? This feature simulates that.
Comment: Picnik has built-in collage templates but doesn't have this feature. It's a nifty effect but I don't think you can use it very often without it becoming cheesy.
Curved Text Path. You can now add text with a path that curves.
Comment: A simple but useful feature. Picnik doesn't have this.
PRICING/UPGRADES:
Photoshop Elements 10 is $99.99 with free shipping until Nov. 20, 2011. If you have any previous version of Elements, you can upgrade for $79.99. If you're on the fence or waiting for the trial version, you might in the meantime want to check out Picnik as an alternative.
Friday, 23 September 2011

How do you make something appear more brilliant? It may seem that adding more light would be the solution. If more light is reflected, wouldn't that mean that the object is more brilliant by definition?
Sometimes, to make an object appear more brilliant, what we need is more shadow (or specifically contrast) instead of more light. Take a look at the comparison shots below. It's not a perfect comparison but it illustrates the point:

(BTW both photos are of the same ring. The left test shot was taken with a Sigma 50-150 then cropped. The right one was taken with a Nikon 28-105 f/3.5-4.5 AF-D. Both were processed with very similar settings in Lightroom 3.)
If you look at the diamond on the right shot, it shows more dark areas. No light is being returned from those dark areas. On the left-hand shot, there are fewer dark areas - mostly highlights and grays. We can infer that more light was returned on the lefthand shot. However, the righthand shot appears more "brilliant" because it has greater contrast.
Indeed in the diamond industry, the brilliance of a diamond is analyzed in terms of not just its brightness but just as importantly, its contrast. See here.
When taking shots of diamonds specifically, the maximum contrast is when the diamond is viewed straight-on. That's because your head and the camera will block some of the light, and the shadow can be seen in some round diamonds as an eight-pointed star.
For other subjects, just keep in mind that sometimes, to make an object appear brighter, you need not just brightness but contrast (e.g. from shadows) as well.
Wednesday, 21 September 2011
 |
| I found this lady bug while I was shooting some flowers |
I want to share with you some of the photos that I took a couple of weeks ago near the beach, there are no tutorials this time, just some of my favorite macro shots, all taken with the Canon 60mm f/2.8 Macro.
P.S. You can click any image to see a larger 1000px version.
 |
| This thing is really tiny in person. |
 |
| I sprayed some water on this flower to make it more interesting. |
 |
| Mr. Crab, this guy is very small, check the next picture to see how small. |
 |
| See these large pebbles around him? These are sand particles. |
That's it, just a quick post until my next one which should either be about "back button focusing" or "circular polarizers".
Monday, 19 September 2011

When you plan to merge a group photo and take the shot accordingly, the results of an automatic photomerge can look great. But what if you weren't planning on merging the group shot? In that case, merging a group shot manually may help you get better results.
Over the weekend, we visited my parents. Our kids had a great time and I was able to capture several shots with great expressions.
Unfortunately, as in many group shots, none of the shots had the best expression for each person in the shot. Here are a couple of shots that I took:
 |
| Shot 1. f/9, 1/250, ISO 640. |
 |
| Shot 2. f/11, 1/250, ISO 640. |
[As a footnote, both shots were with TTL flash using a handheld 25" shoot-through umbrella (the SB-800 was triggered using CLS Advanced Wireless Lighting). I brought the handheld umbrella with me because I knew we were going to shoot outdoors in the hot desert sun.]
Anyway, I have Photoshop Elements 9, which has a feature called Photomerge that was designed specifically for combining the best expressions among several group shots. The problem here is that I wasn't working with Photomerge in mind so I didn't do the things that I should've done like use a tripod and use a consistent exposure. So when I tried Photomerge it didn't work very well:
 |
| Photomerge fail :( |
Instead I went to the second shot, extracted the image of my dad and my son using Topaz Remask. I pasted the extracted image as a new layer on the first shot. After transforming the pasted image to match the scale of the target shot and doing my best to align them, there were still misalignments and differences in exposure:
| Check out the obvious line on my father's arm and sleeve |
To blend the pasted portion more seamlessly with the target shot, I used eraser (brush mode) along the edges of the new layer.
 |
| I partially erased the pasted image especially along the edges. |
Voila. It's not going to survive close scrutiny but it's much better than the Photomerge result (or either of the unedited shots) and took only a few minutes. Here's the shot again for reference:
Sunday, 11 September 2011

So you're one of those people looking for a 50mm equivalent lens for your crop sensor Canon DSLR? Were you considering the Sigma 30mm f/1.4 or the Canon 28mm f/1.8? Hit the jump to see how I made my choice and went with the Canon 35mm f/2, one of Canon's understated lenses.
P.S. For this post I skipped my usual 600px sharpened images and posted 1000px images, so you can click on any picture to see the 1000px larger version.
INTRODUCTION
If you have read my post about the prime lenses, you'll find that I was looking for a 50mm equivalent prime to compliment my longer primes, at first my heart was set on the Sigma 30mm f/1.4, it is an excellent lens with great image and build quality, it ships with a hood and has Sigma's quick and silent HSM focusing, and being an f/1.4 lens costing around $400, it was a real bargain. When I started making some inquiries I quickly discovered that 3rd party lenses sometimes have focusing problems, some people have the focusing spot on from the first sample, while others had problems focusing in low light, and neither did I have the luxury of returning the lens and trying another one until I found one that focused correctly on my camera, nor did I have the option to send my camera plus the lens for Sigma to calibrate them, thus I skipped the whole Sigma idea despite the many attractions.
At that time, I missed Canon's 35mm f/2 and thought they only had the expensive 35mm f/1.4 L, so when I saw Kirk Tuck's blog about the 35mm f/2 I was very excited, I found a 50mm equivalent prime, it was small, it was cheap and it was a Canon (i.e. no AF problems), but what about the buzzy AF motor? It was a small inconvenience that I can easily get over, so let's quickly jump to the review of the actual lens.
 |
| Stadium at dusk, shot @ f/2.2 |
VIEWING ANGLE
Before I start talking about the attributes of the lens, the first and foremost reason I bought this lens is the viewing angle, the widest angle prime lens I have is the 50mm f/1.8, and it is barely usable indoors for anything other than tight shots, if you're sitting on a table and try to shoot someone sitting across, you wouldn't be able to get his head in the frame with the 50mm (we're talking crop sensor here) without moving back, but with the 35mm (~56mm full frame equivalent) you can get the shot you want from a close distance, the viewing angle on the 35mm is close to what our eyes are used to seeing.
The 35mm also enables you to shoot portraits at a close distance without too much distortion to the facial features, unlike wider angles like the 28mm and the 24mm primes.
 |
| My friend was sitting directly across the table, one of my favorite portraits, 1/1000, f/2, ISO 100 |
 |
| A goal keeper angry because of the many goals that entered, 1/250, f/2.2, ISO 1600 |
 |
| Now this is not a sharp picture but I really like the expression and the story this picture tells, my brother took this picture @ 1/50, f/2, ISO 1250 |
SIZE
The size of this lens is just perfect, it is small and light enough to be discreet, it is my most used prime and the one I usually go to whenever I pick my camera. It is very similar in size to Canon's 50mm f/1.8 II.
 |
| 35mm f/2 mounted to my 60D, you can see the lens hood reversed |
SHARPNESS
The 35mm proved to be quiet sharp starting from f/2, becoming sharper at f/2.8 and getting really sharp by f/4. Some will say that the lens is not that sharp at the corners, but how does corner sharpness matter when there is already nothing there but blurred backgrounds? I don't use the 35mm to shoot architecture or landscapes. Check the following examples shot wide open @ f/2, now you tell me if these are sharp or not (all the shots in this post are hand held, down to 1/15 sec).
 |
| Desk Chair, 1/250, f/2, ISO 100 |
 |
| Fork, 1/60, f/2, ISO 1600 |
 |
| Ice Cream, 1/400, f/2, ISO 200 |
 |
| Guava Juice, hand held, 1/15, f/2, ISO 3200 |
 |
| Leaf (KL Bird Park), 1/1600, f/2, ISO 400 |
 |
| Bird (KL Bird Park), 1/8000, f/2, ISO 400 |
IMAGE QUALITY (COLORS, CA & BOKEH)
I like this lens' image quality, all the pictures I take with this lens are contrasty and the colors do pop, every time I use this lens I like it even more.I have hardly noticed any significant chromatic abberation wide open (unlike my 85 f/1.8) which makes me a happy shooter.
The bokeh is also quite smooth (unlike my 50mm f/1.8), take a look at the examples above. The lens has 5 aperture blades which results in pentagon shaped out of focus highlights, some people might not like this, but as long as you're shooting close to wide open you won't notice it, below is one extreme example of pentagon shaped highlights.
 |
| Kuala Lumpur Airport, 1/40, f/4, ISO 1600 |
BUILD QUALITY
The build quality of the lens is good for a lens of this price and size, it has a metal mount, a distance scale and a good focusing ring, although it is not weather sealed, it feels very robust and strong. One thing I like about this lens is that when you have the focusing switch on AF, you can turn the focusing ring freely without breaking the focusing mechanism.
FOCUSING
This lens doesn't have USM focusing, and it is famous for it's buzzy auto focusing motor. I find that the sounds it makes during auto focusing are not that noisy unless you're in a very quiet environment. Focusing is also very quick and very accurate on my 60D, I tend to use other focus points than the center one and I never had a problem. I have compiled a quick video that would show you the focusing sound of this lens.
One more benefit of this lens is the minimum focusing distance, it can focus as close as 25cm which enables you to get shots like these:
 |
| Little Hands, 1/60, f/2.8, ISO 1600, notice the smooth bokeh |
 |
| 1/1250, f/2, ISO 100, notice the sharpness and the smooth bokeh |
 |
| Candle Lights, 1/250, f/2.2, ISO 1600 |
ROUNDING IT UP
All in all, I find this lens superb for what it does, first of all it is cheap (~ $300) and it is small and light enough, as I mentioned before, this is my most used prime lens, I usually pick it up when I'm going out and not sure about the situations that I am going to encounter. With the 35mm I can shoot portraits, I can shoot close ups or I can shoot semi-wide angle shots, I can shoot in low light and I can have a shallow DoF at will. In my opinion, this is my all-purpose lens (more so than the 15-85mm zoom), and I would encourage anyone to buy this little gem, thanks Kirk for bringing this lens to my attention.
I will now show you some general pictures I took with this lens, if you have any questions or comments please don't keep them to yourself and share them with us all here.
 |
| Dusit Thani Hotel, 1/60, f/2.8, ISO 125 |
 |
| Dusit Thani Hotel, 1/50, f/2.8, ISO 100 |
 |
| Spectra Restaurant, 1/250, f/2, ISO 1600 |
 |
| Go Kart, 1/80, f/2.5, ISO 800 |
 |
| Smart Village, 1/2000, f/4, ISO 100 |
 |
| Kuala Lumpur Downtown, 1/30, f/2.8, ISO 640 |
RELATED POSTS:
Canon Lenses Chat - Part 1: Standard Zoom Lenses
Canon Lenses Chat - Part 2: Telephoto Zoom Lenses
Canon Lenses Chat - Part 3: Prime Lenses
Macro Talk: Canon EF-S 60mm f/2.8 Macro USM
Quick Review: Canon 85mm f/1.8
Canon EF Lenses Chat: Canon EF 200mm f/2.8L II USM Review
Canon EF Lenses Chat: Canon EF 50mm f/1.4 USM Review
Here's a quick post analyzing a recent shot that I did. I think the thought process would be helpful for learning lighting.
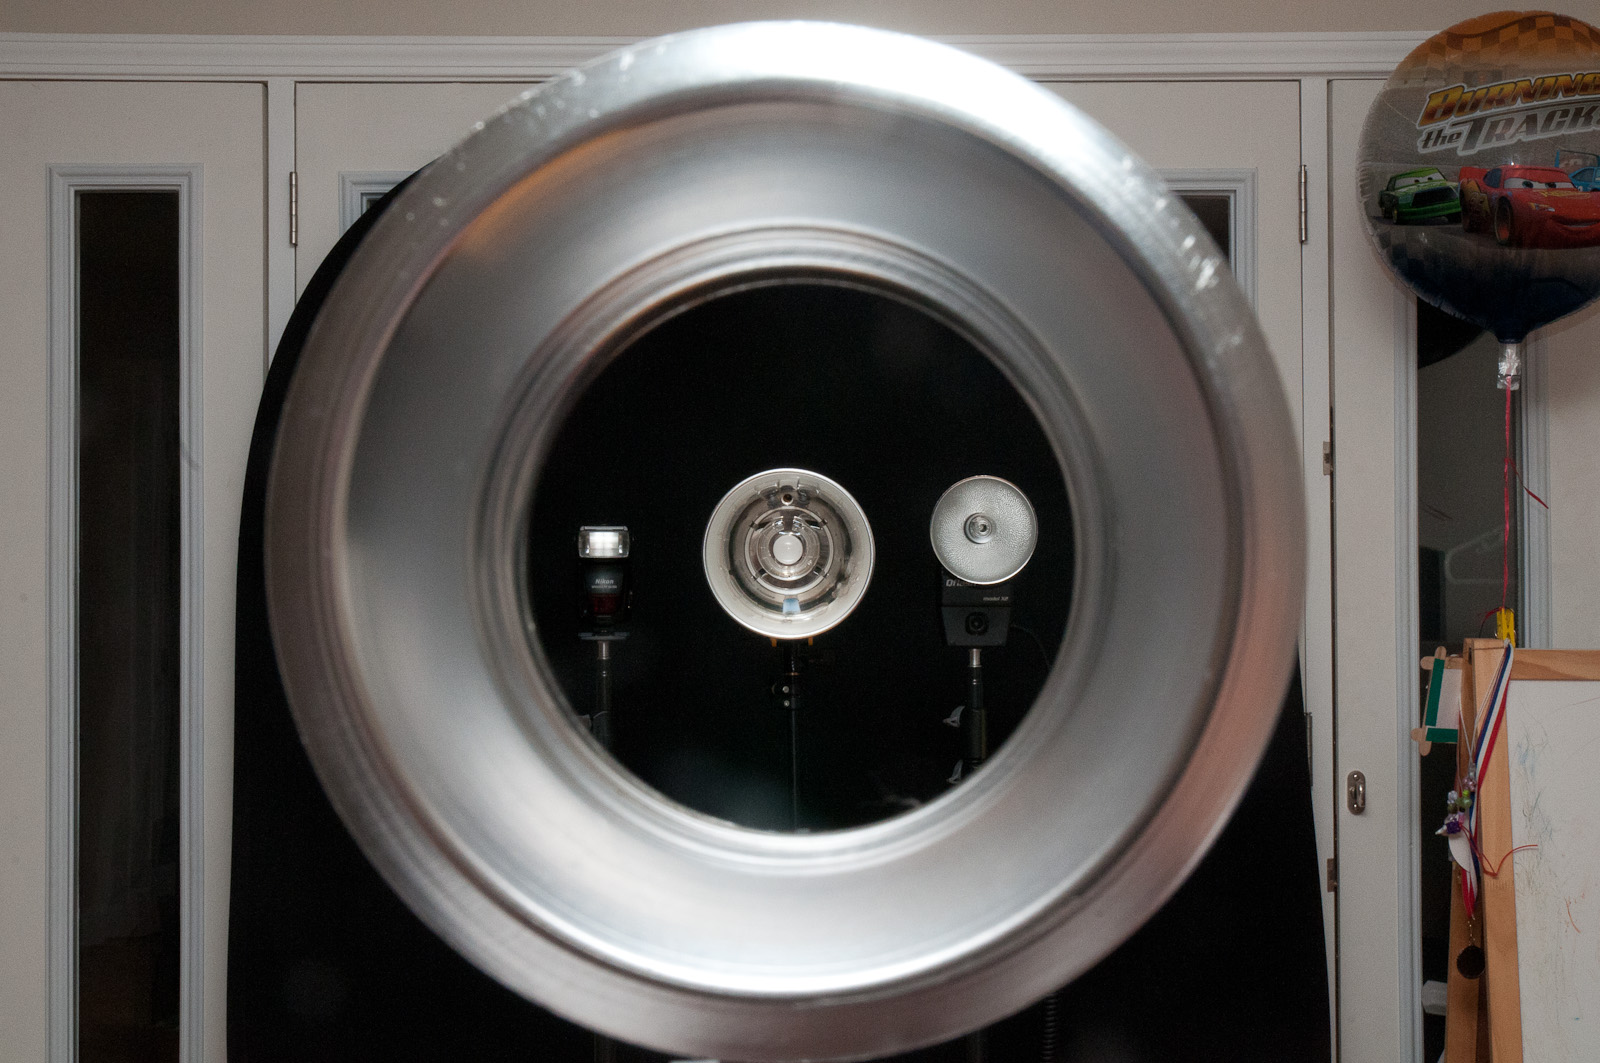
I recently made a post about using a single set of modifiers for speedlights and strobes. The shot I used for the start of the story was this:

Th first step was to compose the shot. The speedring is not very large. To have the lights appear to fit within the hole of the speedring, I used a wide angle lens. Using a wide lens, I could shoot the speedring fairly close to the camera while shooting the strobes at a distance away, thus making the speedring appear larger relative to the strobes.
For a clean-looking background, I used the Fotodiox 5x7 popup background behind the strobes. In retrospect, white would have been a better choice to make the black bodies of the speedlight and Quantum more visible.
In terms of exposure, I wanted to keep both the strobes and speedlights in focus, therefore I had to use a small aperture (to increase the depth of field).
To light the strobes themselves, I had several options. The first option was for the strobes themselves to flash in sync with the shot. The problem with this is that even at the lowest setting from the monolight, I would have gotten a lot of glare. When all three are firing, the glare is even worse.
Instead, I tried to make the strobes come alive through the lighting of the reflectors. The reflectors are shiny surfaces. When lighting a reflective surface, you don't light the surface directly -- all you'll see is the tiny specular reflection of the flash. Rather you light the objects being reflected in the reflective surface. Here I opted to light the ceiling in front of (not directly above) the strobes. Since I was forced to use a small aperture (f/22) to increase the depth of field, and I was using bounce flash, I needed a lot of power. I used an optically-triggered SB-26 speedlight at full manual power aimed directly at the ceiling.
The speedring is also a reflective surface. To light it, I chose to light the ceiling and wall in front of it (behind the camera) using an on-camera SB-800.
The test shot was close to what I wanted but even at f/22 the speedring was not sufficiently in focus. Sigh! I therefore switched to plan B, which was to use a composite of two shots. As with my previous plan, I used bounce flash for both the shot of the speedring and of the strobes. I used Topaz Remask to help me cut out the middle of the speedring. Voila.
Subscribe to:
Comments (Atom)


