Better Family Photos

  • Subscribe to our RSS feed.
  • Twitter
  • StumbleUpon
  • Reddit
  • Facebook
  • Digg

Wednesday, 29 June 2011

Creepy Ghost Portrait

Posted on 15:16 by Unknown
Creepy Ghost Portrait

This photo would not be mistaken for being a better family photo, and I tend to agree, but at least it was a lot of fun to shoot, hit the jump for the full story.

I spent the past weekend on the beach shooting a lot, I will have a new post about a typical three light setup portrait using the Lastolite Ezybox as my key light. The photo you see above is one of the better photos we got, we were shooting in a very dark place with no one around for a long distance and it just occurred to us to create this creepy picture, here's how the surroundings looked like.

Dark & creepy surroundings, this must be where they write horror stories!  The lights you see on the building was a test we did for light painting

The setup was easy, camera on tripod in aperture priority mode, aperture = f/8 to get everything in focus. When I checked my histogram the picture looked too bright compared to the look I wanted to achieve, so I dialed the exposure down by one and two thirds of a stop until it looked good to me. No scientific measurement at all, just my eyes and the histogram.

It took several tries until to get the desired poses and to get the timing right. The resulting shutter speed was 13 seconds, so after several tries I decided to make my subjects stay still for 10 seconds then run out of the frame so that the background would start overwriting the subjects on the sensor for the remaining 3 seconds, thus giving them this faded look. Here's the original picture.

Original Picture, too much exposure and too much orange, I could even say it is quite cheerful. :-D

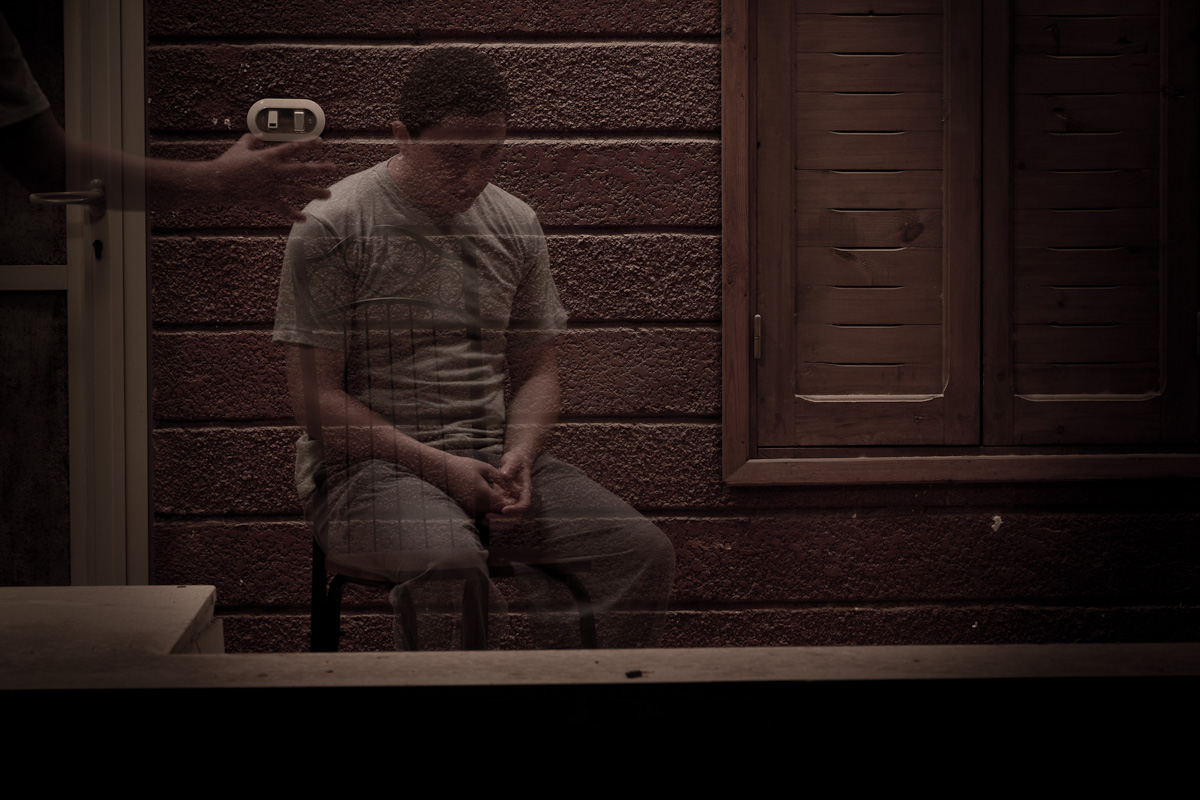
All the post processing was done in lightroom and in no more than 5 minutes, I increased the blacks, decreased the vibrance and the saturation, then added a post crop vignette and played with it's parameters for a while, then finally I decided to decrease the overall exposure by 0.2 stops. That's it, very simple and a different portrait that intrigued lots of my friends. Here's the final image again for your convenience, click it to see a larger version.

Final result, click to see a larger version
Read More
Posted in creepy, ghost, portrait | No comments

Monday, 27 June 2011

Are You Ready for AlienBees?

Posted on 23:26 by Unknown

In the last several years, speedlights have been roped into tasks that have traditionally been filled by studio strobes.  The underlying premise is that speedlights are much more compact, and easier to bring to and set up for a location shot.  Combined with their TTL and high-speed sync capabilities, plus their lower upfront cost, speedlights do offer practical advantages over studio strobes.

At some point though, we run into barriers that remind us of the natural limits of speedlights.  The most significant limit is of course power.  Another is the speedlight's reflector design, which sends light only forward.

It is possible to engineer solutions around those obstacles.  For example, if we need more power, we can combine two or more speedlights.  However, sometimes those solutions create problems of their own.  If we gang four speedlights, we indeed get more power but then we limit our options for light modifiers (there are only a few softbox designs that can accommodate 4 flashes).

Instead of going to extreme lengths to stretch our speedlights, however, perhaps we could reconsider using a studio strobe instead.  One particular studio strobe stands out for its dependability and very high power-to-cost ratio: AlienBees.   Hit the jump to learn more about AlienBees and whether they are right for you.


BACKGROUND
After Paul Buff's White Lightning monolights became a runaway success, Paul turned his attention to younger photographers who had limited budgets.  Using the lessons he learned from almost two decades of making White Lightnings, Paul Buff designed and created the more economical and whimsically-named Alien Bees in 2001, with the tagline Bee Abducted.

YOU MIGHT BEE ABDUCTED IF...

  • If you find yourself combining two or more speedlights from time to time, you might bee abducted.  The B800 and B1600 have plenty of power, with output the equivalent of about 5 speedlights or 10 speedlights, respectively.  In the shots below, using a B1600 (and a Nikon D70) we were able to underexpose very sunny ambient light while shooting with a 24" umbrella about 10 feet away:

ISO 200, f/8, 1/800
  • If you are becoming particular about your choice of light modifiers, and are using speedlights for modifiers that weren't originally designed for speedlights, you might bee abducted.  Yes it's possible to use speedlights for modifiers that weren't originally designed for them, but it may entail compromises.  For example, if you use a speedlight to light a softbox, the light will tend to illuminate only the front diffuser, and less so the sides of the softbox, in turn making a hotspot more likely.  You could use a sto-fen type diffuser, but that would reduce the efficiency of the speedlight.  On the other hand, AlienBees have a bare bulb design, where the flash tube sticks out from the body of the flash and the reflector can be removed to create omnidirectional light.  That allows lighting a softbox as evenly (and as efficiently) as possible.


There are increasing numbers of modifiers for speedlights but there is a still wider variety of light modifiers for monolights such as the AlienBees, and they tend to perform better than their speedlight counterparts (again, due to the bare bulb design).  Here, for example, I used a B1600 with a 48-inch octagon softbox with grid:


  • If you would love to see the highlight and shadow pattern in realtime as you position the lights, you might bee abducted.  AlienBees have a modeling lamp (up to 150w), which allow you to see the highlight and shadow pattern of the flash in realtime, making it easier to position your lights for your intended effect.  Some speedlights do have a modeling lamp as well but they are too weak and too brief to be very useful.
  • If you are looking for a means to light a large room (such as at a party) while using a separate light for taking photos of subjects, you might bee abducted.  Speedlights will be hard-pressed to light up a large room (unless you use several of them).  Strobes such as the AlienBees are much better suited for the job because they not only have a lot of power but they can recycle quickly and keep firing without overheating.

DISADVANTAGES vs. SPEEDLIGHTS
  • AlienBees need AC power.  If a power outlet is nearby then all you'll need is the power cord or an extension cord.  Otherwise, you'll need a portable AC power source.  Not just any power either -- you'll need one with a pure sine wave inverter.
  • Manual only - no TTL.  In an ideal world, the photographer would always retain full control of flash exposure.  However, when the subject is moving around a lot and constantly changing his or her distance to the flash (e.g. kids) TTL is useful.  Unfortunately, AlienBees and other monolights (or pack-and-heads) don't have TTL.
  • No true high speed sync mode.  Although there are ways of going above sync speed and forcing the flash to fire, the flash burst of an Alien Bee won't burn slow enough to last through the entire shutter movement, resulting in very uneven exposure across the frame.  (This is not an issue when you have an electronic shutter.)
  • Slower flash duration at lower output (except IGBT monolights such as the Einstein).  Unlike speedlights, when you reduce the power, the flash duration increases (becomes slower).  


CHOOSE YOUR ALIENBEE
AlienBees come in three models with varying capacity: the B400 (160ws), the B800 (320ws), and the B1600 (640ws).  (Note: although there is a White Lightning X3200 with 1280ws of power, there is no equivalent of the X3200 for AlienBees.)

Personally, I don't think the B400 offers significantly more power compared to speedlights to warrant their use instead of a speedlight.  I would recommend the B800 or B1600 instead.

HOW TO USE AN ALIENBEE


Using an AlienBee is very simple:

  • Put the AlienBee on a light stand using its built-in receptacle for light stands.
  • Plug it into an AC power source using the supplied 3-prong (NEMA 5) power cord.  
  • You can trigger the flash either by its built-in optical slave, a sync cord, or a remote control cable into the RJ-11 port.  If you're using the RJ-11 port, insert a dummy plug into the sync port to disable the built-in optical slave.
  • Remove the plastic protective cap over the flash tube by squeezing the two "antenna" at the top of the AlienBee.  You add the flash modifier you want to use (such as a 7-inch reflector or a speedring for a softbox)
  • Turn on the strobe.  Slide the power to the desired output level.  You're ready to shoot.
    • Here's one difference from how you use speedlights: Whenever you increase the power, the Alienbee will be ready to fire in a second or so.  Whenever you decrease the power, however, you have to wait a little bit for the AlienBee to "dump" the excess energy.  The wait time varies with how far you decreased the power and it can be anywhere from a couple of seconds to a full minute.  While you wait, the dump light will turn red.  It will turn green when it's ready to fire.  Alternatively, instead of waiting, you can press the test button to fire a test shot, which will also get rid of the excess energy.

Modeling Light:
There are a few options for controlling the modeling light. First, you can turn it on or off. Second, you can specify whether it will stay at full intensity or will track the power level (dimming in proportion to the power level you set).  Third, you can specify whether the modeling light will temporarily turn off while the strobe is charging, turning back on when the strobe is ready to fire again.

Remote adjustment:
Maybe I'm spoiled by the Radiopopper JrX, but I really need a remote adjustment option like the JrX to make it practical to control the AlienBee.  I sometimes raise the AlienBee very high, and to have to bring the AlienBee down or tilt the stand every time I want to adjust it is too cumbersome.

As previously mentioned in my JrX review, the JrX receivers include an RJ-11 port that can be connected easily to the RJ-11 port on an AlienBee, White Lightning or Zeus strobe.

PORTABLE POWER OPTIONS
Although an AlienBee requires AC power, you don't have to be tethered to a power outlet.   Paul Buff produces two portable power options: the Vagabond II and the Vagabond Mini.  The Vagabond II ($299) is based on older technology and uses a sealed lead-acid battery.  It has a little more power than the Vagabond Mini, but because of its battery, it weighs over 20 lbs. and must be kept trickle-charged to maintain the battery's capacity.  On the plus side, its weight allows it to double as a sandbag.

Note: The Vagabond II is being phased out.

Vagabond Mini


The Vagabond Mini ($239) is a new portable power option from Paul Buff, just released January 2011.  It uses a cutting-edge lithium-cobalt-nickel-magnesium battery with no memory effect whatsoever and has a very high amount of energy in a compact package.  It weighs only 3.5 lbs. yet has almost as much capacity as the Vagabond II.

Other than the Vagabond II and Vagabond Mini, there are also portable power sources from 3rd parties such as Innovatronix.

I chose the Vagabond Mini.  Although I considered the Vagabond II (so that it can double as a sandbag), I wanted the option of having a lightweight power source.  Plus it doubles as a way to power a laptop or cell phone during long trips (it even has a USB port to power USB devices).


CONCLUSION
I've only had my 'bees for a little while but have become quite fond of them.  It has tremendous power - enough for almost any shot you can imagine.  There are also plenty of light modifiers for it that allow me to achieve effects that I would have some difficulty replicating with a speedlight.  No, it is not a do-it-all light and there are many tasks for which a speedlight is a better tool.  But for setup shots, especially outdoors in bright ambient conditions, or when you want to use a large modifier, there are few tools that will serve you better than studio strobes such as AlienBees.


RELATED POSTS:
Intro to Studio Strobes
Multiple Speedlights
Radiopopper JrX Studio Review
Read More
Posted in "alien bee", alienbee, lighting, monobloc, monoblock, monolight, speedlight, speedlite, strobe | No comments

Friday, 24 June 2011

Radiopopper JrX Studio Review

Posted on 00:47 by Unknown

I was looking for a dependable wireless flash solution that would allow me to adjust my flashes from behind the camera.  I considered several alternatives and ultimately decided on a Radiopopper JrX Studio.  Did it perform as promised?  What's it like to use it in real life?  Hit the jump!

A couple of months ago, I agreed to take a portrait of my co-worker's family.  It was going to be at the beach in the middle of summer.  I was also planning to use a softbox or two, which would block the sensors.  I thought it would be a good time to upgrade from my MK-RC7 flash triggers to a much more reliable wireless trigger.  At the same time, I wanted not just a "dumb" trigger but one that would allow remote adjustment.

OPTIONS CONSIDERED
I considered several alternatives, and it seemed that each system had its unique advantages and disadvantages. I chose the Radiopopper JrX system primarily for these reasons:
  • I was planning to use this for setup shots (not candid shots).  I don't need TTL as much.  Plus, in multiple-flash setups, TTL flash exposure has not been very accurate in my experience.  Moreover if I needed TTL in the future, the JrX is compatible with the Radiopopper PX (which does support wireless TTL).
  • I wanted to mix speedlights and one or more AlienBee monolights.  The JrX system would allow me to do that.
  • My budget is limited.  Not only is the JrX system itself one of the less costly wireless remote adjustment systems, it also allows me to use inexpensive old TTL flashes by Nikon (such as the SB-24 or SB-26) or Canon.  No, I can't use an all-manual Yongnuo YN-560 but those old flashes are still much less expensive than current speedlights.
  • The JrX is compatible with any camera that has an ISO-type hotshoe or sync port, leaving open the possibility of using it with a 35mm film camera or a medium format camera (or if you wanted, a high-end point-and-shoot).  It also makes it possible to combine it with other remote adjustment systems (see below).
The JrX system isn't perfect of course, and there are disadvantages:
  • Can't remotely adjust the Paul C. Buff Einstein E640 monolight.  (The PocketWizard ControlTL and Paul Buff CyberCommander can control the Einstein.)
  • Requires an RPCube module or miniplug-to-TTL cable to control speedlights.
  • Can only control 3 groups.  (The CyberCommander can control up to 16 lights!)
COMPATIBILITY
As noted above, the JrX transmitter can be used with any camera with a regular hotshoe or a sync port.  The JrX can remotely adjust:
  • any flash with a Canon or Nikon TTL quench pin* provided you add an RPCube or similar module.
  • AlienBees or White Lightning monolights
  • Zeus pack-and-head
*Note that this is not limited to speedlights.  For example, a Quantum battery-powered strobe with the appropriate Canon or Nikon TTL module can be remotely adjusted with the JrX.  On the other hand, the JrX cannot remotely adjust the Nikon SB-700 or SB-900 because they don't have the TTL quench pin as such.

This also means that even non-Canikon cameras can use a Canikon TTL flash as a slave.

USAGE

Transmitter
The JrX transmitter has a metal foot that fits the standard ISO-type hotshoe.  It stays on my camera's hotshoe just by friction.  I was surprised that there is no locking pin or knurled lockdown knob or anything like that.  Alternatively, the JrX transmitter can also be triggered via its 1/8 miniplug-type sync port, which can be connected to the sync port of the camera or another flash with the appropriate cable.

The transmitter has a power button that serves other functions.  When the transmitter is on, you can press the power button to send a test signal (also useful for dumping excess power from a monolight).  The power button can also tell you the remaining battery life.  If the power button is pressed (as in a test signal), the green LED light beside it will flash.  It flashes quickly when the battery is full, half-speed when it's half and very slowly when the battery is low.  In addition when the battery has less than 2 hours left, the LED will blink slowly.

The JrX transmitter has 3 dials on the side, one for each group that it can control.  The dials are on the left side of the transmitter.  I suppose they designed it that way so you can keep your right hand on your shutter.  Somewhat counterintuitively, the first group is controlled by the rightmost dial, and the maximum power is set when the dial is turned all the way counterclockwise.

The transmitter also has 6 DIP switches (at least they're not piano switches).  The switches can be used to set several options:
  • The first 4 switches are used to set any of 16 channels.
  • The 5th switch sets whether you want a group to be disabled when the dial is at the minimum.  This is useful for selectively turning off groups.
  • The last switch sets whether changes to power levels are set in realtime (each time the dial is turned, regardless of whether the shutter is released).
Receiver

The receiver has two ports: an RJ-11 (telephone type) jack, and a 1/8" miniplug jack.  When using the JrX to control a Paul C. Buff AlienBee, White Lightning or Zeus, you just need a phone cord to connect the receiver to the strobe.  You also need to insert a dummy plug in your strobe to disable the built-in optical slave,  otherwise the strobe will not work (I thought my strobe broke!).

To control a speedlight, you'll need a way to connect the miniplug jack to the TTL quench pin of the speedlight.  The official solution from Radiopopper is to use an RPCube that is specific to Nikon or Canon.  You insert your speedlight on the RPCube just like any other hotshoe.  The RPCube has a cable that connects to the JrX miniplug port.  The RPCube also has two extra ports - an RJ-11 and miniplug jack, which can be useful for daisy-chaining slave flashes.  It has a metal foot for hotshoes and has a 1/4"-20 insert.

However, besides the RPCube there are other alternatives:
  • DIY RPCube.
  • 3rd party equivalents of the RPCube, such as those from flashzebra and bufo1955 (note: at this time, only Nikon versions are available). What I like about bufo1955's cube is that it's based on a Nikon AS-E900, so it has two extra Nikon 3-pin TTL ports, which can be useful for daisy-chaining speedlights (see below).  On the other hand, the flashzebra cube doesn't have extra ports but does have a plastic foot at the bottom.  Both come with a 1/4"-20 insert. 
  • Some Nikon speedlights have the Nikon 3-pin TTL port, such as the SB-800, SB-80, and SB-26.  If you have a miniplug-to-TTL cable, you can connect the TTL port to the receiver's minijack.  I found a couple of sources for such a cable: again, flashzebra and bufo1955.  I haven't tested flashzebra's cable but I have bufo1955's cable and it works as advertised.
  • If you don't have a 3-pin TTL port but have a Nikon AS-E900 adapter, you can also use a miniplug-to-TTL cable to connect the JrX receiver to the AS-E900, and then mount your flash on the AS-E900.  The AS-E900 is available for just $3.95 from B&H (at the time of this writing).
Once everything is connected, you just switch the slave flash to TTL mode (not manual mode) then you're in business.

RELIABILITY
I haven't experienced any failure to trigger with the JrX.  I haven't experienced accidental firing either except for the fact that when the receiver is connected to the flash while the receiver is off, and then you turn it on, the flash usually goes off once.

The claimed range according to the manual is between 300 feet to 1750 feet, depending on conditions.  There are users who report that they have found that the SB800 emits radio interference that reduces the range of the JrX.  I use SB800s myself but haven't noticed any triggering problems.

USABILITY
Conceptually, the JrX controls are simple and intuitive.  Just turn the dial to adjust the power of each group.  For strobes, the power can be set from full power to 1/32.  For speedlights, the power can be set from full power to 1/128.

Compared to not having a remote adjustment system, the JrX makes shooting so much easier and smoother.  Without it, I need to run to each flash and adjust the power.  That can slow the pace of shooting and if you have to do it while the subject is waiting it can be a buzzkill.  (If you can setup the lights beforehand, then good for you -- until you decide you need to adjust or move the lights again...)

However, there are a couple of issues:
  • First, the scale is nonlinear for strobes (see EZset Studio scale below):
Excerpt from the Radiopopper JrX manual
  • Second, the dial is stepless and doesn't click or have any way to indicate where it's set exactly (other than a small raised dot on the dial).
Nonetheless, in practice, I haven't found it difficult to dial the power to a reasonable flash exposure.  In fact, a friend of mine tried it for the very first time and had no difficulties setting it as well (in fact it was also his first time to shoot with a Nikon and with a monolight).  It is not noticeably harder than adjusting the flash with buttons on the back of the flash.  I don't even think in my head about whether the power is 1/4 or 1/8 +1/3 or anything like that.  I just tweak the dial intuitively.

Purists may balk at this seemingly imprecise approach.  In the future, I may get a flashmeter, in which case I'll update this review based on how easy or difficult it is to get the exposure correct to within 1/10th of a stop.  Just don't hold your breath.

SYNC SPEED
The JrX does not support high-speed sync (its brother the PX does though).  However, the camera is never aware when the JrX is attached, thus your shutter speed won't be limited to your sync speed.  Well that's no use unless it can actually trigger above your sync speed, right?  Well you'll be glad to know it can be triggered at up to 1/1600 shutter speed.
D70 + Sigma 50-150. ISO 200, f/11, 1/1000. SOOC JPEG - no adjustments.
On a camera with unlimited sync speed (such as the D70 with its hybrid shutter), this can "multiply" your flash's power relative to ambient light.  In the shot above, for example, ambient was ISO 200, f/20, 1/250.  Yet we were able to provide adequate fill with a 24" shoot-through umbrella 10 feet away.  It testifies to the power of the B1600 but the shot was also made possible because we could shoot at 1/1000 shutter speed.  At that speed, ambient became the equivalent of f/10 (at ISO 200).  Shooting at f/11 we were even able to underexpose the super-bright ambient by a third of a stop while still getting enough light from the flash.

(Note: the unlimited sync speed party doesn't last forever.  At very high shutter speeds, flash duration instead becomes the bottleneck.)

Even on a camera with a mechanical shutter, the ability to trigger a slave above your sync speed can be useful if you don't need to illuminate the entire frame.

OTHER NOTES
Batteries
Both the transmitter and receiver are powered by CR123A batteries, which are not as common as I'd like it to be.  I considered getting rechargeables but went instead for disposables.  The best deal I found was on Amazon (Streamlight batteries).  It was over $2 per battery versus a rechargeable set (charger with 4 batteries) that would cost around $26.  Each battery lasts 40-50 hours of operational time.  Assuming I use 3 batteries at a time (1 transmitter plus 2 receivers), then my breakeven point is around 4 cycles, or 160 to 200 operational hours.  I think it will be a while before I reach that point.  Plus I didn't want to have to remind myself to charge these batteries.

Daisy-chained speedlights
If you are ganging two or more speedlights, you don't need to have a separate JrX receiver for each of them.  You could instead daisy-chain them.  For example, I had 3 speedlights connected on one receiver: I connected the JrX receiver via the bufo1955 cable to an AS-E900 (to which a speedlight was attached), which in turn was connected via the AS-E900's built-in TTL sync cable to another AS-E900, etc.  When connected this way, the power is adjusted for all the speedlights, not just the first one connected to the JrX.

Combination With Other Wireless Systems
The JrX can be combined with other wireless systems.  For example, I was able to use Nikon Advanced Wireless Lighting to control a slave flash while simultaneously controlling an AlienBee B1600.  All I had to do was connect the transmitter to either my camera's sync port or the sync port of my master flash.  Here are a couple of snaps with a JrX and AWL combination (bare SB-800 + B1600 with 60" reflective umbrella):


Another possibility is to combine it with the CyberCommander.  Here's one possible configuration:
  • CyberCommander mounted on camera
  • CSR+ connected to B1600
  • CSRB+ connected via stereo cable to Radiopopper JrX Studio transmitter
  • Radiopopper JrX Studio receiver connected to speedlight 1
  • Radiopopper JrX Studio receiver connected to speedlight 2
The benefits of such a setup:
  • The CyberCommander will be able to meter not only the B1600 but also the speedlights (although the speedlights triggered by the same JrX transmitter will be treated as a single light source).
  • I can use the JrX transmitter to selectively turn on and turn off certain speedlights and the CyberCommander can let me take flash meter readings each time (although only the most recent metered value for the speedlight(s) will be shown at any given time).
  • A CyberCommander alone can't control speedlights, and a JrX alone can't control an Einstein but with this combo you can control speedlights and Einsteins. =D
I haven't tried this yet but I asked the PCB tech support and they didn't see any reason it wouldn't work.  I'll update this review if and when I get a CyberCommander.

[PRELIMINARY] CONCLUSION
The JrX Studio is 100% reliable and is the most versatile remote adjustment option at the moment.  It is also an economical alternative that allows photographers with limited budgets to shoot with flashes that have the best power-to-value ratios: Paul Buff monolights and old Canon or Nikon TTL flashes.  If you're looking for a bulletproof remote adjustment system, plan to use speedlights (with or without monolights), and aren't afraid to shoot with manual flash, then this system is a great fit for you.

(As of now, I've only had the JrX for about a month so I will be updating this review from time to time.)

DISCLOSURE
I haven't received any monetary, financial, economic, or other compensation or consideration from Radiopopper or any other vendors mentioned here for this review.  I however participated in the just-concluded Radiopopper treasure hunt, under the same terms as everyone.  I also have an Amazon affiliate account and from time to time I link to products on Amazon and thereby receive a small percentage of any resulting sales (without any increase in price to the buyer). Thanks!
Read More
Posted in | No comments

Thursday, 23 June 2011

Tutorial: Sharpening Images For The Web

Posted on 17:12 by Unknown
Have you ever wondered how some images you see on the web look very sharp while the ones you post are not that sharp? I faced this problem when I started writing for this blog and now I claim that I can post very sharp images on the blog. Here's what I know about the subject.

One of the eye openers for me was Roger Cicala's article about Acutance and MTF Charts, I suggest you read this article (and the rest of his articles) for excellent technical explanation about lens sharpness. If you check the black-white bars example in the beginning of Roger's article, you will be impressed by how sharpening in post can increase an image's acutance (apparent sharpness).

There are many tutorials and discussions on the web about sharpening, some people take sharpening to a religious level and use two or three different programs in sequence to sharpen one image, others (like me) just don't give it much concern and make sure to get the image as sharp as possible inside the camera first. I am not going to claim that one method is better than the other, but this is how I process my images.

SHARPENING IN LIGHTROOM (ACR)

If you don't know what the sharpening sliders in lightroom does, then by all means have a look at this tutorial or google "Adobe Camera Raw Sharpening". The absolute thing you have to learn about is the masking slider, this is a very neat trick that enables you to get very sharp images without sharpening the out of focus backgrounds or the high ISO noise in the picture.

I reached a nice preset for sharpening my images in lightroom (applied automatically when images are imported), I have the amount slider at 40, the radius at 1.2 and the masking slider somewhere between the quarter and the third. One other thing is the clarity slider, I have it set by default to +15. These settings are what I found out works best for most of my images, of course there are images that requires totally different settings, especially female portraits.

SHARPENING DURING EXPORT

Lightroom has an option to sharpen images during export, there are lots of arguments about this topic, but here's what works for me, if I am exporting images at full resolution (which I almost never do, who needs 18MP JPEGs after they have been processed?) I don't apply any sharpening during export. And the photos look very sharp at 100% magnification.

However, if I am exporting the images to a smaller size (I resize to 2000 pixel on the long side) I will apply sharpening during export, I set the Sharpen for Screen to Standard. The idea is that when you resize a picture; you are removing pixels from the photo, and this might counter what you already did in sharpening during post (since you were working on the full resolution), that's why I sharpen the image once more after resizing.

SHARPENING FOR THE WEB

I will discuss my experience with blogger (which is where this blog is hosted), you have different options for adding images to the post, you can either link, upload or use your Picasa images. I always upload my images, so let's say I uploaded a 1600 pixel wide image, when posting this image you get the following options for display size: Small, Medium, Large, X-Large and Original. Here's how each of these sizes look like:

Small Size
Medium Size
Large Size
X-Large Size

The first three sizes are too small for my taste, I appreciate reading blogs which have sharp images that fill the full width of the blog space, take Laurence Kim for an example, his posts look really nice with large detailed images and doesn't make you want to click the images to see a larger version. On the other hand, a blog like Srobist is not very pleasant in how the images are displayed, they are too small to see any details (especially lighting details, doh) and most of the time when you click them you are treated with flickr's ugly interface that forces you through a thousand clicks to reach a larger version of the image. What I want to express is that large and sharp images are very welcome in blog posts, they give a blog's look a certain finesse.

Back to our image sizes, the first three sizes are too small and the X-Large while it looks looks nicer (and sharper), unfortunately it is wider than the available blog space so I can't use it. Choosing the original size option you will use a 1600px image that would mess the post.

The solution is very simple, I know that the theme we use on our blog allows for a maximum of 600px wide images, all I have to do is go back to lightroom and export the images needed in a 600px size with sharpening for screen set to standard, this is very important. Now that I have 600px images, I can upload them and use the Original size setting, that way blogger will not interfere with how sharp the image will be. In the 1600px example, when I choose a different size, blogger will use it's own algorithm to resize the image which leads to a lower sharpness, but when I use the original size, blogger will leave the image alone and upload it as-is.

To show you how this makes a difference, below are the same image posted twice, the first image is exported from lightroom at 1600px, sharpened during export, uploaded here and displayed in the X-Large size. The second image is exported from lightroom at 600px, sharpened during export, uploaded here and displayed in it's original size. You judge which one is sharper (hint: eyebrows), of course there is no contest if you compare it to any of the first three sizes (which is what most people use).

1600px, X-Large Size, Click to see the 1600px size
600px, Original Size


CONCLUSION

Quite a difference, huh? As a conclusion, whatever web platform you are using, the best practice is to export your image for the size you are going to post on the web and upload it in it's original size, that way you prevent any web program from resizing your pictures and reducing their sharpness in return.

One last argument you might consider, "But posting the 1600px image has the benefit of clicking it to see a larger version, now all they will see when they click the image is the 600px image?". This is easily solved in blogger, you can simply upload the 1600px image beside the 600px image and link it to the 600px image. Or if your images are large and sharp enough, your readers won't have to click through to see a larger version. ;-)
Read More
Posted in sharpening, web | No comments

Monday, 20 June 2011

Flash Series - Part 7: LumiQuest Softbox III - Off Camera Review

Posted on 08:30 by Unknown
LumiQuest Softbox III

Welcome to a new post in the flash series of posts, today I will attempt to review the Lumiquest Softbox III and how it performs in real world scenarios, Mic has already covered the larger Fotodiox 8x12 here, and now it's time to see how the smaller one will do. Hit the jump for the full treatment.

BACKGROUND
 
A little bit of history first, my soft light modifiers prior to the SB III were a shoot-through umbrella, a reflective umbrella and a softbox like umbrella (a shoot-through with a reflective back cover). My typical shooting scenario is a family gathering or a trip outdoors, and I usually choose one lens only for the whole event, if I'm shooting indoors I'll add one of my flashes and my DIY gel kit and that's it. It is not practical f
Saving...
or me to carry a light stand and an umbrella, of course there are times when I take them with me, but that's like 5% of the time. By the way, Mic has found a very good handheld umbrella here, although I believe he will look like an alien carrying it. :-D


So when I first saw David Hobby's post about the SB III, I was excited because it is small enough to carry and use hand held, and it won't require a light stand, that's how I arrived at the decision that I want one.

SETUP

It comes with with two velcro sets, one of them is attached to your speedlite of choice, this set consists of four small pieces, two long ones for the long sides of your flash head and two short ones for the short sides, when installed this way I find that the SB III is very secure and doesn't need the extra velcro strap that ships with it. The extra velcro is one long piece that sticks to the outside of the SB III after it is secured to the flash for extra security, but I didn't need it. Unlike the Fotodiox 8x12 softbox that Mic reviewed, the SB III are made of hard material that makes it easier to setup quickly.

Velcro straps provided with the SB III, I chose the 580EX because it is powerful and has HSS (compared to the 430EX)

This is the velcro on the SB III, it is powerful enough to provide a secure setup
 
One drawback to the velcro stuff is that you will have to stick velcro to your expensive flash (which I don't like) and won't be able to use it with other flashes unless I stick more velcro on them. I tried setting it up on my 430EX without velcro just using a speedstrap, but it wasn't firm enough, and it didn't help either that the 430EX's head was quite small. In the sample pictures below you will see how it looks attached to the 430EX. But before this here are a couple more pictures of the SB III mounted to the 580EX.

SB III mounted and ready, top view

SB III mounted and ready, side view, that's how I use it in macro/product shots

The SB III internal sides are made of a white reflective material, and the front diffuser has an extra diffusion area in the middle to reduce hotspots.

EXAMPLE - PRODUCT SHOT

You have seen this example before, I used it in my first post in the flash series. I wanted to shoot both the 580EX and 580EX II and didn't want light spill on the background, so I used the 430EX with the SB III and made use of some homemade cardboard reflectors, no ambient light in the final shot. Flash was on manual mode and triggered using the camera's built-in popup flash.

SB III mounted to a 430EX using a speed strap only, no internal velcro

End result of the photo above

EXAMPLE - SB III AS FILL LIGHT

In this example I was shooting in the same day I mentioned in the previous flash series post, the sun was overhead with no clouds. I wanted to show how the SB III worked as a fill light, I shot in aperture priority mode. The SB III was mounted to the 580EX which was fired using the camera's built-in popup flash, TTL mode, 0 FEC. The flash was hand held by one of my friends.

Ambient only, 85mm, f/5, 1/200s, ISO 200

Same as above but with the 580EX firing in TTL mode, much more detail available in the eyes

EXAMPLE - SB III AS MAIN LIGHT + AMBIENT

I have to raise the hat for Canon here (I wonder if Nikon is the same), one famous use for off camera lighting is to underexpose the background by one or two stops then add your lights, this is usually done using the camera in manual mode to check the background exposure first, then reducing it by using the shutter speed, the aperture or the ISO.

In my case I was using aperture priority mode, I dialed in a negative one exposure compensation (i.e. I told the camera to reduce it's calculated exposure by one stop) and used the flash in TTL mode. The system was intelligent enough to use enough flash power to correctly expose my subjects, it was as simple as that, Av mode, -1 EC, Flash on TTL. I'm starting to understand Joe McNally's TTL addiction.

Once again the flash was held by a friend to the camera left and not so close my subjects (wanted unform lighting, inverse square law), I expected the light falling on them to be harder than this, but I really like the quality I am seeing, definitely didn't expect it to be that good. By the way, this was the first time for me to test the SB III.

SB III camera left

100% crop to illustrate the catch lights, can you see that faint dot in the center? That's my popup flash signalling the 580EX

EXAMPLE - SB III AS MAIN LIGHT + ZERO AMBIENT

Finally I took this lone shot at home, I put the camera on a tripod and turned the swivel LCD to face me, then I held the SB III to the left of my face (not so close) and remotely triggered the camera. The flash was on TTL mode, but I have setup the camera in manual mode to kill the ambient.

Yours truly, sorry for the sad look, I was home alone that night

The sharp eyed readers will notice that the background is lit uniformly while my face is not, that's because I was using an 85mm lens (135mm equivalent) which has a narrow field of view, i.e. showing a small part of the wall behind me, and it also compresses the picture, i.e. showing the background to be closer to me than it actually is. From the background's PoV, the SB III was far enough to light the area behind me uniformly. The long focal length is also the reason why my head is chopped from the top and the bottom, the camera was as far away from me as it can get, almost touching the opposite wall of the room, the 85mm on a crop sensor is way tight for indoor use.

CONCLUSION

I really like the SB III and don't regret buying it, thanks to David's review. Build quality is great, it is small enough to carry all the time, yet large enough to light one or two people without hard shadows. I am looking forward to using it more especially outdoors in sunlight where it really shines. It will probably be my most used light modifier.

We are near the end of the flash series, I have two or three more posts, the largest one will be about the 24" Lastolite Ezybox that I got two weeks back, the other two will be short fun short about various accessories and really cheap Chinese studio strobes. I will resume regular posts and fit in the remaining flash series posts when I have tested the Ezybox long enough.


RELATED POSTS:

World's Largest On-Camera Softbox: the Fotodiox 8x12
Flash Series - Part 1: Canon Speedlites Chat (580EX II vs 580EX vs 430EX)
Flash Series - Part 2: Home Made (DIY) Gels & Gel Holder
Flash Series - Part 3: Rogue Grid Review
Flash Series - Part 4: Triggering Your Hotshoe Flashes + eBay RF Trigger
Flash Series - Part 5: Remote Adjustment Radio Triggers
Flash Series - Part 6: Use Flash in Daylight? Really?
Read More
Posted in flash, lumiquest softbox III, off camera, review | No comments

Saturday, 18 June 2011

Better Family Photos Index

Posted on 00:49 by Unknown
Mshafik and I are putting together an index of articles.  The index will appear as a permanent link under "suggested articles."

Meanwhile here's a link to the first draft (which covers the most recent 200 posts or so):
http://betterfamilyphotos.blogspot.com/p/better-family-photos-index.html
Read More
Posted in | No comments

Friday, 17 June 2011

Canon 60D vs 550D (and 600D): Real World Usage

Posted on 00:11 by Unknown
Canon 60D Top View - Credit: Canon USA

It's finally time for me to review my two months old Canon 60D and compare it to my old pal, the Canon 550D (T2i). I have been postponing this review for quite a bit until I get used to the 60D, but I have passed the 10,000 images mark just last week, if anything, the 550D lasted with me for 9 months and has only done around 9,000 images. So lets dive into the hands on review, a small warning, this will be quite long. :-)

DISCLAIMER: I have learned from the internet and several forums that it is impossible for everyone to agree on the same opinion (sometimes even the same fact), so if you see anything below that you don't quite agree with then you're totally welcome to tell me about it in a gentle manner. What you'll read below is my own experience with both cameras no matter what others say elsewhere.

INTRODUCTION:

Let's get cracking, the 550D was my first DSLR after I sold my Canon G11, I was mightily impressed with the sensor's noise performance and the huge jump in focus speed and shutter lag. The only two cameras with the new 18MP sensors were the 7D and the 550D, the 60D wasn't announced yet, and since this was my first DSLR I decided to get the much cheaper 550D. When the 60D was announced I was really tempted but kept telling myself that my 550D has everything I will ever need and I should better invest my money in good lenses.

Then came Japan's earthquake and the Canon DSLR supply was quite low in Egypt and the prices started to increase, in the meanwhile I was traveling to Malaysia in a business trip and knew that they had very good prices on photography equipment, so on a whim I put my 550D (with the kit lens) for sale and was able to sell it for almost the same price it was sold new before the earthquake, then I traveled to Malaysia with my lenses alone planning to get my 60D body from there which I did as you can see from my first impressions here.

When I bought the 60D, I thought that all the advantages of the 60D over the 550D would be the higher fps, swivel LCD, wireless flash and a couple of things more. But reading technical specs alone or reviews about the noise performance of the 60D compared to it's predecessor (the 50D) is only half the story, there are way too much differences that are very useful in everyday shooting that can only be noticed by someone who used both cameras extensively.

I was able to count more than 30 advantages for the 60D over the 550D, I will list them one by one and tell you how I find it useful in the real world, and at the end of the post I will tell you about 6 features I really miss on my 550D. Unless specified, anything you read about the 550D also applies for the 600D. Through out the review, I will be posting some of my favorite pictures that I took with the 60D in the last two months.

Desk Lamp - I have no idea why I like this photo too much, this desk lamp was shot in my hotel room in Malaysia, I took more than 15 shots with different compositions and WB settings

CANON 60D ADVANTAGES OVER THE 550D:

1- Grip Size

One of my main complaints about the 550D was it's grip, it's too small and causes my fingers to crimp and hurt a lot if I'm carrying the camera for more than 15 minutes, the 60D on the other hand has a much beefier and comfortable grip that never bothered me when using the camera for long periods, it's just great. The 600D should also have a better grip than the 550D although I doubt it would be as large as the 60D.

2- Weight

This might seem counter intuitive, but the added weight of the 60D makes it more stable for shooting at very slow shutter speeds, and it balances the camera nicely with heavier lenses like the EF-S 15-85 which was front heavy on the 550D.

Enough Photography! Journalists Chasing me Everywhere, Smart Village Club, Cairo - 35mm f/2 @ f/2.2


3- Viewfinder

The viewfinder on the 60D is a pentaprism versus a mirror on the 550D, the result is a noticeably larger and brighter viewfinder, this was a major "whoa" moment when I first put the 60D to my eye, I know that it is not as large or bright as full frame cameras or my old Olympus OM30 SLR with the split focusing screen.

The viewfinder on the 60D can display more information like the battery status, the electronic level and one extra stop on each side of the exposure meter. The focus points on the 60D are larger and easier to see than the 550D when they turn red.

There have been several discussions on dpreview recently about whether the larger viewfinder on the 60D would make manual focusing easier, let me sum it up for you, using manual focus on the 60D or the 550D downright sucks. There is too much DoF in the viewfinder, it is not large enough and without a special focusing screen (like a split prism) your keeper rate will be too low. You can of course use manual focus and get good results after a lot of training, but at the end of the day, it is not practical, it is slow and the keeper rate will be way too low, check my experience with the manual focus Zuiko 50mm f/1.8.

Westin Hotel Entrance, Malaysia

4- FPS (frames per second)

The 60D can shoot bursts at 5.3 fps versus 3.7 fps for the 550D, it might not sound like a large difference but it is very useful for me when I'm shooting kids and fast moving subjects, check this 27 frame sequence I took for a car making an accident at an autocross event.

Click to see a larger version


5- Larger Buffer

This is one of the huge benefits for me, despite using a class 10 card with the 550D the maximum burst rate I could shoot in RAW was 6 frames @ 3.7 fps before it slowed down to around 1 fps then slows down even more. With the 60D I am able to shoot 16 continuous RAW files @ 5.3 fps before it starts slowing down, makes a huge difference for me.

A Colorful Duck, KL Bird Park, Malaysia - Shot with the EF-S 55-250

 6- Swivel LCD

The most distinctive feature of the 60D and the 600D, I can't stress enough how useful it is in setup shots using live view, one example is when I use the camera on a mini tripod low to the ground, I just swivel the LCD so I can clearly see everything without putting my head on the ground. Another useful example is when you're taking a self portrait with the camera on a tripod or arranging some stuff that you're going to shoot in front of the camera, you can easily tilt the screen 180 degrees and you'd be looking at yourself in the LCD (the camera automatically adjusts the orientation). The LCD can also be turned to face the camera body (closed) so that it's protected.

7- Top LCD

I didn't think I'd ever need this screen since I was used to Canon's quick menu at the back LCD, but after spending some quality time with the 60D, I got used to it that I miss it when I use another camera without the top LCD. The other advantage of the top LCD is that it negates the need to use the back LCD for adjusting settings which saves a lot of battery power, even the top LCD turns off after some inactivity time and turns on again when you half press the shutter, that way I have my 60D on and ready all the time without consuming too much power. On the 550D I used to turn the camera on and off all the time.

Zen, Sharm El Sheikh - 15-85 @ 15mm f/8

8- Battery Lifetime

The 60D uses the same battery as the 7D and the 5D, this battery holds a lot of juice compared to the 550D battery, I was able to get a maximum of 400 shots out of the 550D with very little use of the LCD, while I easily passed the 1000 shots with the 60D with around 19% remaining, damn impressive.

The 60D battery also has a much more accurate battery meter and you can check the percentage, the 550D had only three bars, the first one stayed for a long time, then when it goes off and you think that you still have like 50% of the batter remaining, you'd quickly discover that the last two bars represent around 20% of the battery capacity.

Elegant Egret, Sharm El Sheikh - 15-85 @ 85mm f/8

9- Wireless Flash Control

I have three Canon flashes, so this feature was a heaven send for me, I can now use my flashes much more quickly in E-TTL or manual mode without setting up any triggers, all I have to do is turn on the flashes, make all the necessary settings from the camera's back LCD and shoot away. I am very glad Canon introduced this feature in the 600D which is considered an entry level DSLR, way to go Canon, you have some catching up to do.

A Winning Shot, Sharm El Sheikh - 15-85 @ 22mm f/5.6, 1/15sec, ISO 1600

10- 1/8000 sec Shutter Speed

The 550D's shutter was only able to go as fast as 1/4000 sec which forced me to stop down my aperture when I wanted to shoot at f/1.8 or so in daylight, I know I could've used a ND filter, but it's an extra hassle and would slow me down.

11- 1/250 sec Sync Speed

The 550D has a sync speed of 1/200 sec, the extra sync speed on the 60D makes a difference when you're trying to completely kill the ambient indoors without having to stop down the aperture a lot.

Are You Looking at me Punk? KL Bird Park Malaysia - 55-250 through a fence
 
12- More Hardware Buttons / FEL Button

The 60D has more buttons than the 550D which makes it easier to change settings directly without having to look at the screen or use button combinations. One significantly important button for me was the extra FEL thumb button, the 550D has only two thumb buttons (top right of the camera back), one for the AF point selection and the other for the AEL (exposure lock), and since I am using back button focusing (will write about it in a separate article) I was using the AEL button for focusing, so if I wanted to lock the exposure I wasn't able to do it unless I paired it with the shutter button for example which I don't want, however the 60D solved this one easily by adding a third thumb button labeled with an "*", this is the button that I now use for focusing and I have the AEL button free anytime I need it. The ISO button has a nice bump so you can find it without lifting your eye from the viewfinder.

13- 8-Way Control Dial

This dial has 8 directions, right, left, up, down and 4 directions in between, this makes it very easy to directly select any AF point, you simply press the AF selection button then choose any of the 9 AF points by pressing any of the 8 directions or the center point for selecting the center focus point. On the 550D you have to first choose one of the four points (left, right, up and down) then use the wheel to move to an adjacent point. I will make a post soon about the focus-recompose versus choosing a different AF point.

14- Two Dial Wheels

The 550D has only one wheel at the top of the camera, the 60D adds one more at the back (around the 8-way control dial), it is very useful that when you're in manual mode you can change the shutter speed with one wheel and the aperture with the other, or when you're in aperture priority mode for example you can directly change the exposure compensation by using the back wheel. On the 550D you have to press and hold a button at the back and turn the top wheel to change the EC or the aperture.

15- Button Locks

The 60D has locks on both the rear dial wheel and the top mode dial to prevent accidentally changing any settings, I think I can live without them although I discovered that others find them very useful, maybe I am just more careful.

iPhone FTW, Al Ain Al Sokhna - 35mm f/2 @ f/2.5


16- Custom Mode

One of the things I missed from my Canon G11 was the custom modes, these are modes where you save all the camera settings so you can directly come back to it, let me give you one example, I already told you that I am using back button focusing, so whenever I hand my camera to someone to take a picture of me, they aren't able to focus using the shutter button, so I turned my custom mode to use aperture priority, auto ISO, focusing via the shutter button and all auto focus points active, this way when I handover my camera to someone who's not used to DSLRs I just turn the mode dial to custom mode and increase the aperture to f/8, this way I can guarantee that the pictures they will take will be sharp and in focus.

The Canon 60D has only one custom mode, the 7D has three and the 550D has none.

Fire Show @ Sharm El Sheikh - 15-85 @ 55mm, 1/60sec, ISO 3200

17- WB in Kelvin

On the 60D you can set the white balance using the desired color temperature directly in addition to the standard presets and the custom white balance, this is not available on the 550D.

18- 1/3 Stop ISO Increments

This one used to drive me crazy on the 550D, especially when shooting movies, the 550D can manually select full stop ISO values only (100, 200, 400, etc...), with the 60D and the 7D you can set it in 1/3 stop increments (100, 125, 160, 200, etc...), this is a very debatable topic that I intend to cover in a later post but some say that using multiples of ISO 160 will result in less noise, but not now, maybe later.

19- Slightly Better Noise Performance

I have no scientific proof on this one, but I feel that I am getting slightly cleaner ISO 1600 up to ISO 6400 RAW files, but this might be a visual trick. I can comfortable shoot the 60D at ISO 3200 without worrying about noise too much.

Guava Juice, Thai Restaurant @ Malaysia - f/2, 1/15 sec, ISO 3200, hand held


20- mRAW, sRAW

With the Canon 550D you can shoot either JPEG only (several sizes and qualities) or RAW only or RAW + JPEG with the JPEG set to the highest quality. The 60D gives you the option of shooting any combination of RAW + JPEG you want. There are three RAW settings, the full 18 megapixel RAW, and two smaller RAW sizes (medium and small), have you ever wondered whether you can get reduced megapixel RAW files like you can do with the JPEGs? With the 60D you can when you don't need the 26 megabyte full 18 megapixel RAW files.

21- In-Camera RAW Processing

With the 60D you can process RAW files directly from the camera and save them as JPEGs on the memory card, I never used this feature before but it might be useful for someone, an easier solution is to shoot RAW + JPEG directly and make sure you get your WB correct.

Thai Restaurant, Malaysia - 35mm f/2 @ f/2.2, 1/30sec, ISO 1600


22- Shutter Lifetime

Up to the 500D, Canon claimed that they have a 100,000 click shutter lifetime, with the 550D and the 600D they didn't give any numbers, but with the 60D they claim the 100,000 actuations, not sue what to conclude from this, especially that a shutter can fail prematurely or last for a very long time, but psychologically I feel better with the 60D.

23- Shutter Lag / VF Blackout

The 60D shutter lag is 60ms versus 90ms on the 550D, this is 50% faster and you can feel it when using both cameras, the viewfinder blackout (when the mirror is up during an exposure) on the 60D is a 100 ms versus 130 ms on the 550D.

24- Shutter Sound

This is a totally subjective issue, but one of the attractions of a DSLR is it's shutter sound and feel, the 550D shutter sounds like a small whiny motor (reminds me of my 50mm f/1.8 focusing sound) whizzing to move the mirror, while the 60D has a deeper satisfying thunk. I have compiled a very short clip to show you the difference.


25- Improved AWB

I was usually cross with my 550D's auto white balance, and I envied all the reviews that claimed the 60D has one of the best AWB systems amongst Canon' s  DSLRs, and it's true, I can leave the AWB on and depend on the camera to get the WB correctly.

26- Electronic Level

The 60D has an electronic level which helps you get a straight horizon, it can be displayed in either the back LCD or inside the viewfinder (replaces the exposure meter at the bottom).

Twin Towers seen from KL TV Tower, Malaysia - 15-85 through glass

27- 9 Cross AF Points

While Canon might seem behind Nikon in terms of the sheer number of AF points (they sort of caught up with the 7D), I find that 90% of the time I am using the center point only, the extra points are useful when tracking moving subjects. On the 550D the center focus point was the only cross AF point, this means that the 60D can track moving subjects more accurately than the 550D, and I can use any of the other AF points in very shallow depth of field situations and be sure that I will get my focus spot on.

28- Show AF Points in Review

The 60D can show you the AF points used to take a picture when you are reviewing your pictures on the back LCD, with the 550D I was only able to view it on the computer using Canon's RAW processor.

I can see you from up here, KL Bird Park, Malaysia - 55-250 @ 250mm
 
29- Audio Gain Control

On the 550D, when shooting videos using the the camera's built-in mic or an external mic, the camera's automatic gain control was forced upon you, so if there's complete silence during shooting the camera will increase the audio gain and you will hear a hissing sound, this could be solved on the 550D using a hardware hack or the magic lantern firmware, on the 60D and the 600D you can enable manual gain control from the camera directly with sound level bars to judge your recording level.

30- Weather Sealing

There were lots of complaints about the 60D not using a magnesium alloy body, but until now I have not seen any proof that the 60D is inferior (body strength wise) to it's predecessor or the 7D. Anyway, the 60D is weather sealed, but you'll need weather sealed lenses to be able to benefit from it. I am now much less worried when water splashes on my camera body.

31- Playback & Sorting Options

The 60D has more playback and sorting options than the 550D, you can find your pictures by date for example, and you can also give ratings to the pictures directly from the camera.

32- Creative Filters

The 60D has some creative built-in filters like B/W and miniature effect (simulates tilt-shift effect), I have never used them and I doubt I will, but someone might find them useful, check the entrancing video below, will surely make you fall in love with the 60D. :-)


WHAT I MISS FROM THE 550D
  • Tactile Buttons: the 550D buttons had more feel to it and a satisfying click, but I got used to the 60D.
  • Different LCD Themes: the quick menu at the back LCD had several themes on the 550D, and I really liked the amber one, the 60D has none and frankly it looks much uglier than the 550D but I am not using the quick screen anymore now that I have the top LCD.
  • Weight/Size: despite mentioning the 60D's weight as an advantage, sometimes I miss the less weight of the 550D with the kit lens.
  • Bulb Counter: on the 550D when using the bulb mode, you got a nice counter on the back LCD, on the 60D you get it on the top LCD which is not illuminated, this makes a pain to see in the dark, one solution is to use an external intervalometer.
  • Multiple Shots: this is the feature I miss the most, on the 550D I can tell it to run a self timer for 5 seconds for example then take 10 (or any number) continuous shots, on the 60D self timer only takes one shot. Can also be solved using the inervalometer.

CONCLUSION

This was one of my longest posts ever, and it took me a long time to prepare and write, what I hope to achieve with this post is to show people still hesitant between the 550D/600D and the 60D that there are much more benefits to the 60D than what is widely known, you may be able to collect these differences from several places, but having them all collected like this shows you where will your extra money go with the 60D.

I am not dissing the xxxD series, I had the 550D and I loved it, but I never imagined the 60D would be this much more satisfying until I bought one and used it. The 600D (body only) is selling for $200 less than the 60D (body only), and for my usage I can totally justify spending the extra $200 to get the 60D.

Any comments or feedback are totally welcome.

RELATED POSTS:

Canon Lenses Chat - Part 1: Standard Zoom Lenses
Canon Lenses Chat - Part 2: Telephoto Zoom Lenses
Canon Lenses Chat - Part 3: Prime Lenses
Canon EF 35mm f/2 Review
Quick Review: Canon 85mm f/1.8
Canon EF Lenses Chat: Canon EF 200mm f/2.8L II USM Review
Canon EF Lenses Chat: Canon EF 50mm f/1.4 USM Review
Canon 5D Mark II: First Impressions
Canon 5D Mark II vs Canon 60D & 6D
Read More
Posted in 550D, 600d, 60d, canon, t2i, t3i | No comments
Newer Posts Older Posts Home
Subscribe to: Posts (Atom)

Popular Posts

  • Olympus E-PL3 with 14-42 Lens $199; Moving from Nikon to MFT?
    I saw on 43rumors.com that the Olympus E-PL3 was being sold at Newegg for just $199 with the 14-42 kit lens included.  I checked it out and...
  • Exploring 3D Photography with the Loreo 3D Lens in a Cap
    When I hear of 3D photos or videos, my first impression is that it's gimmicky.  Interesting for one or two shots maybe and then after th...
  • Double Camera Strap & BlackRapid RS-5 Review
    This is a review of two camera straps: - The first is a double camera strap that's -- let's be blunt -- a knockoff of the BlackRapid...
  • 2x Lowepro Review: Toploader Zoom 45 AW & 55 AW + Unraveling The SlipLock™ Mystery
    Left: Lowepro Toploader Zoom 55AW, Right: 45AW, Middle: Canon 60D + 15-85 Welcome to a new rare photography accessory review as I'd lik...
  • Toys for the Big Kids: Speedlight Softbox
    In this post, we will have a look at a softbox for speedlights.  This post is part of a series that will cover equipment reviews for committ...
  • A Couple Of Yashica Oldies
    Yashica Electro 35 GTN + Yashica ST-7   How many of you know the above camera? Have you seen such a tripod before? Hit the jump for a flas...
  • Sigma USB dock available for preorder
    B&H is offering the Sigma USB dock for preorder for $59 + s/h , due for shipping on May 18. The dock allows you to update your firmwar...
  • Canon Professional Network
    I didn't know about Canon Professional Network until Syl Arena recently blogged about his 4-part article on speedlites.  I took a look ...
  • Minimizing Nikon D5200 and D7100 banding; Mysteries Remain
    Many people have noted that the Nikon D5200 and Nikon D7100 have banding in the shadows when the exposure is pushed.  In this post I'll ...
  • Going Crazy With Tripods
    My Tabletop Tripod Trio I love tripods, I go all soft and wobbly when I see attractive looking ones, so here is my story with tripods, inclu...

Categories

  • "alien bee"
  • "april fool's"
  • "ring flash"
  • "yong nuo"
  • 1"
  • 1/1.7"
  • 10-17
  • 10-20
  • 11-16
  • 15-85mm
  • 15z
  • 17-50 vc
  • 190cx pro3
  • 2.8
  • 2.8G
  • 2/3"
  • 200 f2.8
  • 200 L
  • 200mm
  • 200mm f/2.8
  • 200mm f/2.8 L II
  • 200mm f2.8
  • 200mm f28
  • 200mm f28 L II
  • 2012
  • 2013
  • 23 Samsung led
  • 24-105 f4
  • 24-70
  • 25 1.4
  • 28-105
  • 28-70
  • 35mm
  • 35mm f/2
  • 35mm f2
  • 360
  • 3rd party
  • 4.1
  • 4/3
  • 40 pancake
  • 40 panckae
  • 40 stm
  • 40-150R
  • 40mm f/2.8
  • 430EX
  • 43rumors
  • 45 18
  • 45 AW
  • 4x4
  • 50 14
  • 50 f14
  • 50-150
  • 50mm
  • 50mm f/1.4
  • 55 AW
  • 55-250
  • 550D
  • 55aw
  • 560ex
  • 580 ex ii
  • 580EX
  • 580EX II
  • 5d
  • 5d mark 2
  • 5d mark 3
  • 5D Mark II
  • 5d mark iii
  • 5d2
  • 600d
  • 600ex-rt
  • 60d
  • 60fps
  • 60mm macro
  • 650d
  • 6d
  • 7.5mm
  • 720p
  • 75 f1.8
  • 85mm f1.8
  • 8x12
  • abbc
  • abstract
  • accuracy
  • active d-lighting
  • adjustment
  • adl
  • AF
  • af point
  • AF Point Expansion
  • aftermarket
  • airport
  • alexandria
  • alien bee
  • alien bees
  • alienbee
  • alienbees
  • alternative
  • ambient
  • ambient light
  • angle
  • aperture priority
  • APS-C
  • apsc
  • assignment
  • auto focus
  • auto white balance
  • autofocus
  • AWB
  • awl
  • back button focus
  • background
  • background blur
  • backlight
  • backlighting
  • backlit
  • bad behavior
  • bad photography
  • balance
  • bare flash
  • battery
  • BBF
  • beach
  • beams
  • beauty dish
  • bellagio
  • BFT
  • birthday
  • black
  • black foamie thing
  • black rapid
  • blackrapid
  • blogs
  • blower
  • blown
  • blur
  • bokeh
  • bounce
  • bounce card
  • bounce flash
  • bower
  • bracket
  • brightness
  • brilliance
  • brolly grip
  • brother
  • build
  • burst mode
  • butterflies
  • butterfly
  • C.Fn
  • cable
  • cake
  • camera
  • camera bag
  • camera releases
  • camera settings
  • candle
  • candlelight
  • canon
  • Canon 100mm Macro L IS
  • canon 200mm f28L
  • canon 24-105
  • canon 40 stm
  • canon 40mm f28 pancake
  • canon 50
  • canon 50 1.4
  • canon 55-250
  • canon 5d mark 2
  • canon 5d mark ii
  • canon 5d mark iii
  • canon 5d2
  • canon 5d3
  • Canon 60d
  • canon 6d
  • canon g11
  • canon speedlite
  • car
  • carbon fiber
  • catch lights
  • cheap
  • christmas
  • clean
  • cleaning
  • clipped
  • clipping
  • close up
  • clouds
  • cls
  • clustered
  • color
  • compact
  • comparison
  • composition
  • compositional aid
  • construction
  • contrast
  • cooler master
  • copyright
  • core i7
  • cowboy
  • cowboystudio
  • cpl
  • creepy
  • crop factor
  • crop sensor
  • cyber commander
  • cybersync
  • d-lux
  • d-lux5
  • d3
  • d300
  • D5100
  • D600
  • d70
  • d700
  • D7100
  • d90
  • dark background
  • david hobby
  • daylight
  • dell 24 inch
  • depth of field
  • desert
  • diamond
  • digital
  • directional
  • distance
  • diy
  • dlux
  • dlux5
  • dng
  • double
  • dslr
  • DSLR bag
  • dual
  • dust
  • dx
  • dynamic range
  • earthquake
  • ebay
  • ebay trigger
  • eclipse
  • editing
  • EF 40mm f/2.8
  • ef-s 60mm
  • einstein
  • Electro GN
  • engagement
  • environmental portrait
  • ep5
  • equipment
  • ETTL
  • ettr
  • europe
  • events
  • evf
  • ex600
  • existing light
  • expensive
  • exposing to the right
  • exposure
  • f/3.5
  • family
  • faq
  • fasten-r3
  • favorite
  • fayoum
  • Fayoum desert
  • fill
  • fill light
  • film
  • filter
  • finepix
  • fire
  • fireplace
  • first impressions
  • fish-eye
  • fisheye
  • fix
  • FL600R
  • flash
  • flash bounce
  • flash sync
  • flash trigger
  • flashmeter
  • flashright
  • focal length
  • focus
  • food
  • football
  • fotodiox
  • fountain
  • freexwire
  • fuji
  • fujifilm
  • Full Frame
  • fun
  • fx
  • galaxy s 3
  • galaxy s4
  • gecko
  • GeForce gtx570 OC
  • gel
  • geomag
  • ggs
  • ghost
  • gigabyte z77 ud3h
  • glass
  • gn
  • Goodbye
  • gorillapod
  • gregg
  • grid
  • grip
  • group shot
  • gskill ripjaws
  • guide
  • guide number
  • gx7
  • haf 912
  • handheld
  • hands on
  • hands-on
  • hdr
  • head shot
  • hiatus
  • high dynamic range
  • high iso
  • high speed sync
  • highlight
  • highlights
  • histogram
  • holder
  • holiday
  • home
  • home made
  • Honda civic
  • honeycomb
  • hotshoe
  • hoya
  • humor
  • i9500
  • id
  • image quality
  • impressions
  • indoor flash
  • infrared
  • infringement
  • insects
  • inverse square law
  • japan
  • jewel
  • jewelry
  • joby head
  • jpeg
  • Kingston hyperX SSD
  • kirk tuck
  • kl bird park
  • krakow
  • kuala lumpur
  • las vegas
  • lastolite
  • laurence kim
  • lax
  • lcd
  • leica
  • lens
  • lens cap
  • lens compression
  • lens review
  • lenses
  • lenspen
  • lensrentals
  • light
  • light painting
  • lighting
  • lightroom
  • lightroom 4
  • lightroom 5
  • location
  • long
  • long exposure
  • los angeles
  • low key
  • low light
  • Lowepro
  • Lowepro 45aw
  • Lowepro 55aw
  • lr4
  • lumiquest softbox III
  • lumix
  • lx-5
  • lx5
  • m4/3
  • m43
  • macro
  • macro adapter
  • makernotes
  • malaysia
  • manfrotto
  • manfrotto tripod
  • manual
  • mark ii
  • mark iii
  • MFT
  • mft. micro four thirds
  • micro four thirds
  • mielec
  • migration
  • mini review
  • mirror
  • mirror-less
  • mirrorless
  • mobile
  • modification
  • modifier
  • monobloc
  • monoblock
  • monolight
  • motion
  • motion blur
  • multi function printer
  • multiple
  • nano crystal
  • natural light
  • neil
  • Neil VN
  • niekerk
  • nikkor
  • nikon
  • nikon d600
  • noise
  • off camera
  • oil
  • olympus
  • olympus 12-50
  • Olympus 40-150
  • olympus 45
  • olympus 45 18
  • olympus om-d em-5
  • om-d
  • omd
  • omd em1
  • omd em5
  • omd em6
  • on-camera
  • one inch
  • overexposure
  • overpowering sun
  • panasonic
  • panasonic leica 25 14
  • pancake
  • party
  • passport
  • pastries
  • pastry
  • pc
  • pentax
  • peter
  • phone
  • phone photography
  • photo
  • photo tips
  • photography
  • photokina
  • photomerge
  • photoshop
  • photoshop elements
  • planning
  • pocketwizard
  • point and shoot
  • poland
  • polarizer
  • popup
  • popup flash
  • portrait
  • post processing
  • post-processing
  • postprocessing
  • product
  • product shots
  • profile
  • protection
  • protector
  • quad-flash
  • quantum
  • radiopopper
  • raid 0
  • Range finder
  • raw
  • raw editing
  • raw+jpeg
  • rays
  • real
  • recovery
  • reflection
  • reflector
  • resources
  • restaurant
  • review
  • rf-603
  • rf603
  • ricoh
  • ring
  • ringflash
  • robin wong
  • roger cicala
  • rogue
  • rokinon
  • roll off
  • roll-off
  • rolloff
  • rs-5
  • rs-7
  • rumors
  • s5
  • s5 pro
  • s5pro
  • samples
  • samsung
  • samyang
  • sb-26
  • sb-80
  • sb26
  • sb800
  • screen protector
  • sensor
  • sensor swab
  • sensorclear
  • sensorklean
  • sensorklear
  • separation
  • shadow
  • shadow pulling
  • shadows
  • shards
  • sharpening
  • sharpness
  • shoot through
  • shoot-through
  • shoot-thru
  • shooting technique
  • shootout
  • short
  • sigma
  • sigma 50-150
  • skin tones
  • skylight
  • Slik Mini Tripod
  • slingshot
  • slow
  • small
  • smooth
  • soft
  • softbox
  • sony
  • sony a99
  • sony rx100
  • sony t10
  • specular
  • speed
  • speedlight
  • speedlite
  • spinlight
  • spots
  • standard
  • stockholm
  • story
  • strap
  • strobe
  • strobist
  • studio
  • studio strobe
  • subject
  • substitute
  • sudden
  • summilux
  • sunrise
  • sunset
  • sweden
  • swivel
  • sync speed
  • t2i
  • t3i
  • Table top tripod
  • tamron
  • technique
  • techniques
  • tele
  • telephoto
  • thinktank retrospective 5
  • third party
  • tips
  • tokina
  • tonal
  • tonality
  • tone curve
  • toploader
  • toys
  • translucent
  • travel photography
  • tri-flash
  • Tribute
  • trifold
  • trigger
  • tripod
  • truth
  • ttl
  • TTL Cord
  • u43
  • ultra-wide
  • ultrawide
  • umbrella
  • underexposure
  • unlimited sync speed
  • up-rise
  • up-rise 15z
  • update
  • uprise
  • USM
  • uv
  • uwa
  • vanguard
  • versus
  • vertical
  • video
  • view nx2
  • visual science lab
  • vs
  • wadi rayan
  • wd caviar black
  • web
  • weekend
  • westin
  • white balance
  • white lightning
  • wide
  • wide angle
  • window
  • wireless
  • wireless flash
  • wireless release
  • wireless trigger
  • workflow
  • Yashica
  • yashica gtn
  • yashica st-7
  • yn-560
  • yn-560ex
  • yn-ex600
  • yn560
  • yong nuo
  • yongnuo
  • zack arias
  • zoom
  • zoom toploader
  • zuiko

Blog Archive

  • ►  2013 (165)
    • ►  December (5)
    • ►  November (10)
    • ►  October (8)
    • ►  September (7)
    • ►  August (3)
    • ►  July (11)
    • ►  June (10)
    • ►  May (15)
    • ►  April (19)
    • ►  March (33)
    • ►  February (24)
    • ►  January (20)
  • ►  2012 (193)
    • ►  December (17)
    • ►  November (22)
    • ►  October (34)
    • ►  September (47)
    • ►  August (12)
    • ►  July (11)
    • ►  June (10)
    • ►  May (13)
    • ►  April (13)
    • ►  March (8)
    • ►  February (1)
    • ►  January (5)
  • ▼  2011 (141)
    • ►  December (8)
    • ►  November (8)
    • ►  October (7)
    • ►  September (9)
    • ►  August (13)
    • ►  July (13)
    • ▼  June (19)
      • Creepy Ghost Portrait
      • Are You Ready for AlienBees?
      • Radiopopper JrX Studio Review
      • Tutorial: Sharpening Images For The Web
      • Flash Series - Part 7: LumiQuest Softbox III - Off...
      • Better Family Photos Index
      • Canon 60D vs 550D (and 600D): Real World Usage
      • Why I Love My Sigma 50-150
      • Flash Series - Part 6: Use Flash in Daylight? Really?
      • Flash Series Part 5: Remote Adjustment Radio Triggers
      • Backlight vs. Rim Light
      • DIY Passport Photos
      • Low-Key Self-Portrait
      • MK-RC7 review updated
      • Flash Series - Part 4: Triggering Your Hotshoe Fla...
      • Candlelight Photos Revisited: Birthday Cake
      • Preview of Upcoming Posts
      • Balancing Flash and Ambient: Candlelight Photos
      • Can You Stack 50 UV Filters? And Take a Picture?
    • ►  May (17)
    • ►  April (25)
    • ►  March (22)
Powered by Blogger.

About Me

Unknown
View my complete profile