Better Family Photos

  • Subscribe to our RSS feed.
  • Twitter
  • StumbleUpon
  • Reddit
  • Facebook
  • Digg

Thursday, 28 April 2011

Getting Directional Light Using Your Popup Flash

Posted on 00:47 by Unknown
 
 
Ever wondered if you can get good quality directional light from your DSLR's popup flash just like the big boys with external speedlites do? This is what we'll try to find today. Hit the jump for the details.

DISCLAIMER: If you feel this post is hastily made, then you're probably correct, I had only one hour to prepare the images and write the post because of time constraints, so excuse me, I will be revisiting this topic later on with more finesse.

Ever since I bought my first speedlite I wanted a Sto-Fen Omni Bounce diffuser, I had almost zero lighting knowledge back then and I thought this was how everyone used their external flash, but since we don't have great camera accessories shops in Egypt, all I was able to find was this strange looking thing:


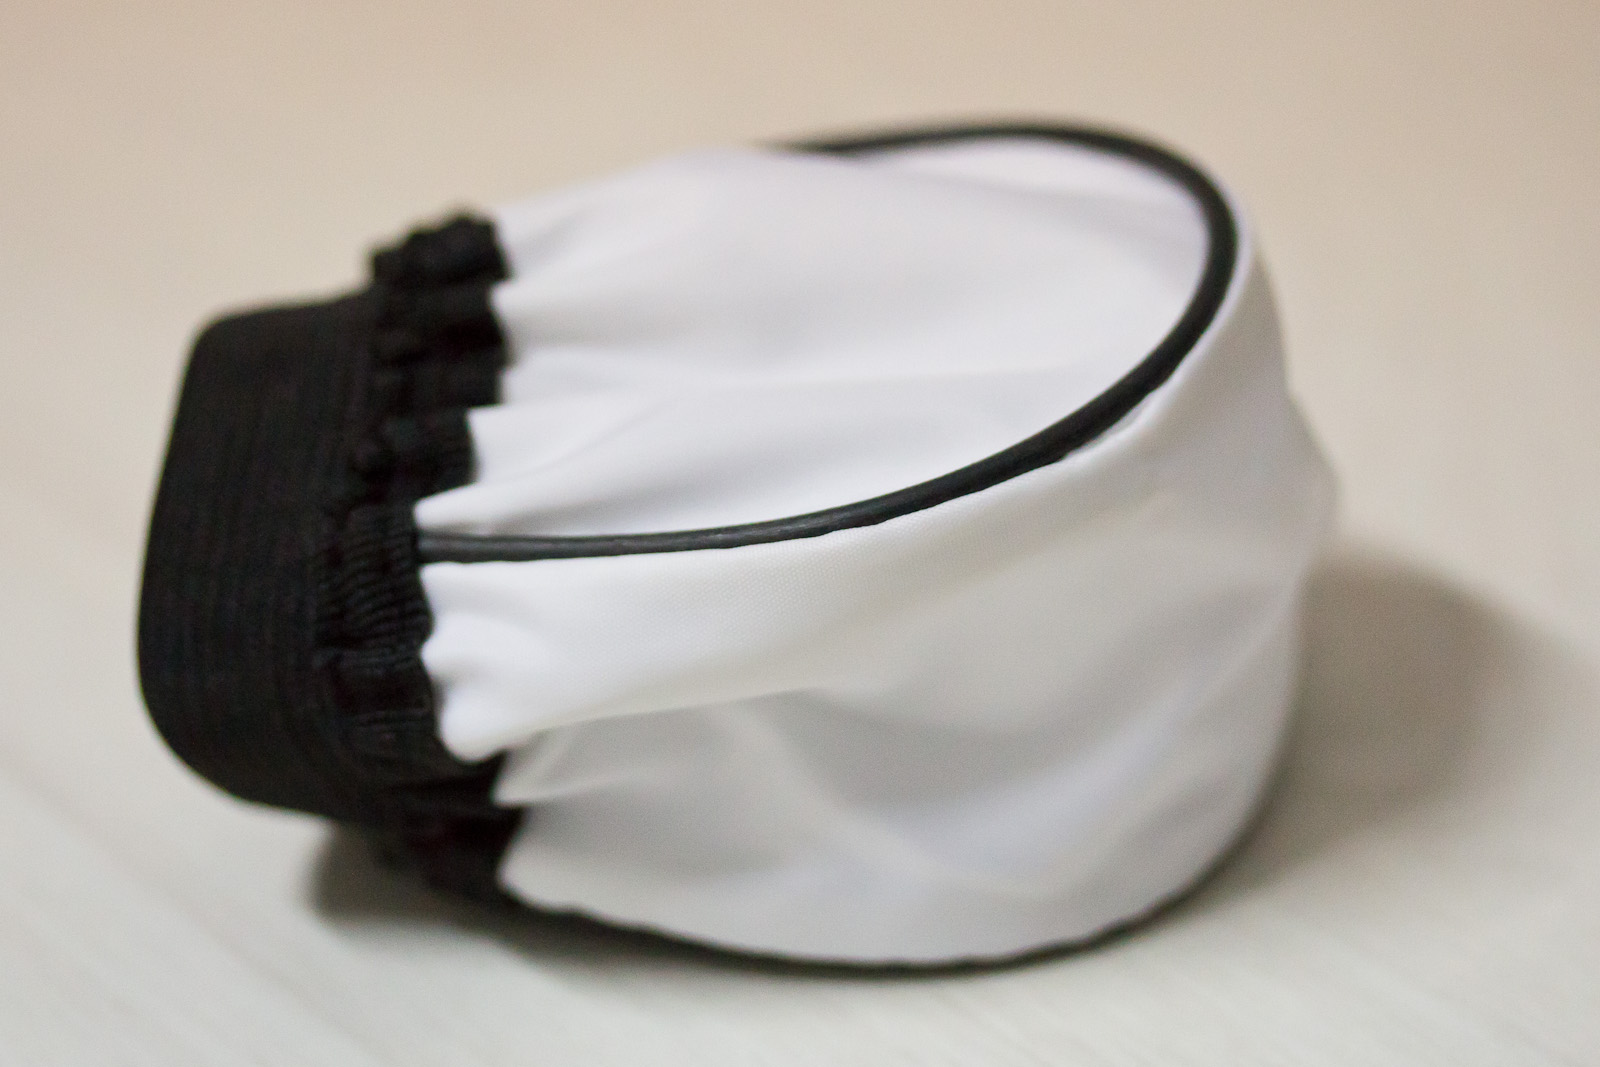
Excuse the lousy quality of the pictures but I really had no time (available light, handheld, ISO 1600), anyway, as you can see, this diffuser has a translucent white material at the top part, the sides and the front part, while the back part which looks black from the outside is lined with a bumpy reflective silver material from the inside. I think I bought this contraption for less than $6, and I also think it is supposed to fit on the speedlite's head some way or another, but I was never able to find any use for it with my flashes and it sat gathering dust for a long time.

Then one day I had the idea of using it on my camera's popup flash to bounce light of walls, can it work? Does the popup flash have enough power to get through the diffusing material, bounce from the wall and back to the subject and still give acceptable exposure? I know that new sensors now can deal with ISO 1600 with almost no noise, but will this be enough?

 
I think my camera's popup flash  guide number is 13 or something, while the speedlites have guide numbers of 40 and more, but even then, I remember that in several situations my speedlite didn't need to use full power to successfully bounce and give me a good exposure. So to try this idea I started off with a high shutter speed to kill the ambient and see how the flash did on it's own, I even started with ISO 400 to challenge the flash even more. I will be using f/2.8 aperture throughout the post, needless to say, this whole article is talking about indoor shooting.

Base Exposure - f/2.8, 1/250 sec, ISO 400

Direct Flash - f/2.8, 1/250 sec, ISO 400
I forgot how ugly direct flash looks, I left that years ago when I sold my point & shoot, and no matter what I tried to do with the white balance I was never able to get any better results.

Directional Popup Flash - f/2.8, 1/250 sec, ISO 400
As you can see here, the picture looks way better than direct flash alone, I put the diffuser thing over my popup flash with the reflective material facing almost towards me but an angle to reflect on my right side. I also put my hand in front of the flash to prevent any stray direct flash from reaching my subject, but as you can see from the catch lights I was not 100% successful.

Directional Popup Flash - f/2.8, 1/250 sec, ISO 800
I was not getting enough light from the flash, so I pumped the ISO to 800 and the result looked even better. Next I wanted to try getting some ambient light to work in my favor, remember that in bounce flash situations we don't always get light by using the flash alone, we use it to enhance the available light, so I dialed my shutter speed to 1/160 sec and kept the ISO at 800.

Base Exposure - f/2.8, 1/160 sec, ISO 800

Directional Popup Flash - f/2.8, 1/160 sec, ISO 800
You can see even better results with the ambient light (fluorescent lamps) contributing to the exposure, and I was able to shield the direct flash with my hand better in this one.

You might be wondering by now why go through this hassle and not shoot available light directly, two reasons, first, for the sake of experimentation, I am a geek and I like to try things, and secondly, because it looks way better than overhead available light that throws ugly shadows, see for yourself.

Available Light Only

Popup Flash Diffused Light (and no, the difference is not in WB alone)
Anyway, to sum this up, I was very happy with the results and I will definitely return to this topic with more ideas, but because of the short time I have to end here, if you have any comments or ideas please share them, and excuse any typos, I didn't proof read this post.
Read More
Posted in directional, flash, light, popup, portrait | No comments

Wednesday, 27 April 2011

Nikon 50 1.8G officially announced

Posted on 14:58 by Unknown
Check out the product page:
http://www.nikonusa.com/Nikon-Products/Product/Camera-Lenses/2199/AF-S-NIKKOR-50mm-f%252F1.8G.html
 
Key differences in specs from 50 1.8D:
- This is an AF-S lens meaning it has a silent wave motor (SWM).  Can autofocus on entry-level Nikons that don't have a focusing motor.  Should focus quickly and quietly.
- M/A switch.  Allows manual override of autofocus.
- Has one aspherical element, which should reduce aberration.
- As a G lens, it doesn't have an aperture ring.  On some film bodies, aperture can't be controlled in A or M mode (it can be indirectly controlled in P or S mode).
- Minimum aperture f/16 vs. f/22 for the 1.8D.
- Filter size 58mm vs 52mm for 1.8D.
- The product page makes a big deal about the bokeh.  I'm no bokeh hound but will be looking into this.
- The product page mentions Super Integrated Coating (SIC) to reduce flare but even the 1.8D already has that.
- MSRP: $220 vs. $135 for the 1.8D.
Read More
Posted in | No comments

Lightroom 3.4 and ACR 6.4 released

Posted on 14:36 by Unknown
New camera raw files supported, new lens profiles added (a bunch of them for Pentax lenses; also added Nikon 18-105 VR and Nikon 55-200 VR), plus some bug fixes.
 
For a list of the changes check out:
http://blogs.adobe.com/lightroomjournal/2011/04/lightroom-3-4-and-camera-raw-6-4-now-available.html
 
To download the update go to:
http://www.adobe.com/downloads/updates/
Read More
Posted in | No comments

Tuesday, 26 April 2011

Checklist for Moving Lightroom

Posted on 13:25 by Unknown
I'm pleased to report that I migrated my Lightroom successfully. If you have a new computer or need to reformat your current computer, be aware of some migration pitfalls for the unwary.
BACKSTORY
I wish I had to migrate my Lightroom because I had a new computer.  Instead it's because my PC was plagued with a stubborn virus.  I couldn't get them all even with 3 antivirus programs installed, and I was getting so many antivirus alerts (several per second) that my computer became unusable.  Finally I hit the proverbial Big Red Button and reformatted my PC which is now back to normal.
LIGHTROOM'S BACKUP CATALOG
Before I reformatted my computer, I was very concerned about Lightroom.  I didn't want to lose all my edits or my photos.
Everyone knows that Lightroom has a built-in function for backing up a catalog.  However, if you don't read the fine print, you may be in for a surprise.  The backup catalog only includes the catalog itself.  It does not include:
  • the photos themselves
  • sidecar files (with edits)
  • previews
  • slide shows
  • web galleries
Let me add a few more to that list:
  • presets (unless you select "Store presets with catalog")
  • plugins
  • custom preferences
  • custom lens correction profiles
  • camera profiles
  • I haven't tested this but I think it also may not include collections and publish services settings either.
Losing all that would be a nightmare!
HOW I MIGRATED LIGHTROOM
Fortunately, in my revived computer, Lightroom now looks pretty much like it did before I formatted my computer.  I didn't rely on the backup catalog or even the export catalog command.  Instead I took these steps:
1. Note the location of your photos, slideshows, and galleries (again, they are not part of your catalog).  Copy all those files into an external drive.  In my case, my photos already reside in an external drive.
2. Note the location of the Lightroom catalog (see under Additional Resources below re default file locations).  Copy the whole Lightroom folder into an external drive.  Confirm by checking the total number of files and file size of the original Lightroom folder and the copied folder.
3. Note the location of each of the following and copy them to the external drive (see under Additional Resources below re default file locations):
  • Presets (if not stored with the catalog).
  • Plugins
  • Preferences (note: if you're moving from PC to Mac or vice-versa, preferences are not cross-platform)
  • Custom Camera Profiles
  • Custom Lens Correction Profiles
*Note that the folder AppData is a hidden folder in Vista.  You need to go to Control Panel then select Folder Options and view hidden files.

4. In your new computer, install Photoshop or Photoshop Elements (if you have either) before Lightroom so that when Lightroom is installed you'll automatically get the option for roundtrip editing in those programs.
5. Install Lightroom, including updates.  Exit Lightroom.
6. Start copying back all the files you copied from your old PC, and place them in the same directory locations:
  • photos, slideshows, galleries
  • replace the new Lightroom folder with the copied Lightroom folder from your old computer
  • Presets (if not stored with the catalog).
  • Plugins
  • Preferences
  • Custom Camera Profiles
  • Custom Lens Correction Profiles
7. Relaunch Lightroom.
Voila.  It will look like you never left (well, almost -- I had to re-register one of the plugins).
ADDITIONAL RESOURCES:
Lightroom Queen - How Do I Move Lightroom to a New Computer
Lightroom Queen - Default File Locations
Read More
Posted in | No comments

Monday, 25 April 2011

Glowing Air: Volumetric Lighting

Posted on 05:59 by Unknown
2011042315-D70-_DSC2247.jpg

One of my favorite lighting effects is volumetric lighting.  Normally, we see light only when it hits a solid surface or some liquids.  We usually don't see it in the atmosphere itself.  But when there's smoke, dust, fog, steam, water droplets, or other small particles in the air, light becomes visible.  This is the underlying principle for crepuscular rays (sunbeams).  It's also an effect often used by one of my absolute favorite photographers, Rarindra Prakarsa, and to me it looks pretty darn cool.

I met up with some fellow strobists from my local photography club over the weekend and practiced some strobist setup shots at a local park.  There was this spot where steam was coming out from some vents.  We used it as an opportunity to take some shots, and I liked the results.

2011042315-D70-_DSC2238.jpg

Anyway, here are a few more examples of volumetric lighting:


Got some more samples of volumetric lighting?  Pls. share them in the comments!  [ Readers from New York and the UK, I'm looking at you! :) ]
Read More
Posted in beams, lighting, rays, strobist | No comments

Sunday, 24 April 2011

Portrait On a Crop Sensor: 35mm vs 50mm

Posted on 01:02 by Unknown
NON SUBJECT RELATED INTRO:

Before I begin I'd like to apologize about my lack of contribution lately, but after I thought my schedule was stable once again after my return trip from Malaysia, it got unsettled again and we have a very long vacation here (almost 10 days), and I will be traveling to the red sea and taking tons of pictures there.

I already have a long queue of new equipment that I want to talk about and I promise you I will do, so today's post will be a quickie.

THE REAL POST:

While in Kuala Lumpur I went to a nice camera shop where I had the opportunity to try the Sigma 50mm f/1.4 lens, and since there was only me and the shop owner inside I took a quick available light portrait of him using the Sigma 50mm f/1.4 and the Canon 35mm f/2 that I had with me at the time.

I didn't move back or move my subject between the shots, and I shot both lenses wide open, and the Sigma nailed the focus perfectly. You can see in the pictures below the difference in DoF (I calculated it and the DoF for the Sigma at this distance was like 5 cm, while it was 14cm for the 35mm) and how tight the 50mm is (look at the objects in the background). You can also see the effect of the different focal length on his face, I will leave you to observe both pictures for yourself, but it is obvious that longer focal length results in more pleasant portraits.

P.S. The 35mm equivalent focal length for both of these lenses are 56mm and 80mm.

Canon 35mm f/2 @ f/2

Sigma 50mm f/1.4 @ f/1.4
Read More
Posted in 35mm f2, 50mm f/1.4, canon, crop sensor, portrait, sigma | No comments

Friday, 22 April 2011

Quick and Easy Portrait

Posted on 10:09 by Unknown
Here's a simple family portrait I took at our living room that took no more than 5 seconds to do.  All I did was to take a shot in front of a wall.  The clean background can simulate a seamless background at a studio.
The trick to making it work is the lighting.  If you use a pop-up flash or direct flash, the subjects' shadows will be clearly visible on the wall, which won't look very good.  Instead, you have to use a soft light source such as light from a large window (as long as the sun is not shining through it directly on your subjects) or bounce flash (with the flash facing away from the subjects).  In the shot above, I used both ambient light (from a patio door behind the camera) and flash bounced to a ceiling camera rear and right, on TTL mode.
If you don't have an external flash, try using ambient only.  If the ambient is too dim and a popup flash is all you have, at least move the subjects away from the wall so that their shadows hopefully don't show against the wall.
Read More
Posted in | No comments

Thursday, 21 April 2011

World's Largest On-Camera Softbox: the Fotodiox 8x12

Posted on 04:45 by Unknown

I've been looking for a hands-free on-axis fill solution.  I've tried the Coco Ring Flash, which worked pretty well and got me the results I wanted.  However, I find it quite bulky and inconvenient to carry.  I wondered whether a small softbox fitted to an on-camera flash would work as well.  I found the Fotodiox 8x12 Softbox from Amazon and gave it a try.  How well did it work?  Hit the jump to find out!


The Fotodiox 8x12 softbox is a foldable mini-softbox designed for hotshoe flashes.  What sets it apart from dozens of other similar hotshoe softboxes is its size.  Fotodiox seems to have chosen the largest size that can still allow the softbox to be used with an on-camera flash.  At 8 inches by 12 inches, its surface is 33% larger than that of the 8 x 9 inch Lumiquest Softbox III, which to my knowledge was the previous recordholder for largest on-camera softbox.  The Fotodiox's extra size translates to a little extra softness.

In the real world though, even at 8 x 12, it can't get you the same soft light as bounced flash, or a large modifier like a more typical-sized softbox or umbrella.  For my purposes though, I was planning to use the 8x12 as on-axis fill.  Other than the Coco Ring Flash, my alternatives would have been popup flash (which is closer to the lens axis but a much smaller and thus harder light source) or on-camera hotshoe flash (not as close to the lens axis and a hard light source as well).  Mr. Strobist did have an innovative technique for handholding a hotshoe flash immediately beside the lens, which I've tried and works very well, but I wanted a hands-free solution so I can use another flash handheld (such as with a handheld umbrella).


The 8x12 is made of fabric, with no solid frame.  The exterior seems to be ballistic nylon.  The shooting surface is made of some sort of polyester, which I believe is similar to that of a "real" softbox.  The interior is texturized silver (not just smooth silver) to help spread the light more evenly and avoid hotspots.  There is also a built-in baffle inside, also made of polyester, to further reduce hotspots.  The baffle is attached to one side and is used by velcro-ing it to the opposite side of the softbox interior.


The 8x12 comes flat.  To use it, I simply fluff it up and attach it to the hotshoe flash using the built-in velcro strap.  The underside of the velcro strap is a bit rubberized to allow the 8x12 to grip the flash more securely.  Nice touch.  I'm confident it will stay on except in extremely strong wind.  At the same time, if it gets knocked off by accident, I'm sure it won't rip the flash head off with it.  Because the 8x12 has no frame per se, it can be somewhat floppy.  I like to use mine with the logo facing downward, which seems to keep it more level than otherwise.

I was pleased to find out that even with a 17mm lens (25.5mm equivalent) and a Nikon SB-600, the softbox did not block the lens -- barely.  With that combo, if the softbox tilts down slightly, it will show up in the shot.  It helps to use the lens hood to keep the softbox from tilting down.

LIGHT LOSS
I still don't have a flash meter.  I estimated light loss using the same testing protocol as with the Coco Ring Flash (I fired bare flash in manual mode and then fired the flash with the 8x12 inserted at the same power, then compared the apertures that yielded similar histograms.)  Using this protocol, it seems that the 8x12 eats up a little more than 3 stops of light compared to bare flash.

With Softbox: 1/128 manual power, f2.8 @ ISO 200

Bare Flash: 1/128 manual power, f/8 @ ISO 200

TEST SHOTS
Here are some test shots in TTL mode taken at sync speed to minimize ambient, all basic JPEG, straight-out-of-the-camera with no adjustments whatsoever other than resizing (except for the one shot below).  Note: there is a yellow tinge in the bottom right hand corner -- that's the desk lamp I used to help me focus on the target (because the 8x12 blocks the AF assist light of the hotshoe flash).

Here's what the 8x12's light looks like by itself and as on-axis fill.  I was about 2.5 feet from the mannequin head, and the wall was about 1.5 feet behind the mannequin head:
8x12 softbox only (SB-800)

Bare flash only (SB-600)

Bare flash as key (SB-600) + softbox as fill/commander (SB-800)
As with the Coco Ring Flash, it seems that TTL gets confused.  I think it's because the flash is facing forward, which causes the camera to use the distance data as part of its TTL calculations.  With a +1.5 exposure adjustment in Lightroom 3, the shots look like this:


"REAL WORLD" SHOTS
I was able to use the 8x12 in real world shots.  For these shots, we were in the desert and the sun was blazing.

Here is a comparison between a shot without flash, and a similar shot with the softbox.  Again SOOC, basic JPEG, no adjustments other than resizing.
No flash

With flash and softbox
MACRO USE
I also tested the 8x12 as a light source for macro flash.  Note: I only tested with the Tamron 17-50 VC (1:3 ratio), not a true macro lens.  These are SOOC, no adjustments.
Without flash

With flash and softbox

SUMMARY


Here are some of the things I like about the Fotodiox 8x12:
  • currently about half the price of the Lumiquest SBIII
  • 33% larger than the 8x9 SBIII.
  • The interior surface is not just white or smooth silver.  It has a bumpy silver surface which I think helps the light spread out more evenly inside the box and reduce hotspots.
  • Can still be used for on-camera flash.  Light enough that it doesn't seem to strain the flash head.  
  • Does not block the lens at 17mm (25.5mm equivalent) -- the main reason I didn't get the Lumiquest LTP.
  • Includes a built-in velcro strap and rubberized interior strip to grip the flash head without the need for a cinch strap.
  • Includes a built-in internal baffle for extra diffusion.  I haven't been using it though.
  • Much more portable than a ring light.
  • Includes a convenient carrying bag with a small strap that I can attach to my camera bag.
  • 2 yr warranty.
What I don't like about it:
  • It is not rigid and doesn't have any kind of frame, so the sides don't straighten out perfectly.  It flexes like starched dinner napkin.  But even if the sides aren't evenly straightened it seems that the light still looks even (even if I don't use the internal baffle). 
  • Takes a few seconds to unfold it, "fluff" it up, and attach it to the flash.  I think it would be faster if the sides had some rigidity.
  • Not 100% perfect for fill light because it still casts a shadow.
  • Blocks the AF assist light from the hotshoe flash.
  • Very tight fit on the YN-560 (which I think has the exact same dimensions as a 580EXII).
  • The front part is some sort of thin polyester fabric -- I'm concerned that it might get damaged.  However, from what I gather, that's the same type of material used in 'real' softboxes.
  • Carrying bag is extremely thin.  I doubt the bag will last a long time.
Where does the Fotodiox fit in my gear options?  If I'm in a fully controlled environment and wanted fill light, I would use bounce flash, an umbrella, or regular-sized softbox to minimize shadows.  If I'm shooting run-and-gun the whole day (e.g. as an event photographer), the Coco Ring Flash seems to provide less noticeable shadows (because it's closer to the axis).  But for everyday shooting purposes, which require me to take my camera in and out of my camera bag, or when I'm not sure if I'm even going to take any photos, bringing the Coco Ring Flash is too inconvenient, and I would instead use the Fotodiox 8x12.  That's why the Fotodiox's carrying bag has been firmly attached to my camera bag ever since I got it.

If you'd like to get the Fotodiox 8x12 from Amazon, here's the link (note: it's an affiliate link - thanks for helping to support the blog!).

Here are a few more shots with the softbox:


photo taken by my dad!
Read More
Posted in 8x12, flash, fotodiox, lighting, lumiquest softbox III, on-camera | No comments

Wednesday, 20 April 2011

Alternative Full Frame Lenses for Nikon

Posted on 16:28 by Unknown
Updated: 4/14/12

The successor to the D700 is anticipated to be released this year.  I'm one of those who are looking forward to that as an opportunity to move up to full frame, either by getting a good price on the current D700, or getting the successor. 
Of course, one of the deterrents to upgrading to full frame is the cost of the lenses compared to similar DX lenses.  Fortunately, even without considering third party alternatives, there are relatively less expensive full frame Nikon lenses that still perform fairly well.  Have a look (unless otherwise noted, lenses are Nikon and prices are for new lenses):

Wide angle zoom
Small sensor: 10-24 ($900), 12-24 (~$1000), Sigma 8-16, Sigma 10-20, Tokina 11-16 2.8, Tokina 12-24 f/4.
Ideal full frame: 14-24 2.8G ($1800), 17-35 2.8D ($1769),  16-35 f/4G VR ($1259).
Decent full frame alternative: 20-35 2.8D (~$700? used), 18-35 f/3.5-4.5D (~$600), Sigma 12-24 ($900), Tokina 16-28 2.8 , Tokina 17-35 f/4

Standard zoom
Small sensor: 17-55 ($1479).
Ideal full frame: 24-70 2.8G ($1829).
Decent full frame alternative: 28-70 2.8 AF-S (~$1000), 24-85 3.5-4.5 VR ($599), Tamron 24-70 2.8 VC ($1299), Tamron 28-105 2.8, 24-85 f/2.8-4D ($680), 24-85 3.5-4.5G (~$300 used)

Telephoto zoom
Small sensor: 55-300 VR ($345), 55-200 VR ($235), Sigma 50-150 OS (TBD)
Ideal full frame: 70-200 VR II ($2600)
Decent full frame alternative: 70-200 VR I (~$1600 used), 80-200 ($1225),  70-300 VR ($540).

Walkaround lens
Small sensor: 16-85 VR ($700).
Ideal full frame: 24-120 f/4G VR ($1200). 
Decent full frame alternative: Tamron 28-105 2.8, Nikon 28-105 3.5-4.5D (~$200 on ebay).

Portrait prime
Small sensor: 50 1.4G ($485), 50 1.4D ($369).
Ideal full frame: 85 1.4G ($1700), 85 1.4D ($1220), 105 2.8G VR, 105 f/2 DC, 135 f/2 DC
Decent full frame alternative: 85 1.8G ($499), 85 1.8D ($470)

4/1/12: I will be reviewing the Nikon 28-70 2.8 and the Tamron 28-105 2.8.
Read More
Posted in | No comments

It's Like Getting Gear for Free

Posted on 14:10 by Unknown
Do you want free gear?  A lens or a flash perhaps?  Here are my favorite ways of getting gear painlessly.
1.  Change we can believe in.
I put all my spare change in a jar.  After a while it adds up.  Ask your bank if they will convert coins into cash.  If not, try Coinstar.  Coinstar normally charges a 9% fee but if you choose to receive your money as a gift certificate with certain partners, there's no fee.  Fortunately, one of those partners is Amazon, which usually has pretty good prices.  Recently I brought a jar of coins to my local Coinstar and got a gift certificate for $88. That's easily enough for a Yongnuo YN-560!
2. Let your bank work for you.
Some banks have reward programs.  I use Citibank, which offers ThankYou points that can be redeemed for stuff.  Signing up for ThankYou points doesn't cost me anything and I would use Citibank's services anyway, so this is like getting something for nothing.
Citibank's ThankYou rewards are pretty diverse and even includes a Nikon SB-900 (81,100 points).  However, I find I get a better deal by trading my points for gift certificates with their partners.  A couple of those partners have camera gear: J&R and Best Buy.  I find that J&R (jr.com) usually has decent prices that are often comparable to Amazon's.
A few tips:
  • Check if you get more rewards for your points if you choose higher denominations.  For example, for J&R, a $50 certificate is 6,000 points while a $100 certificate is 10,000 points (17% discount).
  • With some partners, you're limited to only one certificate per transaction.  It pays to read the terms and conditions.
  • Some rewards are available only to Citi credit cardholders with ThankYou points.  You may want to sign up for such a card to get more for your Thankyou points (last I checked, there was no annual fee).
  • With Citi's program, you can earn points by using your debit card.  That's one reason to use a debit card instead of a credit card.
3. Charge!
Many credit cards offer rewards.  It seems to me that the best ones end up with only around 1% cashback, whether it's in the form of cash, rewards, or whatever.  I found a few exceptions to the 1% rule, though:
  • Discover: if you exchange your points for gift certificates with certain partners, you effectively get more than 1%.  Here are some of those partners (with camera gear): Brookstone: 50% bonus.  Crutchfield 25% bonus.  Barnes & Noble: 11% bonus.  Dell: 11% bonus.  Overstock.com: 11% bonus.
  • Target: this won't get you free gear per se, but this is a great way to save.  If you have a Target credit card, you get 5% discount both at their retail stores and online.  In addition, for every $1,000 you spend you get a 10% discount card for retail stores *and* a 10% code online.  Best of all, the 10% discount is combined with the 5% Target card discount, effectively resulting in a 15% discount!  The net effect is that as long as you use the 10% discount card for a purchase that's more than $100, you effectively get more than 1% cashback.  For example, if you use it to buy a $1000 camera, then you'll get a $100 discount (on top of the 5% discount).  The extra $100 discount you got for spending $1,000 to get the points is like a 10% cashback - far higher than the usual 1% cashback.  Update: Target has canceled its rewards program.
Target's prices aren't always the lowest especially when compared to online prices (though one time I found a Transformers toy at Target for less than $10 while Walmart was selling the same toy for $12).  However, there are some items that are almost the same price anywhere -- online or retail.  Apple and some Nikon products for example.  On those items, a 15% discount is huge!
Just a reminder: credit card interest rates tend to be pretty high.  That's why I always pay my card in full and never carry a balance. ;)
Read More
Posted in | No comments

Tuesday, 19 April 2011

Mitchell Kanashkevich's Seeing the Light

Posted on 14:10 by Unknown
When I first learned about lighting and flash, my head was full of knowledge about how to control the light and use techniques such as using the flash off-camera to control its direction, balancing flash and ambient, all that good stuff.  What was missing was how to use all that technical knowledge in a way that gave me good results. 

If you're in that spot, this book is for you.  Hit the jump to see why I love this book AND to get an amazing offer!


I read a lot about lighting and most of the books and websites I've seen discuss the mechanics of lighting, such as how to control its quality, direction, intensity relative to ambient, etc.  However, the technical aspect of lighting is only a part of the lighting equation.  Knowing that we can bounce light for example, doesn't tell us where we should aim the light for best results.

That's where Mitchell Kanashkevich's Seeing the Light comes in.  Mitchell is an award-winning travel photographer.  In this book, he discusses his techniques for using three lighting tools: flash, reflector and natural light.

As he explains in the book's intro, Mitchell usually doesn't have the time or manpower for complicated lighting setups, and that's why his techniques are usable for many readers of this blog.  You don't need a crew or a truckload of lighting gear to shoot the way he does.  In all of the examples in the book, he uses only one hotshoe flash or one reflector.  That's it.  Very practical and doable.

As I mentioned, the reason I recommend this book is because it addresses the other part of the lighting equation, which I might call lighting design.  In Seeing the Light, Mitchell doesn't just talk about the technical aspect of how the lighting was setup, but *why* the lighting was setup that way.  His rationale for his lighting setup is consistently applied throughout the examples in the book (with great results).  And if you're looking to get direction about lighting design, this book will help you and show you the approach Mitchell uses to get his results.

Speaking of results, great lighting is just one of the key elements in Mitchell's photos.  Mitchell also uses post-processing techniques to bring out the best in his photos, and that's why you ought to pay attention to this amazing offer:  You can get the two e-books, Seeing the Light and Understanding Post-Processing (reviewed here) for the price of one ebook!!!  Isn't that awesome?  Just purchase both through the two-in-one link on Mitchell's site ( http://mitchellkphotos.com/two-in-one.html ) and enter the code "betterfamilyphotos".  If you must know, I get no commissions or anything -- this is purely a favor from Mitchell to our blog readers.  I don't know how long this offer will last -- be sure to take advantage of this offer before it's gone!
Read More
Posted in lighting | No comments

Saturday, 16 April 2011

Layers

Posted on 10:35 by Unknown

OK, this post has a little something for beginners and intermediate shooters alike. :) 

Tip: consider using a cheap mini-tripod with a ballhead like the one pictured above to position your off-camera flash.  You won't get much difference in terms of height but what you do get is a little more flexibility in positioning the flash head, especially being able to tilt the flash downward more than 7 degrees.

That's it folks - enjoy your weekend...  Just kidding.  Hit the jump.

The shot above is pretty simple and I thought I'd be done in a minute and work on my taxes.  Instead, it took me a little more than an hour to do, with about 50 test shots.  I suppose experienced strobists might not even flex their photographic muscles in the slightest with that shot.  But, you know, this is Better Family Photos: Techniques, Tools and Resources for Family and Candid Photography.  I take mostly people photos and not a lot of product photos or setup shots.

Anyway, the first shot looked like this:

It was really simple.  On-camera flash (SB-800) bounced to a wall and ceiling high camera left to create kind of a short light effect.  Flash exposure was TTL, 0 FEC if I recall correctly.  I thought it looked mediocre but somewhat passable by my it's-Saturday-night-and-I'm-kinda-sleepy standards.

Then I thought the shadow side of the flash looked a little too flat.  I thought it would look nicer if the corners on the side of the flash had a specular highlight, analogous to a rim light.  From that point, things snowballed until I got the final shot which was pretty close to what I had envisioned:
  • The flash has prominent highlights on the corners.  I initially placed a flash on camera right which did produce highlights but they illuminated the side a bit too much, diminishing the impact of the highlight.  Instead I got a reflector, then aimed it for maximum highlight.  I blasted the reflector with an SB-600.  I also put a 5 degree grid on the SB-600 to minimize spill on the background and on the flash itself.  A bright continuous light source would have made things much easier.
  • I wanted the flash to look like it was firing but I was concerned it would be too bright or would cause flare.  Instead, to make the flash look like it fired, I aimed an SB-800 at the floor.  The light would reflect back at the flash head and into the lens, making the flash head look like it fired.  In addition, the light from the floor would look like light from the YN560.
  • I was wearing a red shirt that was reflecting into the flash head.  To disguise my reflection, and to create more contrast in the flash head, I draped a black cloth over me.
It seems like a lot of effort for just minimal results.  However, I benefited from practicing problem-solving for setup shots.  I plan on getting some more practice and honing my setup skills.


      Read More
      Posted in | No comments

      Friday, 15 April 2011

      Dealing with GWCs

      Posted on 11:48 by Unknown
      I learned a new word the other day: GWC (guy-with-camera).  It's a word used derisively by some pro photographers, pretty much synonymous with Uncle Bob.  (Ladies, you're not off the hook -- there are also MWCs moms-with-cameras.)  I suppose I would be deemed a GWC, and thought about suggesting a solution for pros.
       
      Pro Perspective
      I'm not a pro but from what I understand, some pros who shoot events don't like guests who are so enthusiastic in taking pictures that they crowd out the pro and get in the way of good shots, making the pro's job much more difficult.  I can certainly empathize.  During our wedding a few years ago, my well-meaning brother and uncle were getting in the way of the photographer we hired.  I had to remind them to move out of the photographer's way.
       
      Another reason some pros don't like GWCs is because some GWCs are mediocre or unskilled photographers, but they offer their services as a photographer to the host/bride/groom, who end up with pictures that don't do justice to the wedding or event.  Meanwhile, the pro photographer, who could have given better quality photos, loses a sale.  A losing proposition for the host and the pro.
       
      A GWC's Perspective
      When I go to a party or wedding, I like to take photos.  Both to improve my skills and hopefully come up with some images the hosts will like.  In deciding whether to take photos, I try to observe the context.  If the hosts have hired a pro, then I'm going to assume the pro will serve their needs and I will take only photos for myself (e.g. taking a photo of our toddler, etc.).  Such was the case, for example, at this pool party. 
       
      If the hosts look like they could use a photographer but they don't have one, then I will tend to shoot a little more, but I still make sure to respect boundaries and stay reasonably discreet - I won't do anything a guest shouldn't be doing.  Hence my low key (ha!) approach at this egg hunt party.  (Alternatively I might ask the hosts beforehand if they'd like me to help them take photos.)
       
      A Suggestion
      If you're a pro and there are GWCs around, here's a suggestion for dealing with them: consider using them as free labor.  (Definitely ask your client/host if it's ok first of course.)  But my point is that GWCs are usually just trying to be helpful, so why not ask them for help?  
      • Maybe they can be a VAL for one or more shots, or they can hold a reflector, etc.  From the GWC's perspective, they would probably be happy to participate in the making of a photo.  I know I would :)
      • Ask them to help you herd guests or keep other guests out of the shots.
      • Maybe you can even ask them to take photos from particular perspectives, or photograph particular subjects you didn't have time to shoot.
      Of course you wouldn't actually rely on GWCs (i.e. ask them to do anything mission-critical), but at least by redirecting their enthusiasm, you can reduce distractions to you and maybe as a bonus get some help in the process.
      Read More
      Posted in | No comments

      Thursday, 14 April 2011

      Coco Ring Flash - First Impressions

      Posted on 01:14 by Unknown

      A few weeks ago, after much deliberation, I finally decided to get a ring flash adapter.  My purpose was to use it as on-axis fill, much like how David Hobby often uses a ring flash adapter.  Here are my impressions from having used it briefly.

      OPTIONS
      David uses the Ray Flash and the Orbis, both of which are around $200 each (see his comparison here).  I unfortunately don't have the budget for that.  Instead I got what seems to be a knockoff of the Ray Flash, the Coco Ring Flash.  There are other cheap ring flash adapters such as the Cowboystudio Ring Flash and the Saturn Ring Flash.  What made me pick the Coco was that I was skeptical of the light quality from the horseshoe-shaped CowboyStudio Ring Flash.  Between the Coco and Saturn, they looked pretty similar and the Coco was significantly cheaper, so that's what I got.

      BUILD QUALITY / DROP TEST:
      I had really low expectations for build quality based on the Amazon reviews.  However, it wasn't as bad as I feared.  It's probably not very sturdy but it's not as fragile as an egg or ready to fall apart.  In fact, I dropped mine by accident from a height of about 3 feet (it got knocked off) onto a hardwood floor and it survived with only a tiny crack on one corner.  It still works ok.

      The construction would not be mistaken for DIY.  However, the build isn't very polished.  It looks like it was hastily assembled, because of extra glue around some bits.  However, from a functional point of view, I don't have any complaints about it, and I think it's not overpriced.

      FIT ON SB-800 AND SB-600:
      There actually isn't a Coco flash available for the SB-800 and SB-600.  They only have units for the SB-900, the Canon 580EXII, and the Sony HVL-F58AM.  (On the other hand, there is a Ray Flash specifically for the SB-800).

      Not surprisingly, this SB-900-sized Coco adapter was much too large for an SB-800 or SB-600.  However, the packaging came with a very thick and dense rubber foam to prevent the Coco from moving around during shipment, and the thickness of the foam was just right to fill the gap between the adapter and the SB-800's head.  It also fits on the SB-600, albeit with a slightly less snug fit.  I cut up the foam to about the size of the top of the SB-800's head.  There's also a knob on top that pushes a plate down but it doesn't have enough thickness to substitute for the rubber foam.

      To further secure the adapter to my flash units, I taped some velcro on the inside of the adapter:

      When I use the adapter, I first mount the flash on camera, insert the adapter over the flash head (each of my flashes have velcro around them), then I insert the rubber foam to hold the adapter securely:

      The process is a bit cumbersome, but once inserted this way, the ring flash won't move unless you really try.

      BTW, the shot at the top of this post is with the Coco mounted on an SB-600 and a D300.  It's a little off-center.  With the Coco mounted on an SB-800 and the D300, the Coco is close to centered.

      LIGHT LOSS:
      I don't have a flash meter, so I can only estimate the light loss. I fired bare flash and then fired the flash with the ring flash inserted, then compared the apertures that yielded similar histograms.  Using this protocol, it seems that the ring flash eats up about 3 1/3 or 3 2/3 stops of light compared to bare flash.

      PERFORMANCE - PORTRAIT
      My main purpose for this ring flash is for photos of people.  Here are some test shots showing the effect of this ring flash adapter on portrait-type shots.  These were just quick tests, so the flashes here are all on TTL.  These are also straight-out-of-camera with no adjustments, to give you a hopefully more accurate idea of what to expect in terms of diminished TTL accuracy.

      SB-800 with Ring Flash only
      Key light only (bare SB-600). No ring flash.
      Bare SB-600 as key, SB-800 with Coco Ring Flash as fill/commander

      PERFORMANCE - REAL WORLD
      What I was most interested in was whether this ring flash would work as a good fill light option for real world shots.


      In all of these photos, it isn't obvious to me that flash was used -- which is ideal, especially for fill light. 

      PERFORMANCE - MACRO
      By special request, I took macro shots with the Coco.  I'm not a macro shooter, and I don't know what macro shooters look for in terms of lighting.  I don't have a real macro lens but I do have a Nikon 28-105 which goes up to 1:2.  Anyway I took these test shots - again, SOOC with no editing whatsoever.  Please click on them to get higher resolution 1600px versions (remember to click on the "+" to zoom in if necessary).


      This plant was swaying in the breeze, so it was hard to focus especially with no AF Assist.
      Another plant/weed
       
      Crop from the shot above.  Hopefully the spider web and tiny spider gives a clue as to the scale.

      OVERALL IMPRESSIONS

      Advantages:
      • Does provide near-shadowless on-axis fill.
      • Can be used to create a shadowy "aura" around the subject (in front of a wall).
      • TTL still works - somewhat.
      • Keeps both hands free.
      Disadvantages:
      • Blocks the AF Assist Lamp
      • Uses up a lot of light.
      • Inconvenient to carry around.
      • Inconvenient to install on and remove from SB-800 and SB-600.
      • Not spouse-friendly.  My wife hates it more than she does the handheld umbrella, because to non-photographers, it looks like a sci-fi b-movie prop.
      I plan to use this ring flash for those occasions when I want fill light, I don't need to keep my camera in the bag, and plan to use only one camera.  Meanwhile, I did test another modifier for on-axis fill that is even less expensive than this ring flash adapter - the Fotodiox 8x12 softbox.  Will post that review soon.
      Read More
      Posted in | No comments
      Newer Posts Older Posts Home
      Subscribe to: Posts (Atom)

      Popular Posts

      • Olympus E-PL3 with 14-42 Lens $199; Moving from Nikon to MFT?
        I saw on 43rumors.com that the Olympus E-PL3 was being sold at Newegg for just $199 with the 14-42 kit lens included.  I checked it out and...
      • Exploring 3D Photography with the Loreo 3D Lens in a Cap
        When I hear of 3D photos or videos, my first impression is that it's gimmicky.  Interesting for one or two shots maybe and then after th...
      • Double Camera Strap & BlackRapid RS-5 Review
        This is a review of two camera straps: - The first is a double camera strap that's -- let's be blunt -- a knockoff of the BlackRapid...
      • 2x Lowepro Review: Toploader Zoom 45 AW & 55 AW + Unraveling The SlipLock™ Mystery
        Left: Lowepro Toploader Zoom 55AW, Right: 45AW, Middle: Canon 60D + 15-85 Welcome to a new rare photography accessory review as I'd lik...
      • Toys for the Big Kids: Speedlight Softbox
        In this post, we will have a look at a softbox for speedlights.  This post is part of a series that will cover equipment reviews for committ...
      • A Couple Of Yashica Oldies
        Yashica Electro 35 GTN + Yashica ST-7   How many of you know the above camera? Have you seen such a tripod before? Hit the jump for a flas...
      • Sigma USB dock available for preorder
        B&H is offering the Sigma USB dock for preorder for $59 + s/h , due for shipping on May 18. The dock allows you to update your firmwar...
      • Canon Professional Network
        I didn't know about Canon Professional Network until Syl Arena recently blogged about his 4-part article on speedlites.  I took a look ...
      • Minimizing Nikon D5200 and D7100 banding; Mysteries Remain
        Many people have noted that the Nikon D5200 and Nikon D7100 have banding in the shadows when the exposure is pushed.  In this post I'll ...
      • Going Crazy With Tripods
        My Tabletop Tripod Trio I love tripods, I go all soft and wobbly when I see attractive looking ones, so here is my story with tripods, inclu...

      Categories

      • "alien bee"
      • "april fool's"
      • "ring flash"
      • "yong nuo"
      • 1"
      • 1/1.7"
      • 10-17
      • 10-20
      • 11-16
      • 15-85mm
      • 15z
      • 17-50 vc
      • 190cx pro3
      • 2.8
      • 2.8G
      • 2/3"
      • 200 f2.8
      • 200 L
      • 200mm
      • 200mm f/2.8
      • 200mm f/2.8 L II
      • 200mm f2.8
      • 200mm f28
      • 200mm f28 L II
      • 2012
      • 2013
      • 23 Samsung led
      • 24-105 f4
      • 24-70
      • 25 1.4
      • 28-105
      • 28-70
      • 35mm
      • 35mm f/2
      • 35mm f2
      • 360
      • 3rd party
      • 4.1
      • 4/3
      • 40 pancake
      • 40 panckae
      • 40 stm
      • 40-150R
      • 40mm f/2.8
      • 430EX
      • 43rumors
      • 45 18
      • 45 AW
      • 4x4
      • 50 14
      • 50 f14
      • 50-150
      • 50mm
      • 50mm f/1.4
      • 55 AW
      • 55-250
      • 550D
      • 55aw
      • 560ex
      • 580 ex ii
      • 580EX
      • 580EX II
      • 5d
      • 5d mark 2
      • 5d mark 3
      • 5D Mark II
      • 5d mark iii
      • 5d2
      • 600d
      • 600ex-rt
      • 60d
      • 60fps
      • 60mm macro
      • 650d
      • 6d
      • 7.5mm
      • 720p
      • 75 f1.8
      • 85mm f1.8
      • 8x12
      • abbc
      • abstract
      • accuracy
      • active d-lighting
      • adjustment
      • adl
      • AF
      • af point
      • AF Point Expansion
      • aftermarket
      • airport
      • alexandria
      • alien bee
      • alien bees
      • alienbee
      • alienbees
      • alternative
      • ambient
      • ambient light
      • angle
      • aperture priority
      • APS-C
      • apsc
      • assignment
      • auto focus
      • auto white balance
      • autofocus
      • AWB
      • awl
      • back button focus
      • background
      • background blur
      • backlight
      • backlighting
      • backlit
      • bad behavior
      • bad photography
      • balance
      • bare flash
      • battery
      • BBF
      • beach
      • beams
      • beauty dish
      • bellagio
      • BFT
      • birthday
      • black
      • black foamie thing
      • black rapid
      • blackrapid
      • blogs
      • blower
      • blown
      • blur
      • bokeh
      • bounce
      • bounce card
      • bounce flash
      • bower
      • bracket
      • brightness
      • brilliance
      • brolly grip
      • brother
      • build
      • burst mode
      • butterflies
      • butterfly
      • C.Fn
      • cable
      • cake
      • camera
      • camera bag
      • camera releases
      • camera settings
      • candle
      • candlelight
      • canon
      • Canon 100mm Macro L IS
      • canon 200mm f28L
      • canon 24-105
      • canon 40 stm
      • canon 40mm f28 pancake
      • canon 50
      • canon 50 1.4
      • canon 55-250
      • canon 5d mark 2
      • canon 5d mark ii
      • canon 5d mark iii
      • canon 5d2
      • canon 5d3
      • Canon 60d
      • canon 6d
      • canon g11
      • canon speedlite
      • car
      • carbon fiber
      • catch lights
      • cheap
      • christmas
      • clean
      • cleaning
      • clipped
      • clipping
      • close up
      • clouds
      • cls
      • clustered
      • color
      • compact
      • comparison
      • composition
      • compositional aid
      • construction
      • contrast
      • cooler master
      • copyright
      • core i7
      • cowboy
      • cowboystudio
      • cpl
      • creepy
      • crop factor
      • crop sensor
      • cyber commander
      • cybersync
      • d-lux
      • d-lux5
      • d3
      • d300
      • D5100
      • D600
      • d70
      • d700
      • D7100
      • d90
      • dark background
      • david hobby
      • daylight
      • dell 24 inch
      • depth of field
      • desert
      • diamond
      • digital
      • directional
      • distance
      • diy
      • dlux
      • dlux5
      • dng
      • double
      • dslr
      • DSLR bag
      • dual
      • dust
      • dx
      • dynamic range
      • earthquake
      • ebay
      • ebay trigger
      • eclipse
      • editing
      • EF 40mm f/2.8
      • ef-s 60mm
      • einstein
      • Electro GN
      • engagement
      • environmental portrait
      • ep5
      • equipment
      • ETTL
      • ettr
      • europe
      • events
      • evf
      • ex600
      • existing light
      • expensive
      • exposing to the right
      • exposure
      • f/3.5
      • family
      • faq
      • fasten-r3
      • favorite
      • fayoum
      • Fayoum desert
      • fill
      • fill light
      • film
      • filter
      • finepix
      • fire
      • fireplace
      • first impressions
      • fish-eye
      • fisheye
      • fix
      • FL600R
      • flash
      • flash bounce
      • flash sync
      • flash trigger
      • flashmeter
      • flashright
      • focal length
      • focus
      • food
      • football
      • fotodiox
      • fountain
      • freexwire
      • fuji
      • fujifilm
      • Full Frame
      • fun
      • fx
      • galaxy s 3
      • galaxy s4
      • gecko
      • GeForce gtx570 OC
      • gel
      • geomag
      • ggs
      • ghost
      • gigabyte z77 ud3h
      • glass
      • gn
      • Goodbye
      • gorillapod
      • gregg
      • grid
      • grip
      • group shot
      • gskill ripjaws
      • guide
      • guide number
      • gx7
      • haf 912
      • handheld
      • hands on
      • hands-on
      • hdr
      • head shot
      • hiatus
      • high dynamic range
      • high iso
      • high speed sync
      • highlight
      • highlights
      • histogram
      • holder
      • holiday
      • home
      • home made
      • Honda civic
      • honeycomb
      • hotshoe
      • hoya
      • humor
      • i9500
      • id
      • image quality
      • impressions
      • indoor flash
      • infrared
      • infringement
      • insects
      • inverse square law
      • japan
      • jewel
      • jewelry
      • joby head
      • jpeg
      • Kingston hyperX SSD
      • kirk tuck
      • kl bird park
      • krakow
      • kuala lumpur
      • las vegas
      • lastolite
      • laurence kim
      • lax
      • lcd
      • leica
      • lens
      • lens cap
      • lens compression
      • lens review
      • lenses
      • lenspen
      • lensrentals
      • light
      • light painting
      • lighting
      • lightroom
      • lightroom 4
      • lightroom 5
      • location
      • long
      • long exposure
      • los angeles
      • low key
      • low light
      • Lowepro
      • Lowepro 45aw
      • Lowepro 55aw
      • lr4
      • lumiquest softbox III
      • lumix
      • lx-5
      • lx5
      • m4/3
      • m43
      • macro
      • macro adapter
      • makernotes
      • malaysia
      • manfrotto
      • manfrotto tripod
      • manual
      • mark ii
      • mark iii
      • MFT
      • mft. micro four thirds
      • micro four thirds
      • mielec
      • migration
      • mini review
      • mirror
      • mirror-less
      • mirrorless
      • mobile
      • modification
      • modifier
      • monobloc
      • monoblock
      • monolight
      • motion
      • motion blur
      • multi function printer
      • multiple
      • nano crystal
      • natural light
      • neil
      • Neil VN
      • niekerk
      • nikkor
      • nikon
      • nikon d600
      • noise
      • off camera
      • oil
      • olympus
      • olympus 12-50
      • Olympus 40-150
      • olympus 45
      • olympus 45 18
      • olympus om-d em-5
      • om-d
      • omd
      • omd em1
      • omd em5
      • omd em6
      • on-camera
      • one inch
      • overexposure
      • overpowering sun
      • panasonic
      • panasonic leica 25 14
      • pancake
      • party
      • passport
      • pastries
      • pastry
      • pc
      • pentax
      • peter
      • phone
      • phone photography
      • photo
      • photo tips
      • photography
      • photokina
      • photomerge
      • photoshop
      • photoshop elements
      • planning
      • pocketwizard
      • point and shoot
      • poland
      • polarizer
      • popup
      • popup flash
      • portrait
      • post processing
      • post-processing
      • postprocessing
      • product
      • product shots
      • profile
      • protection
      • protector
      • quad-flash
      • quantum
      • radiopopper
      • raid 0
      • Range finder
      • raw
      • raw editing
      • raw+jpeg
      • rays
      • real
      • recovery
      • reflection
      • reflector
      • resources
      • restaurant
      • review
      • rf-603
      • rf603
      • ricoh
      • ring
      • ringflash
      • robin wong
      • roger cicala
      • rogue
      • rokinon
      • roll off
      • roll-off
      • rolloff
      • rs-5
      • rs-7
      • rumors
      • s5
      • s5 pro
      • s5pro
      • samples
      • samsung
      • samyang
      • sb-26
      • sb-80
      • sb26
      • sb800
      • screen protector
      • sensor
      • sensor swab
      • sensorclear
      • sensorklean
      • sensorklear
      • separation
      • shadow
      • shadow pulling
      • shadows
      • shards
      • sharpening
      • sharpness
      • shoot through
      • shoot-through
      • shoot-thru
      • shooting technique
      • shootout
      • short
      • sigma
      • sigma 50-150
      • skin tones
      • skylight
      • Slik Mini Tripod
      • slingshot
      • slow
      • small
      • smooth
      • soft
      • softbox
      • sony
      • sony a99
      • sony rx100
      • sony t10
      • specular
      • speed
      • speedlight
      • speedlite
      • spinlight
      • spots
      • standard
      • stockholm
      • story
      • strap
      • strobe
      • strobist
      • studio
      • studio strobe
      • subject
      • substitute
      • sudden
      • summilux
      • sunrise
      • sunset
      • sweden
      • swivel
      • sync speed
      • t2i
      • t3i
      • Table top tripod
      • tamron
      • technique
      • techniques
      • tele
      • telephoto
      • thinktank retrospective 5
      • third party
      • tips
      • tokina
      • tonal
      • tonality
      • tone curve
      • toploader
      • toys
      • translucent
      • travel photography
      • tri-flash
      • Tribute
      • trifold
      • trigger
      • tripod
      • truth
      • ttl
      • TTL Cord
      • u43
      • ultra-wide
      • ultrawide
      • umbrella
      • underexposure
      • unlimited sync speed
      • up-rise
      • up-rise 15z
      • update
      • uprise
      • USM
      • uv
      • uwa
      • vanguard
      • versus
      • vertical
      • video
      • view nx2
      • visual science lab
      • vs
      • wadi rayan
      • wd caviar black
      • web
      • weekend
      • westin
      • white balance
      • white lightning
      • wide
      • wide angle
      • window
      • wireless
      • wireless flash
      • wireless release
      • wireless trigger
      • workflow
      • Yashica
      • yashica gtn
      • yashica st-7
      • yn-560
      • yn-560ex
      • yn-ex600
      • yn560
      • yong nuo
      • yongnuo
      • zack arias
      • zoom
      • zoom toploader
      • zuiko

      Blog Archive

      • ►  2013 (165)
        • ►  December (5)
        • ►  November (10)
        • ►  October (8)
        • ►  September (7)
        • ►  August (3)
        • ►  July (11)
        • ►  June (10)
        • ►  May (15)
        • ►  April (19)
        • ►  March (33)
        • ►  February (24)
        • ►  January (20)
      • ►  2012 (193)
        • ►  December (17)
        • ►  November (22)
        • ►  October (34)
        • ►  September (47)
        • ►  August (12)
        • ►  July (11)
        • ►  June (10)
        • ►  May (13)
        • ►  April (13)
        • ►  March (8)
        • ►  February (1)
        • ►  January (5)
      • ▼  2011 (141)
        • ►  December (8)
        • ►  November (8)
        • ►  October (7)
        • ►  September (9)
        • ►  August (13)
        • ►  July (13)
        • ►  June (19)
        • ►  May (17)
        • ▼  April (25)
          • Getting Directional Light Using Your Popup Flash
          • Nikon 50 1.8G officially announced
          • Lightroom 3.4 and ACR 6.4 released
          • Checklist for Moving Lightroom
          • Glowing Air: Volumetric Lighting
          • Portrait On a Crop Sensor: 35mm vs 50mm
          • Quick and Easy Portrait
          • World's Largest On-Camera Softbox: the Fotodiox 8x12
          • Alternative Full Frame Lenses for Nikon
          • It's Like Getting Gear for Free
          • Mitchell Kanashkevich's Seeing the Light
          • Layers
          • Dealing with GWCs
          • Coco Ring Flash - First Impressions
          • Troubleshooting the Meike MK-RC7
          • First Impressions: Canon 60D + 35mm f/2 in Malaysia
          • Easter Egghunt Birthday Photos
          • News and Previews
          • Lightroom Workflow Tip: DNG + JPEG
          • Outperformers: 5 Products That Beat My Expectations
          • Upside Down Flash
          • Updates: 35mm f/2, Canon 60D and more
          • Nikon D5100 and ME-1 microphone officially announced
          • Counting My Blessings
          • BFP Shooting Cap
        • ►  March (22)
      Powered by Blogger.

      About Me

      Unknown
      View my complete profile